Join me live(-ish) as I tinker with an ESP32!
It has been a while, hasn't it? Sorry about that. Life has been challenging the past few years, but lets not dwell on that. Instead lets hack around with something. I'll be hacking around all day on September 13 2025.
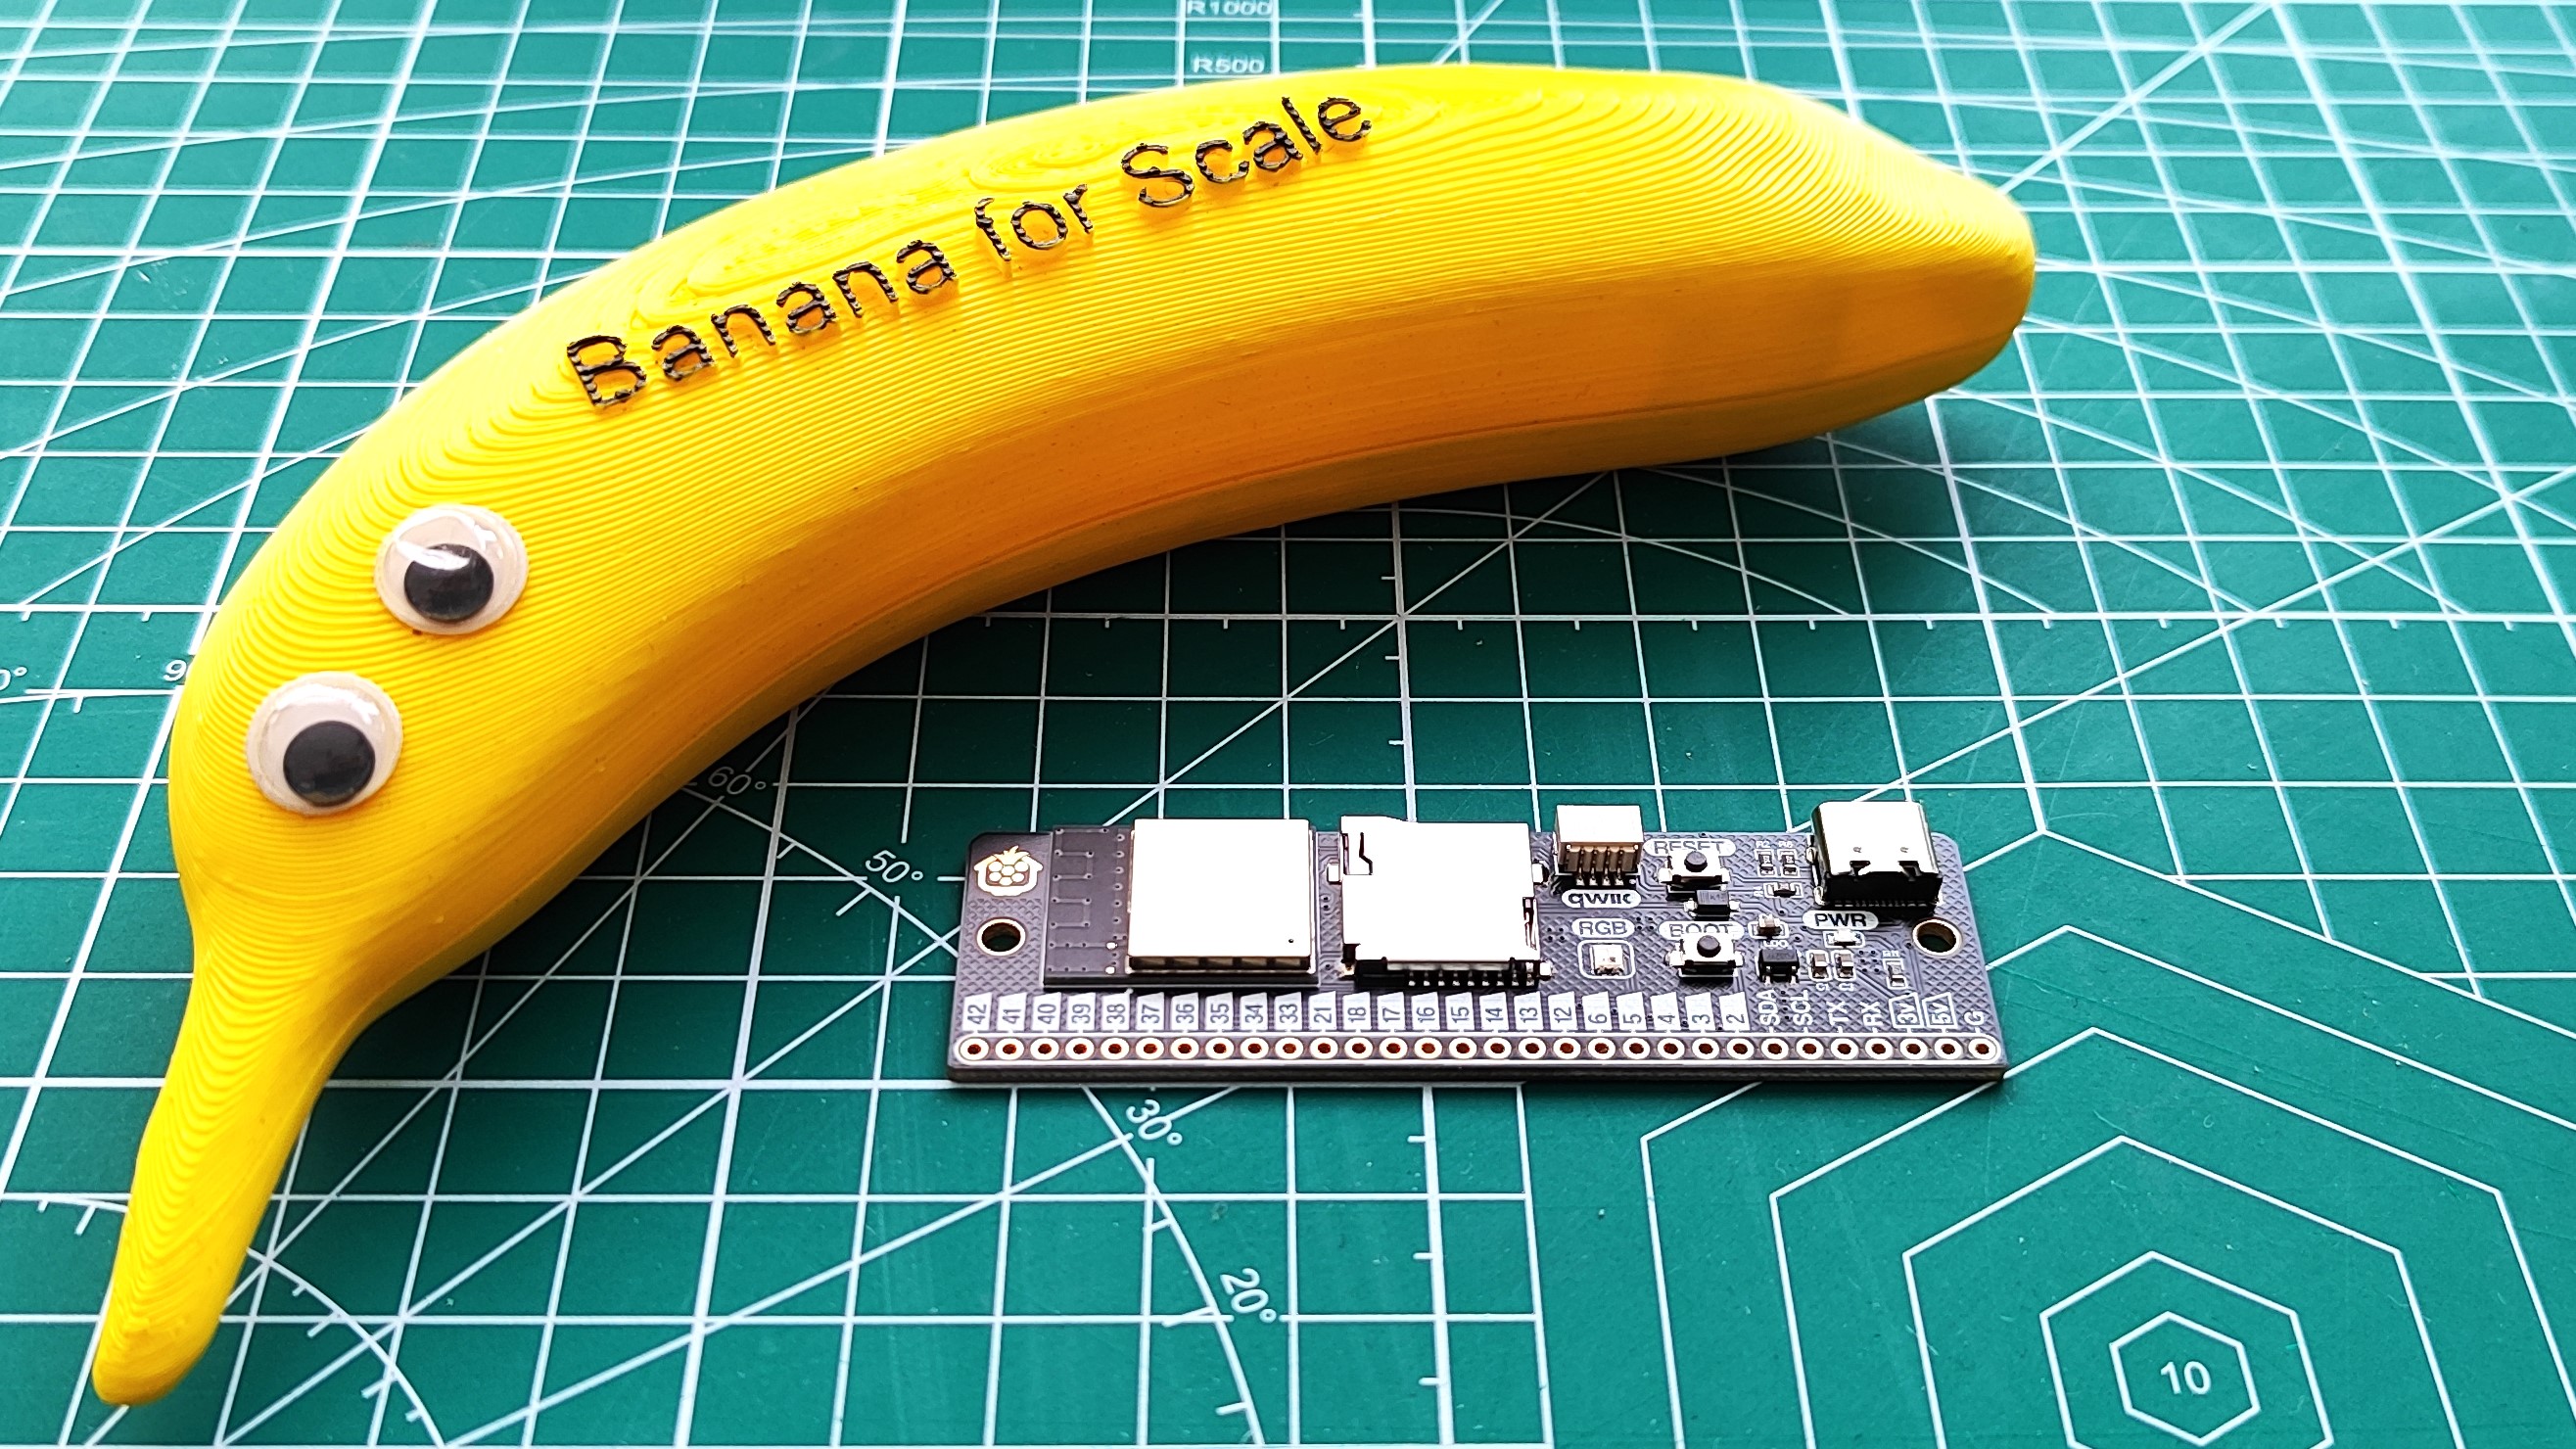
You don't "knead" this, but you will want it!
The ESP32 has been around for a while. I've got a drawer full of various ESP devices, but when I saw the Baguette S3 from The Pi Hut, I had to get one.
Full disclosure, I paid for this piece of kit out of my own money.
The Baguette S3 "is a compact ESP32-S3 development board designed for prototyping ESP-based projects on a breadboard" (The Pi Hut listing text). and for £11.50 it is a little more expensive than the generic ESP32 that I typically buy from Aliexpress. But In this case I am paying for the convenience of the form factor.
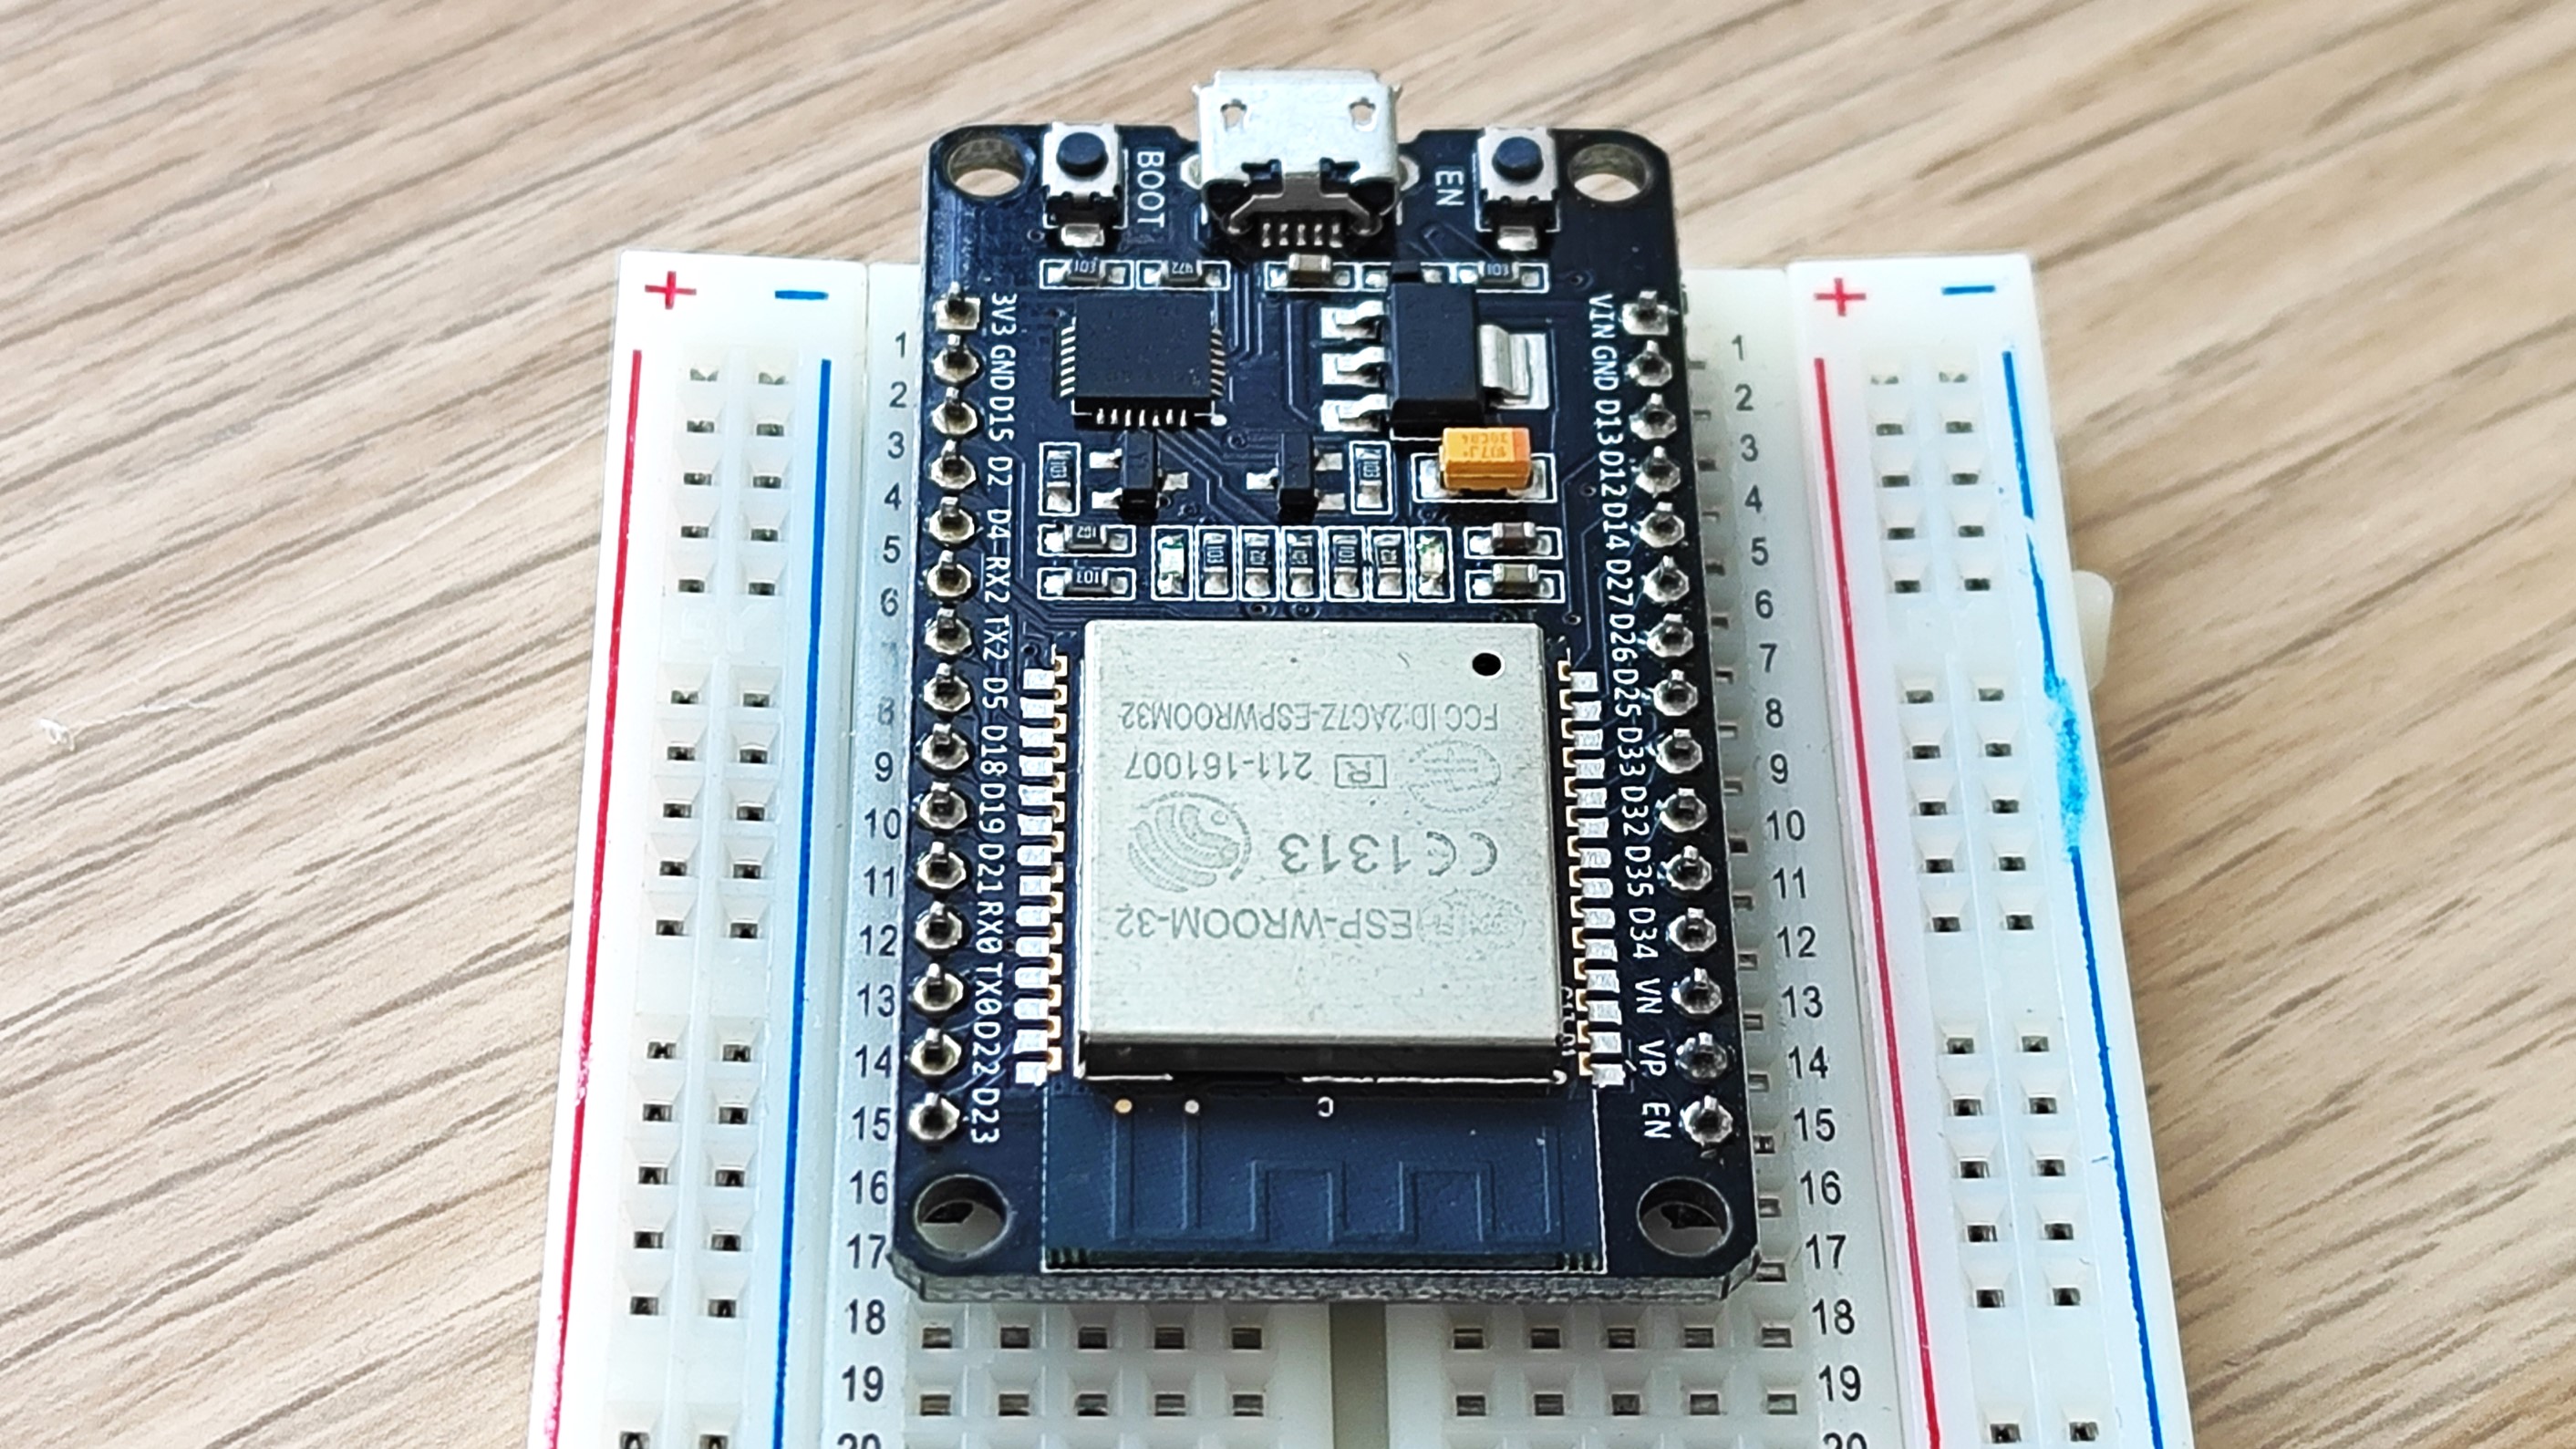
You see, the Baguette S3 is designed for use with a half-size breadboard, unlike some ESP32 boards which dominate a breadboard and make it difficult to prototype with.
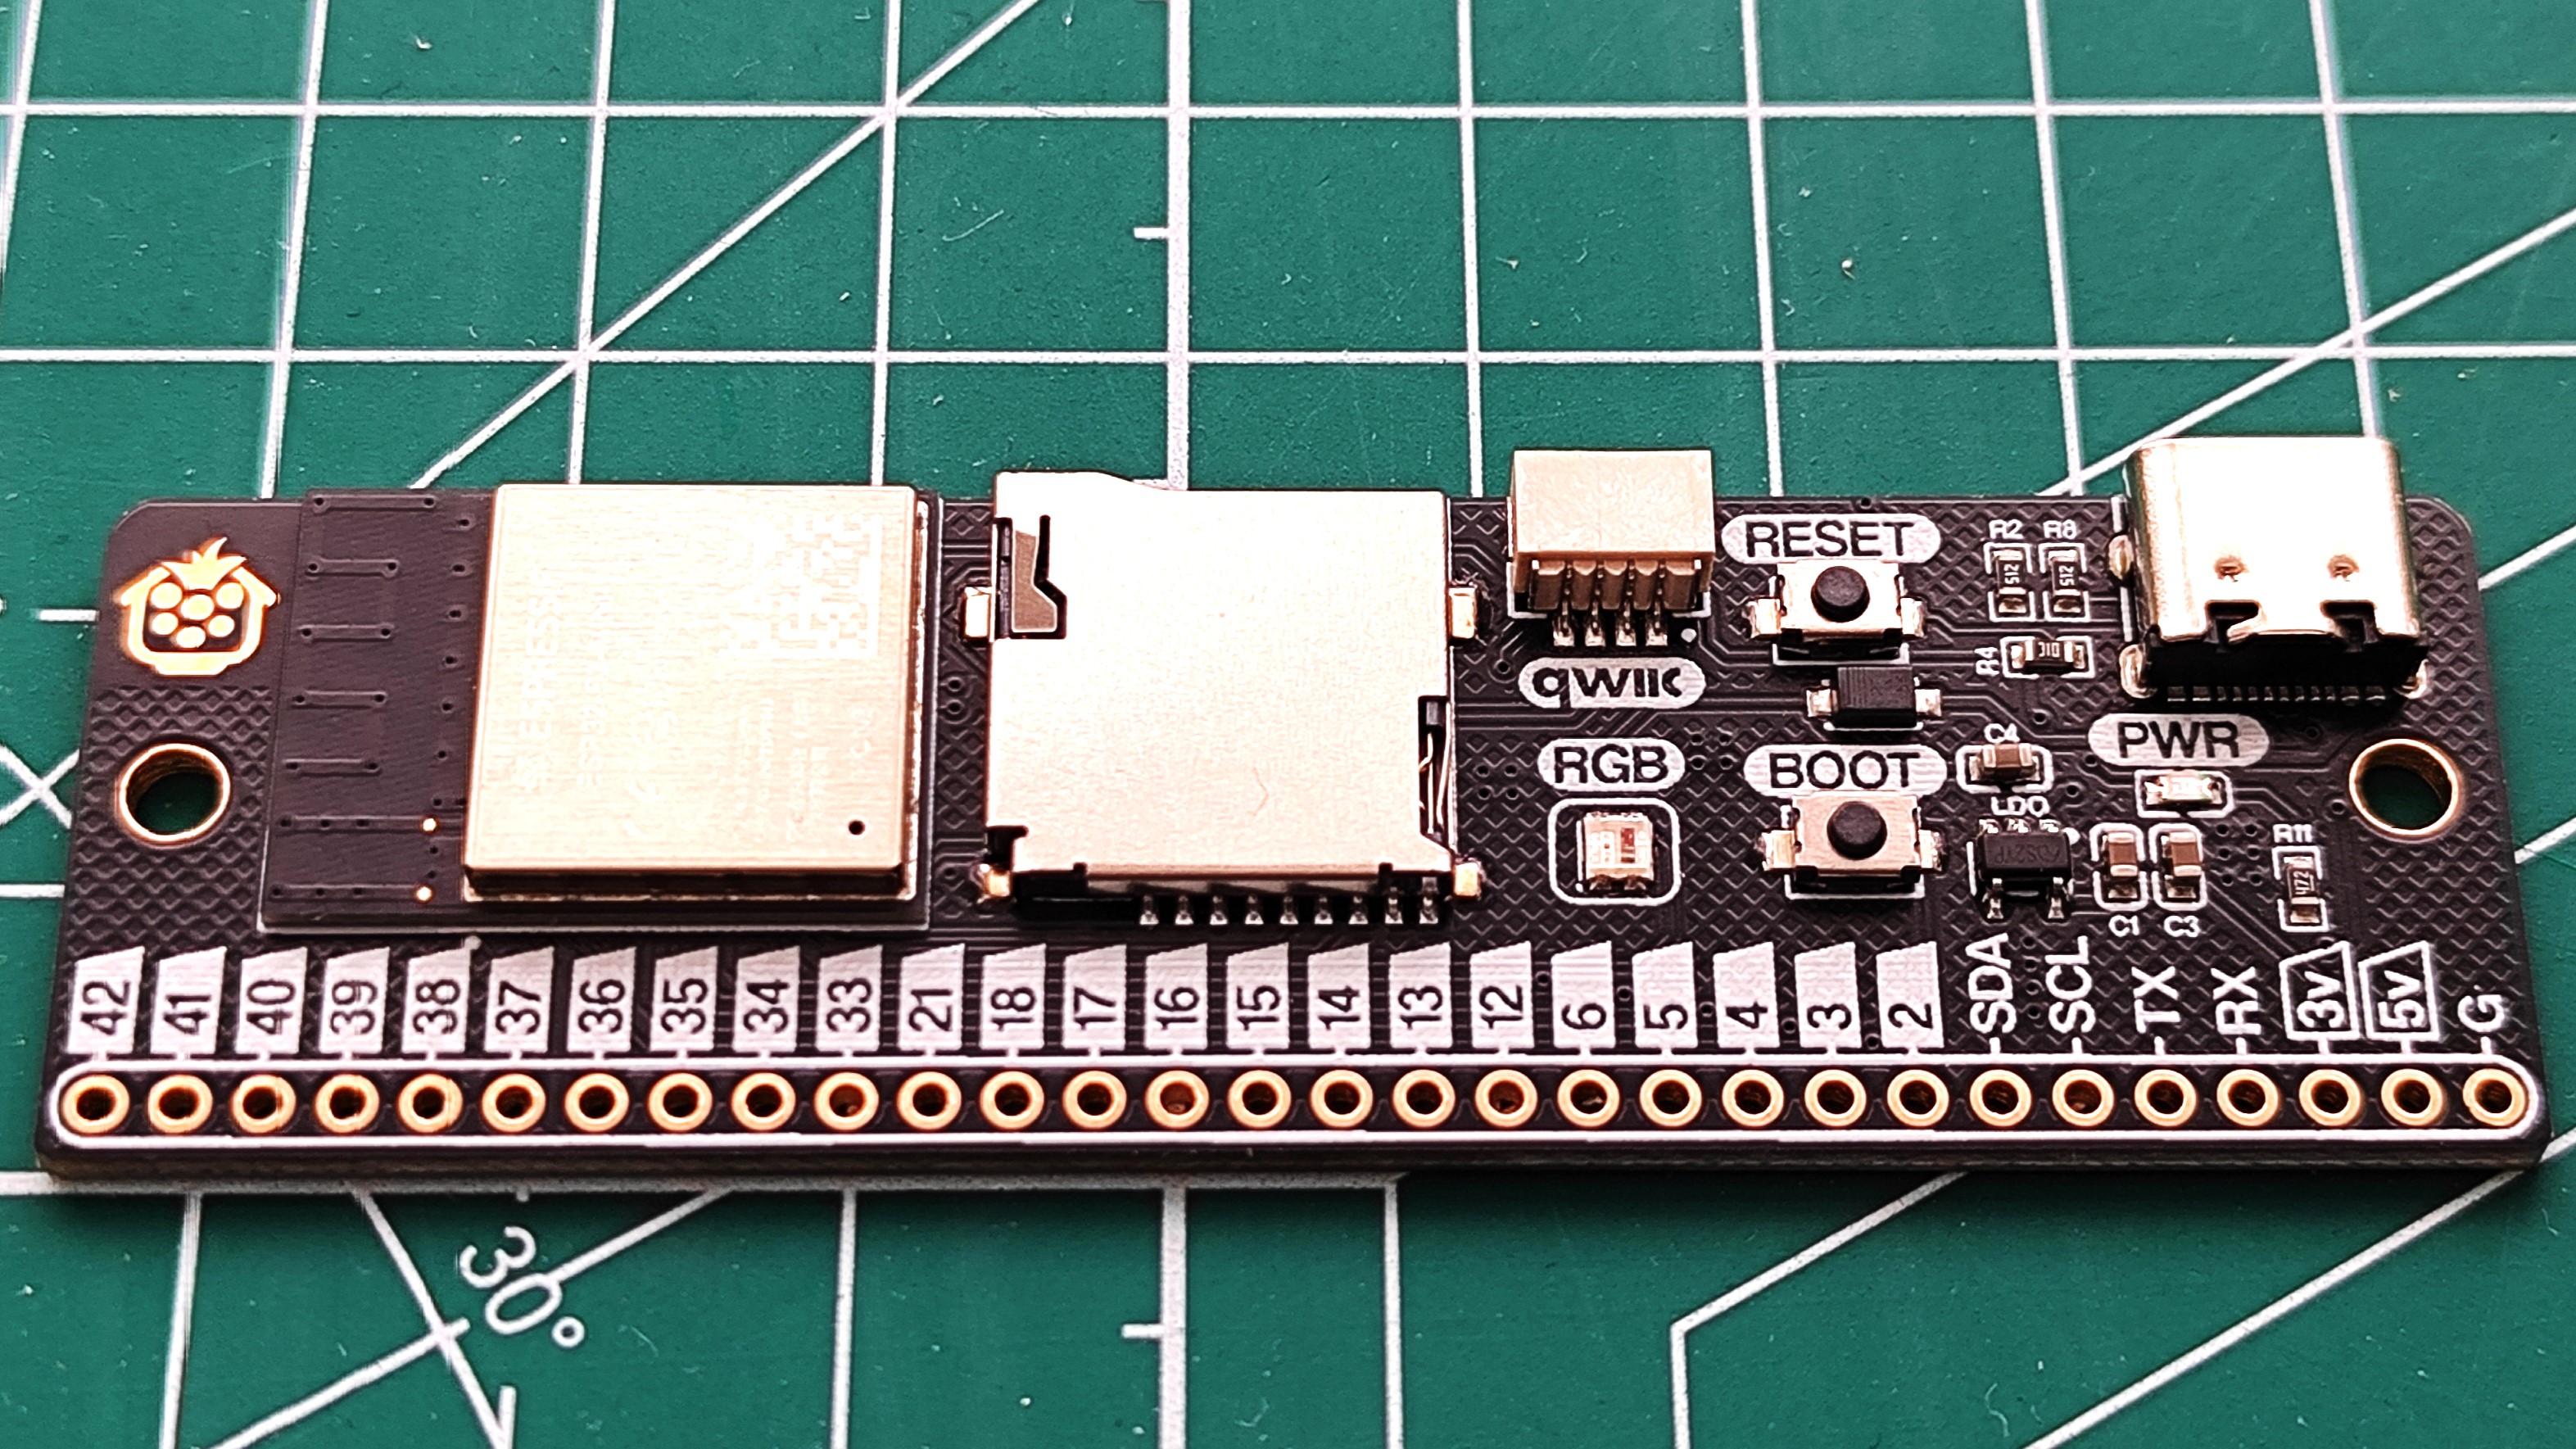
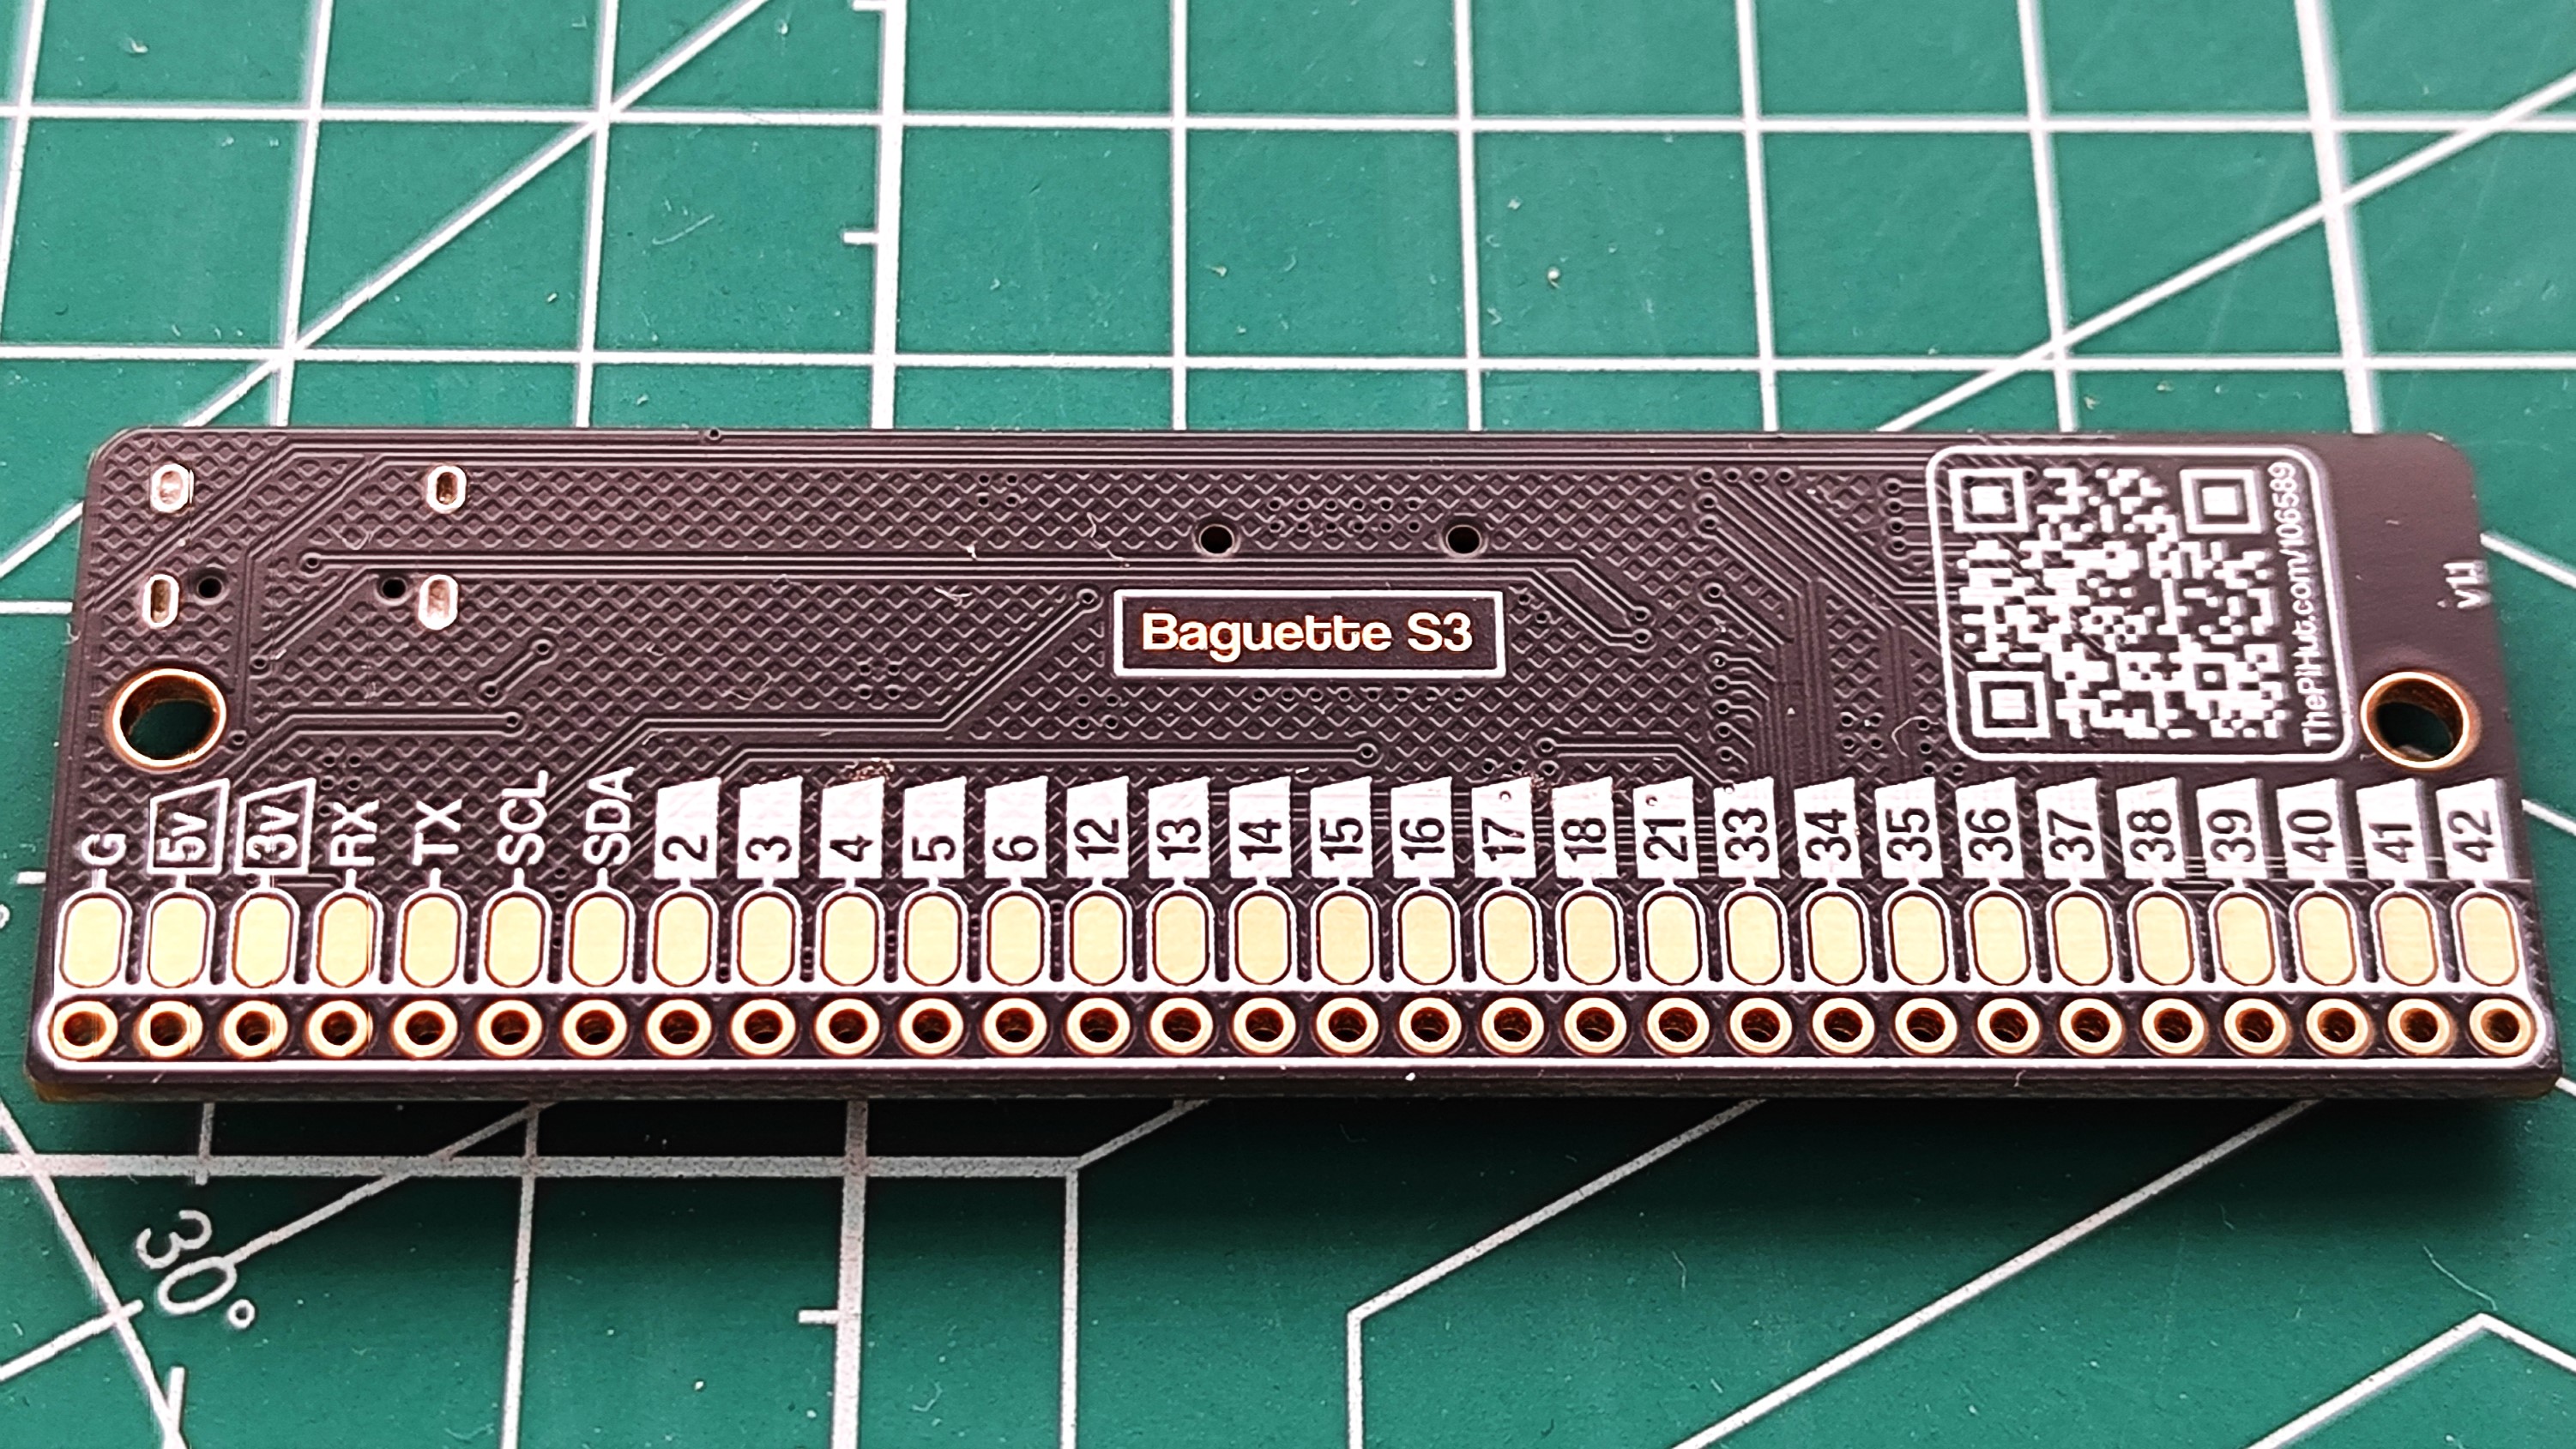
The Baguette S3 provides us with a plethora of GPIO options.
- 23 GPIO pins (in order!)
- I2C, Serial
- Qwiic / Stemma QT
- Micro SD card
- RGB LED "NeoPixel"
- USB C
The ESP32 S3 at the heart of the board is an ESP32-S3-MINI-1-N8 with 8MB of flash, 384KB ROM and 512KB of SRAM. Wi-Fi and Bluetooth (5 and LE) works via the onboard antenna.
Software support for the Baguette S3 is currently officially listed as Arduino and ESPHome, but the ESP32 S3 is supported by MicroPython CircuitPython, and The Pi Hut are still working on guides to support this.
But, I am impatient and wanted to tinker with CircuitPython on my new toy. So join me as I do just that.
Here is the process I'll be following
- Set up the software
- Solder the GPIO
- Build a project
So join me as I embark on the first step, flashing CircuitPython on to the Baguette S3.
12:07PM BST CircuitPython Setup!

This is the goal for this section!
Adafruit's CircuitPython is a personal favourite of mine. Ever since I was introduced to it by Kattni Rembor at PyCon in 2018, I have loved it. So I wanted to use it with Baguette S3 and because it uses an ESP32 S3, I can.
So lets do just that!
I'm going to connect my Baguette S3 to a laptop running Ubuntu 24.04 using a USB A to C cable.
I downloaded the version of CircuitPython for the ESP32 S3, specifically the .bin file as I wanted to flash it to the Baguette S3 using esptool. I chose CircuitPython 9 as that is the current stable release. There is also a version 10, but that is still in Beta.
Then I opened a terminal and created a Python virtual environment to contain esptool away from the system Python install.
virtualenv esptool
Then I changed directory to esptool
cd esptool
Lastly I activated the virtual environment.
source bin/activate
Now I am working in a Python virtual environment, and I won't destroy my precious system.
I install esptool, a tool to flash and manage ESP devices, such as the ESP32.
pip install esptool
After installation, I checked that it worked.
esptool -h
Now it is time to use esptool to erase the flash storage on the Baguette S3. Warning, make sure that you do not have any other ESP devices attached to the computer otherwise you risk wiping those too!
In the terminal I tell esptool to erase the flash.
esptool erase_flash
After a short while, the Baguette S3's flash will be wiped and ready for new software, in this case it is CircuitPython.
To get CircuitPython onto the Baguette S3, we need to press and hold the RESET and BOOT buttons. Then release the RESET button, and hold the BOOT button for five seconds. This will force the Baguette S3 into BOOTLOADER mode.
With that done, let's go back to the terminal and use esptool to write CircuitPython to the Baguette S3. I invoke the command to write the CircuitPython.bin file to the start (0) of the flash storage. I copied the .bin image into the same directory as my virtual environment, but you can just pass the absoute path /home/les/Downloads/circuitpython.bin if you wish.
esptool --baud 460800 write_flash 0 adafruit-circuitpython-espressif_esp32s3_devkitc_1_n8-en_GB-9.2.9.bin
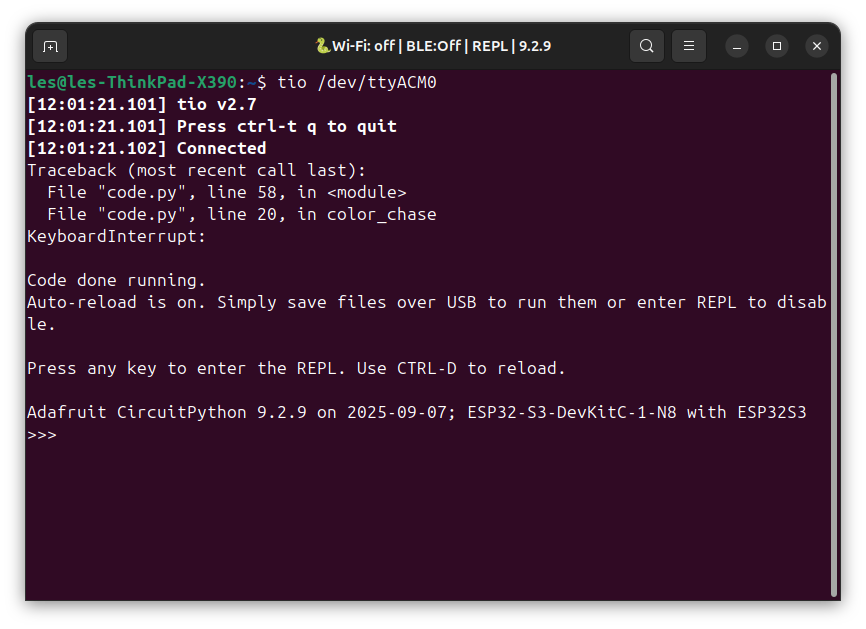
The process will take a few moments, leave it to do its work. When done you'll have CircuitPython on the Baguette S3. I used tio to access the REPL via a USB serial interface.
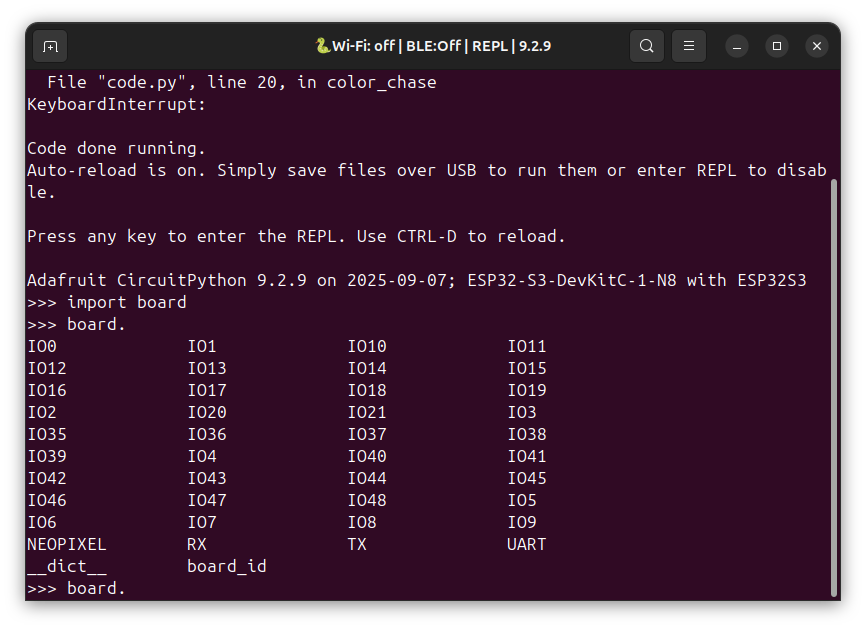
I can list the GPIO pins too, so with that excellent segue, I shall solder the GPIO pins and then we can do some testing.
12:32PM BST Soldering Time!
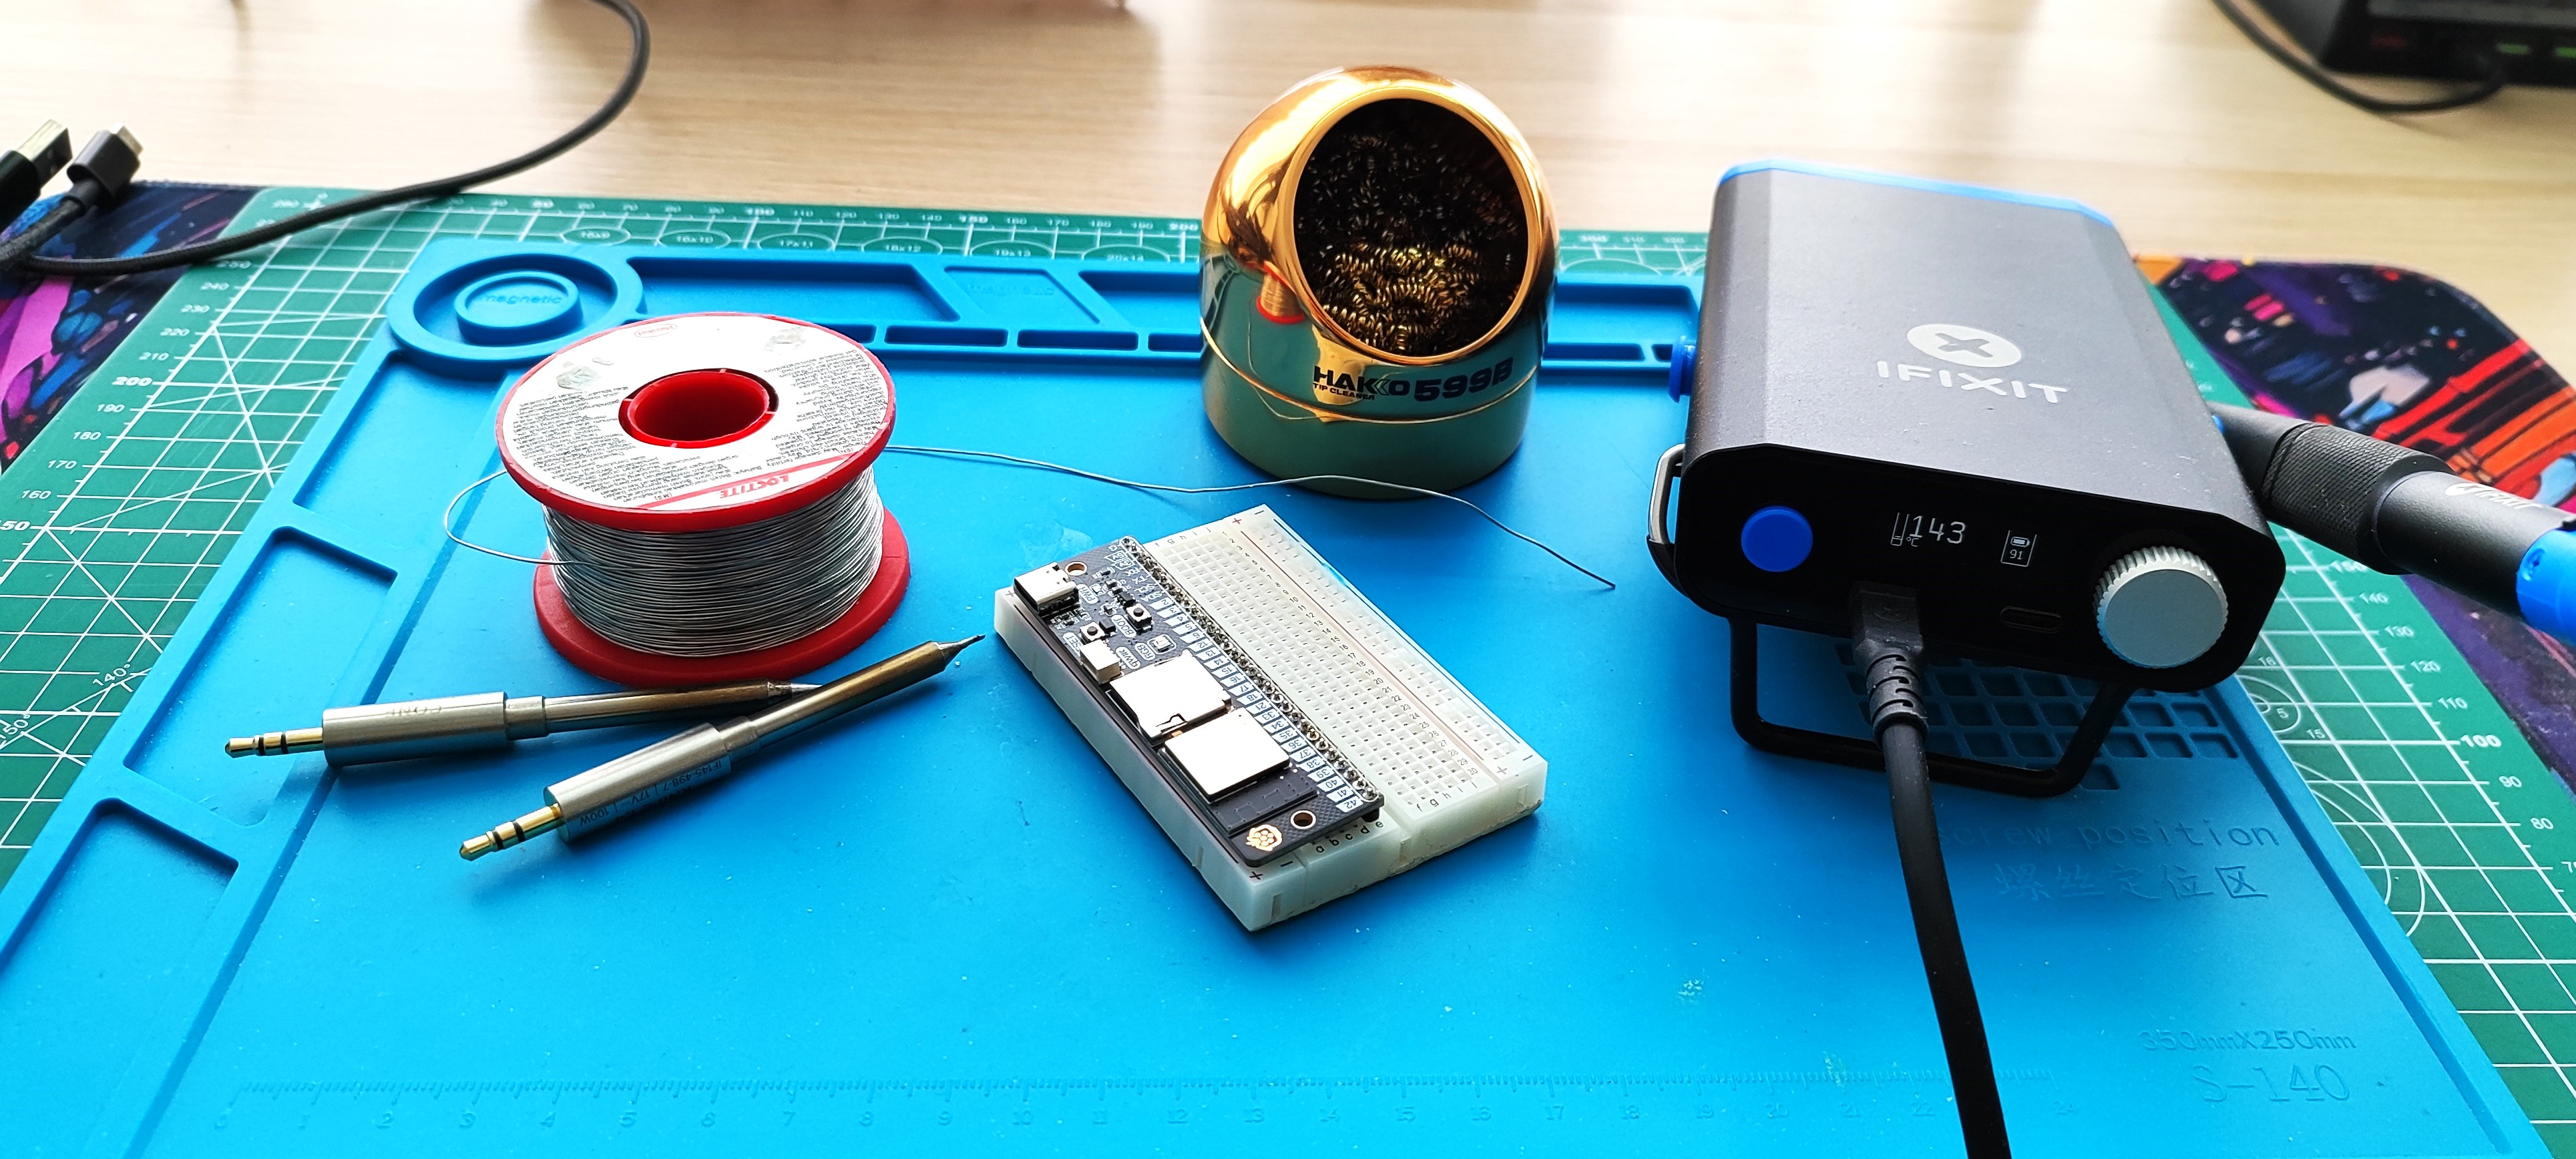
I own a lot of soldering irons, but I reached for the nearest and it just happened to be the iFixit Smart Soldering Station that I recently resurrected from the dead.
It turns out the older firmware and leaving a battery for months will make the unit "die" but you can resurrect it by flashing the latest firmware onto the soldering station and the smart soldering iron.
I placed the Baguette S3 onto the header pins, and used a half-size breadboard to steady it all. Five minutes and a little isopropyl alcohol later, the board was soldered and ready for tinkering.
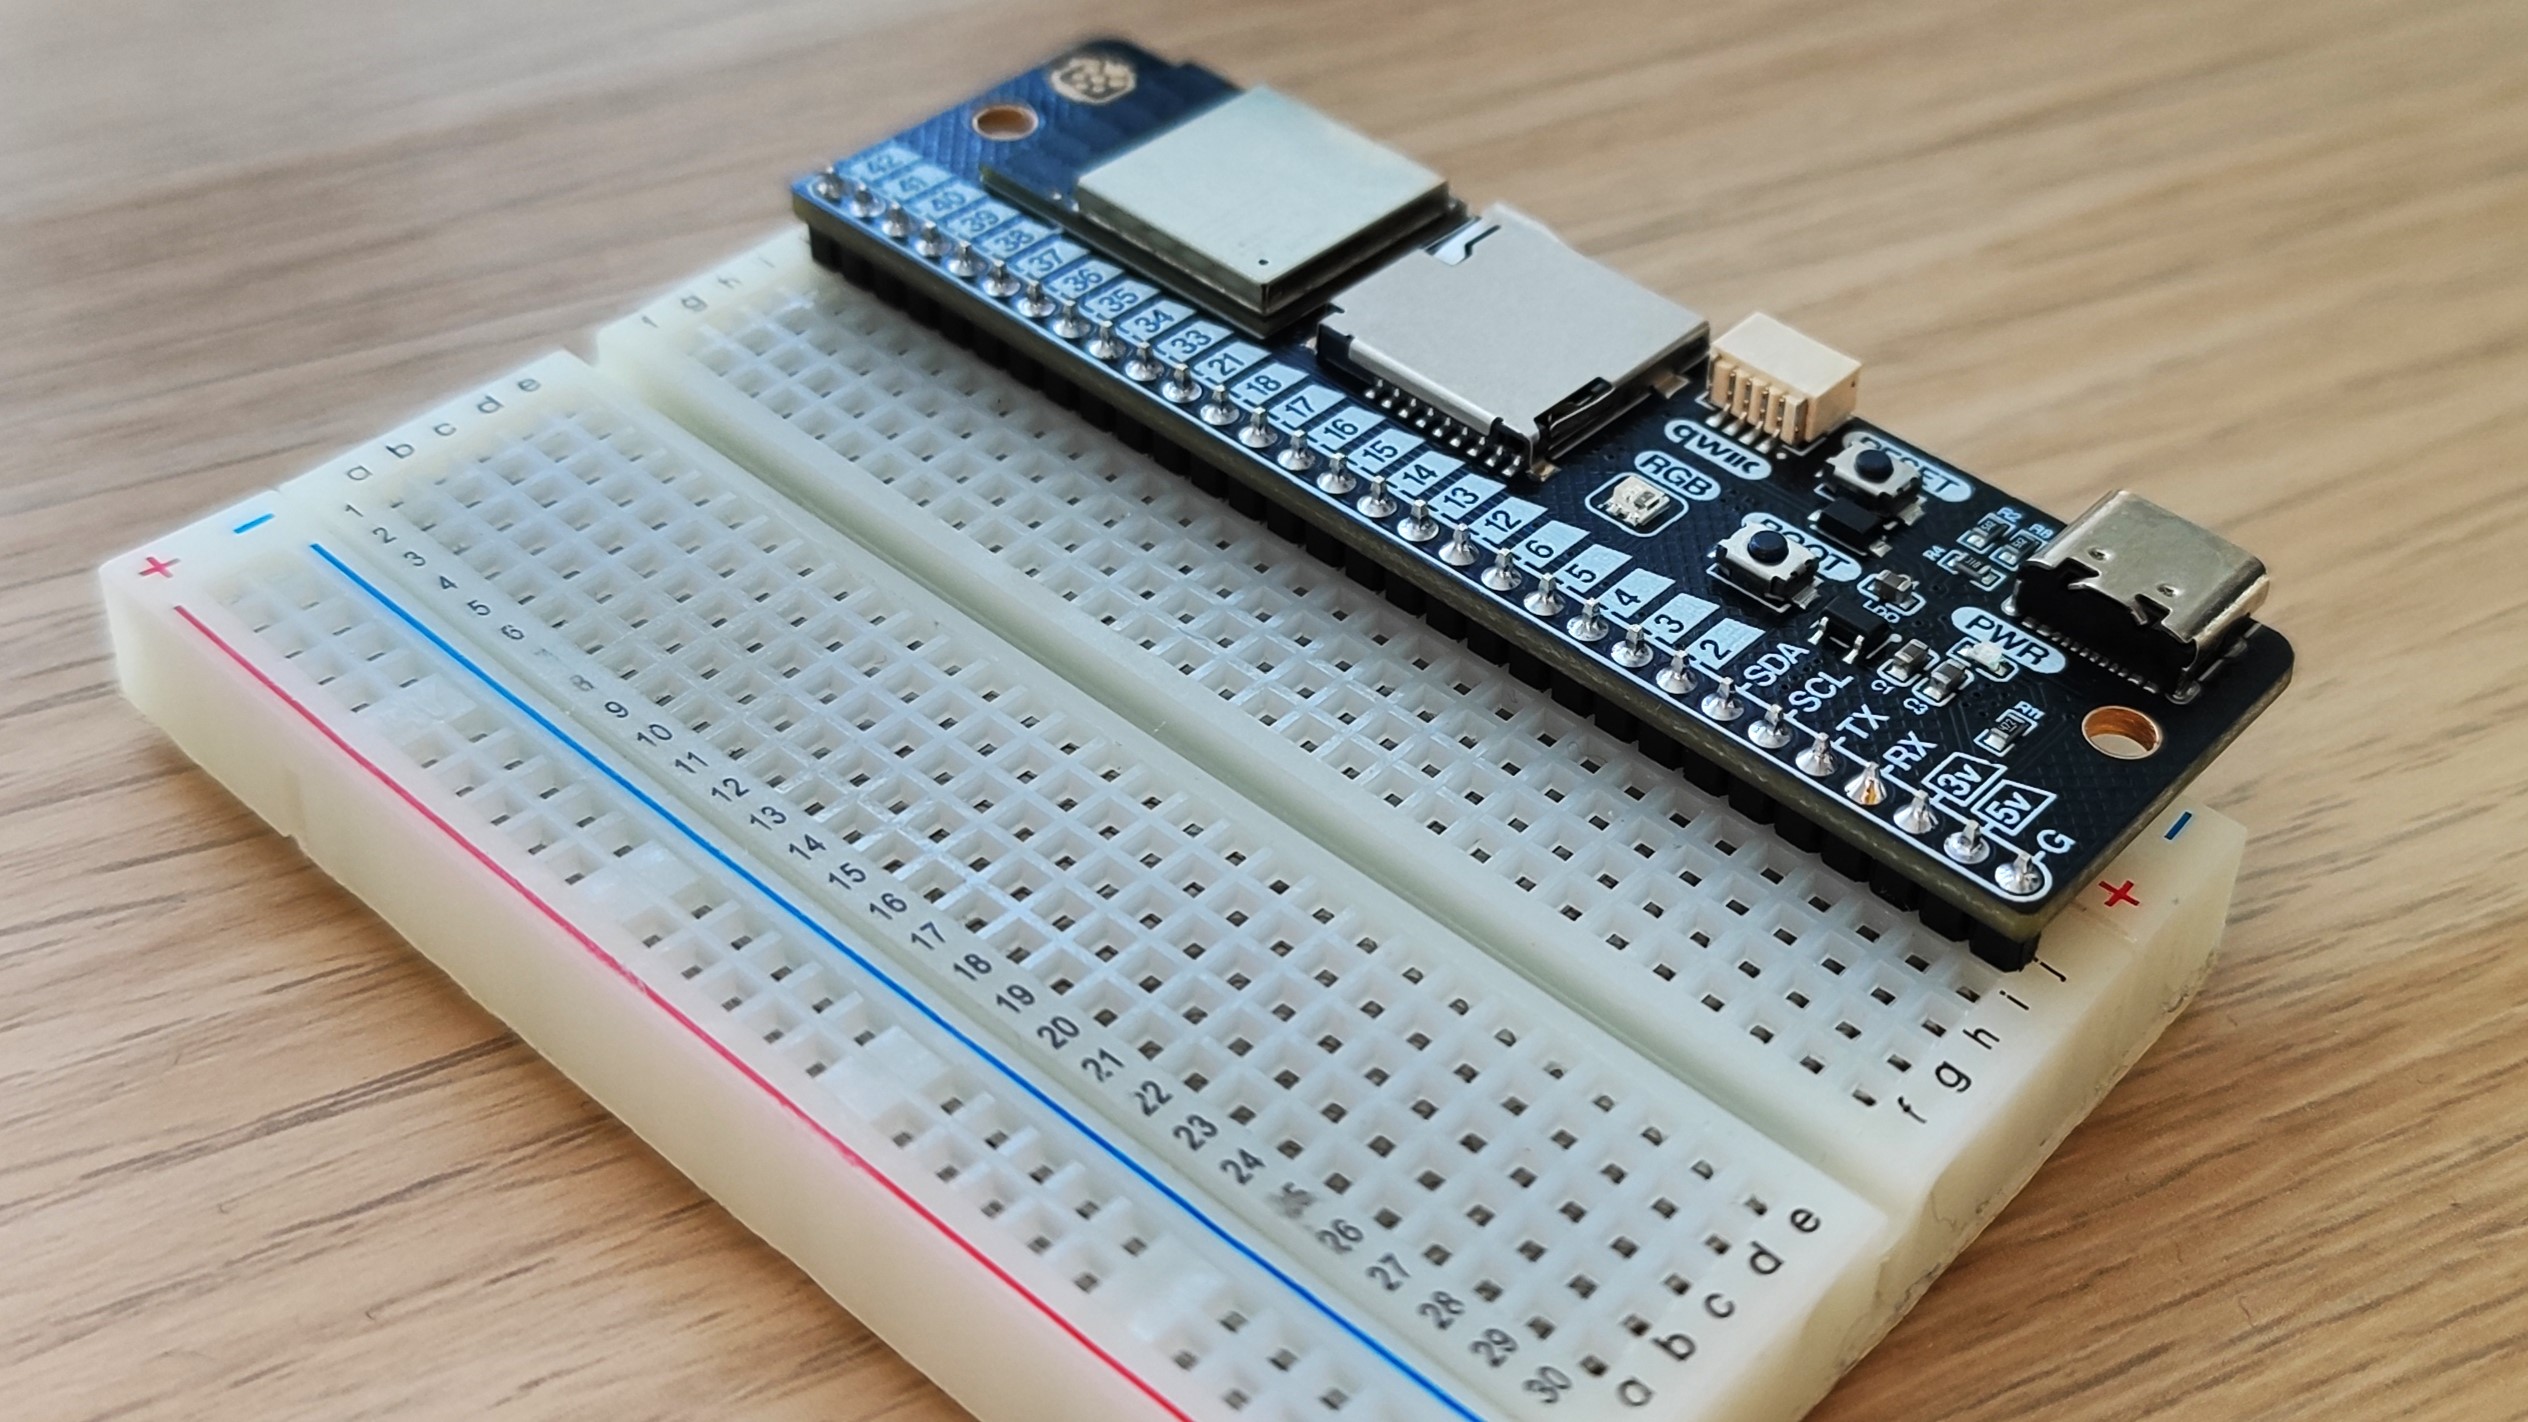
The Baguette S3's design means that it uses all of the rows in a half-size breadboard, and I can keep the board out of the way.
Compare this to an ESP32 devkit, and you have to choose which side of GPIO pins that you want to use. Or, use two half-size breadboards and make some unholy creature!
Lunch, then time to make some LEDs blink.
1:29PM BST Hello World of Electronics — How to Blink an LED
In the world of programming, Hello World is often the first project that we undertake. Why? It is quick and easy to write, and provides a basic test of input and output.
The input is our code, the output is what we told the computer to do with our code. In the world of electronics, Hello World is usually an LED, blinking on and off in a loop. So I did just that, but I used some LED noodles from Pimoroni instead because they are gorgeous!
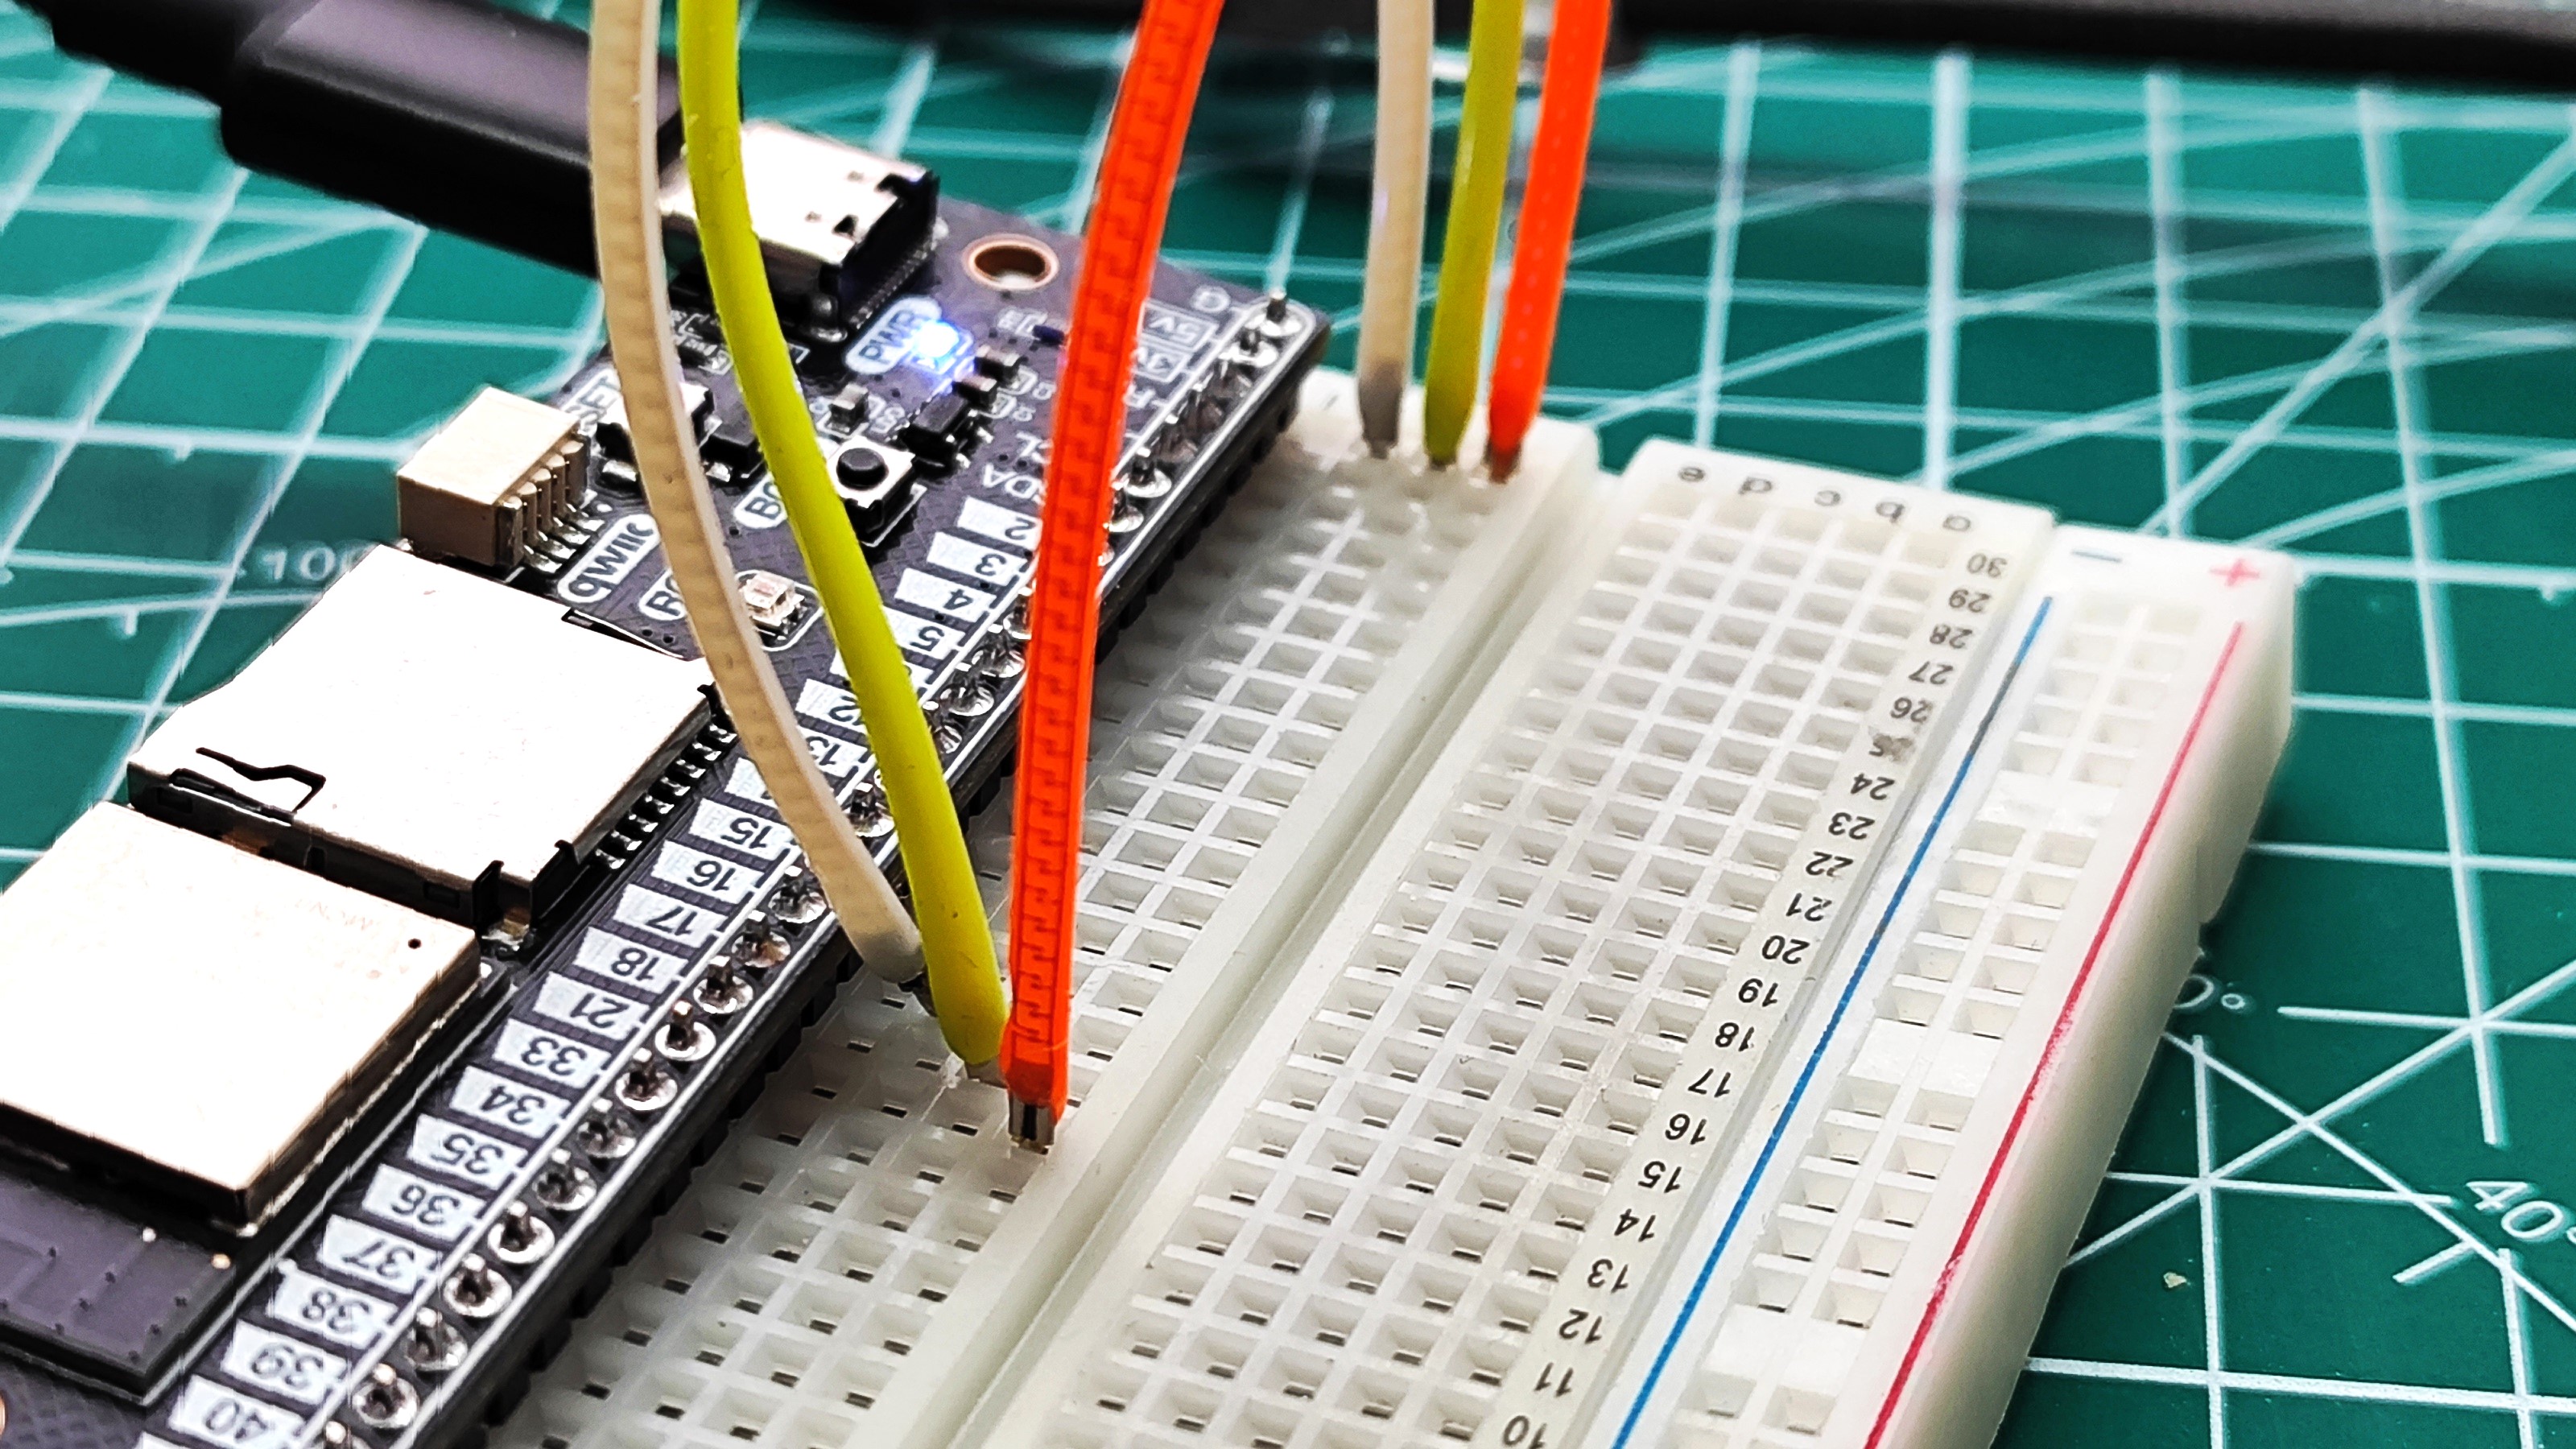
I connected the cathode end of the noodles to GND, and the anode end to GPIO pins 15,16 and 17 on the Baguette S3 via a half-size breadboard.
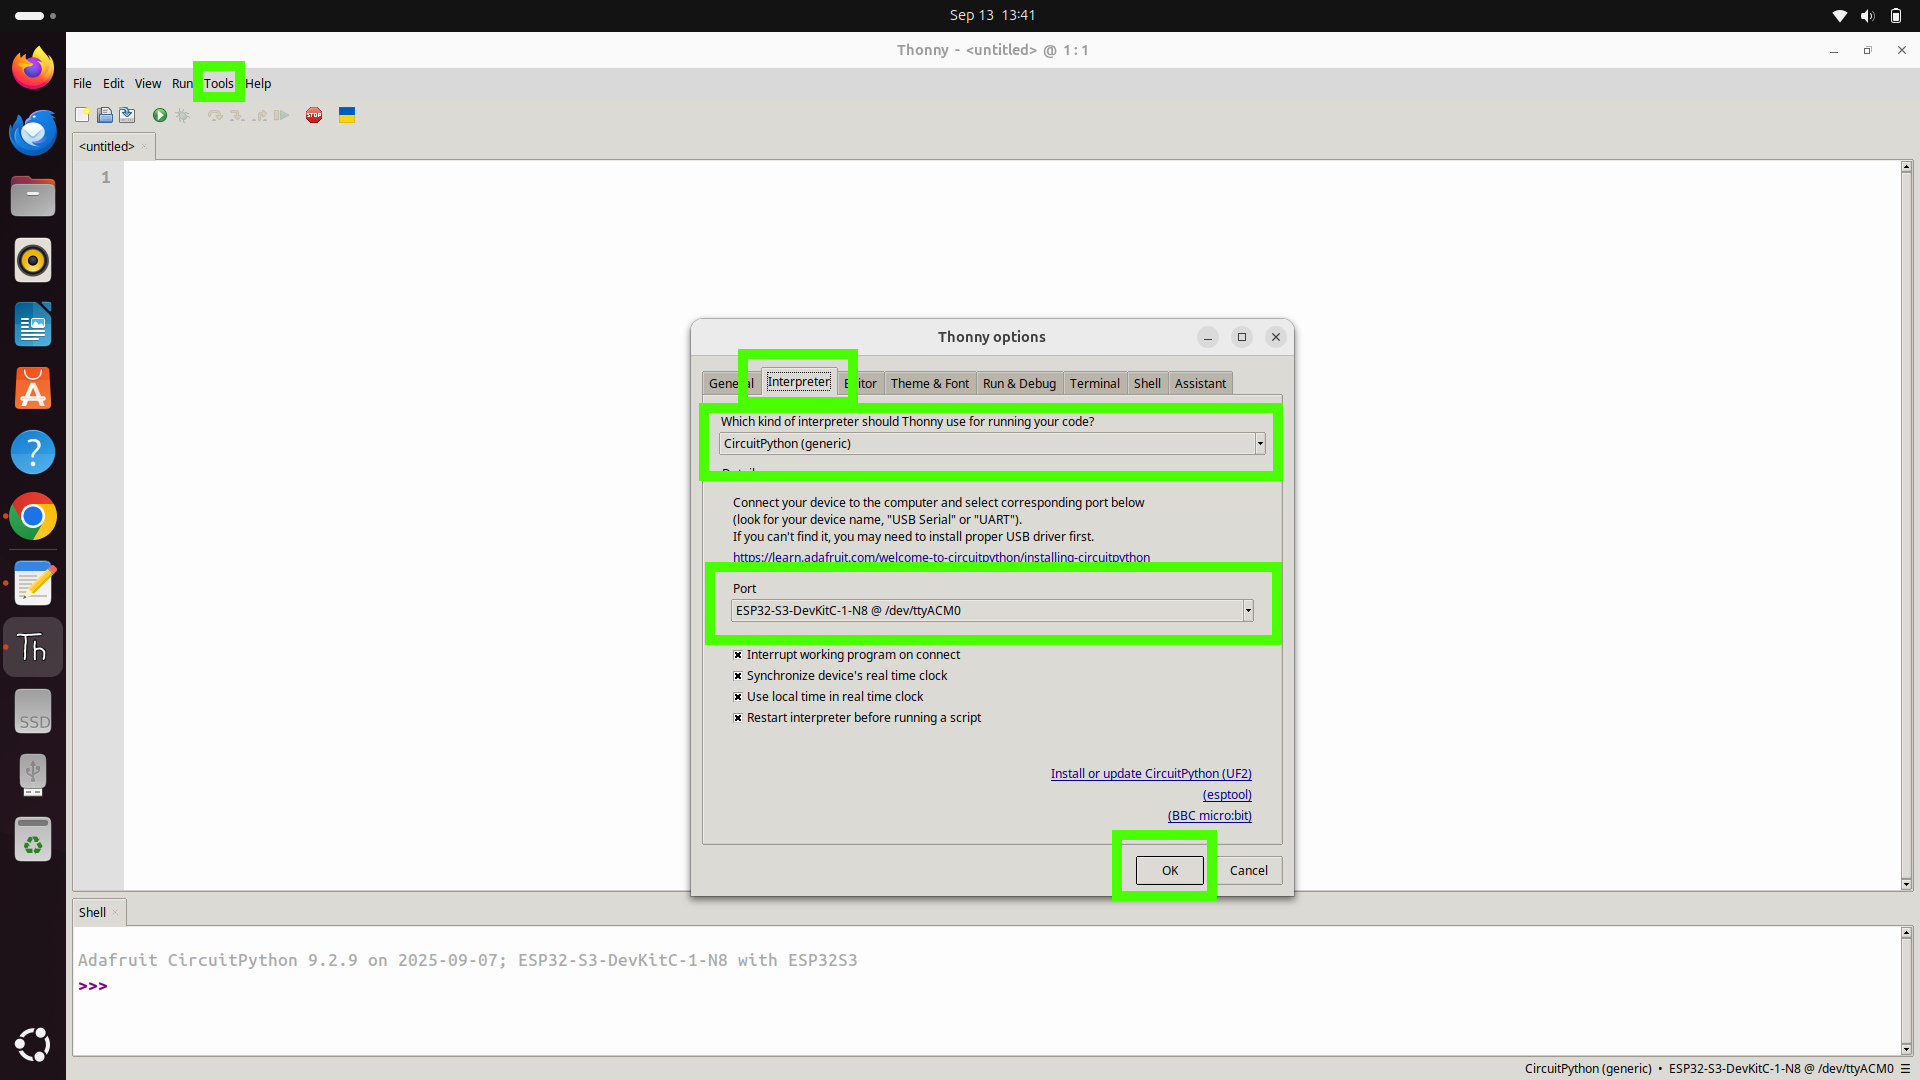
I then installed Thonny and set it up to connect to a CircuitPython device (Tools >> Options >> Interpreter and then set the interpreter to CircuitPython and select the Baguette S3 from the PORT dropdown).
Then I wrote a simple script to control the three GPIO pins to which my LED noodles are connected.
I started by importing three modules
time: to control the delay
board: to use the GPIO pins
digitalio: to control the GPIO pins
import time
import board
import digitalio
Then I setup each GPIO pin to be an output (so current flows from the GPIO pin). There is probably a better way to do this, but this is simple enough to get the job done.
led1 = digitalio.DigitalInOut(board.IO15)
led1.direction = digitalio.Direction.OUTPUT
led2 = digitalio.DigitalInOut(board.IO16)
led2.direction = digitalio.Direction.OUTPUT
led3 = digitalio.DigitalInOut(board.IO17)
led3.direction = digitalio.Direction.OUTPUT
I then created a variable called delay and stored 0.2 inside of it. This refers to a 0.2 second delay to control the how long the LED is on and off for.
delay = 0.2
Using a while True loop (to run the code indefinitely) I then turned on each LED, one after the other. As one would turn on, the others would go off, creating an animated effect. Controlling how long an LED is on/off for, I used a time.sleep() and passed the delay variable to set the 0.2 second delay.
while True:
    led1.value = True
    led2.value = False
    led3.value = False
    time.sleep(delay)
    led1.value = False
    led2.value = True
    led3.value = False
    time.sleep(delay)
    led1.value = False
    led2.value = False
    led3.value = True
    time.sleep(delay)
I saved the code to the Baguette S3 as blinky.py and then clicked on Run (green arrow) to start the code. The LED noodles came to life and I had a mini light show / cyberpunk rave running!
Complete Code Listing
import time
import board
import digitalio

led1 = digitalio.DigitalInOut(board.IO15)
led1.direction = digitalio.Direction.OUTPUT
led2 = digitalio.DigitalInOut(board.IO16)
led2.direction = digitalio.Direction.OUTPUT
led3 = digitalio.DigitalInOut(board.IO17)
led3.direction = digitalio.Direction.OUTPUT
delay = 0.2

while True:
    led1.value = True
    led2.value = False
    led3.value = False
    time.sleep(delay)
    led1.value = False
    led2.value = True
    led3.value = False
    time.sleep(delay)
    led1.value = False
    led2.value = False
    led3.value = True
    time.sleep(delay)
Next step, get the Baguette online!
3:29PM BST Getting the Baguette S3 online
I never expected to try and get a "bageutte" online...
At the most basic level, getting the Baguette S3 online is a piece of cake. We just need to create a file called settings.toml and save it to the root of the CircuitPython filesystem
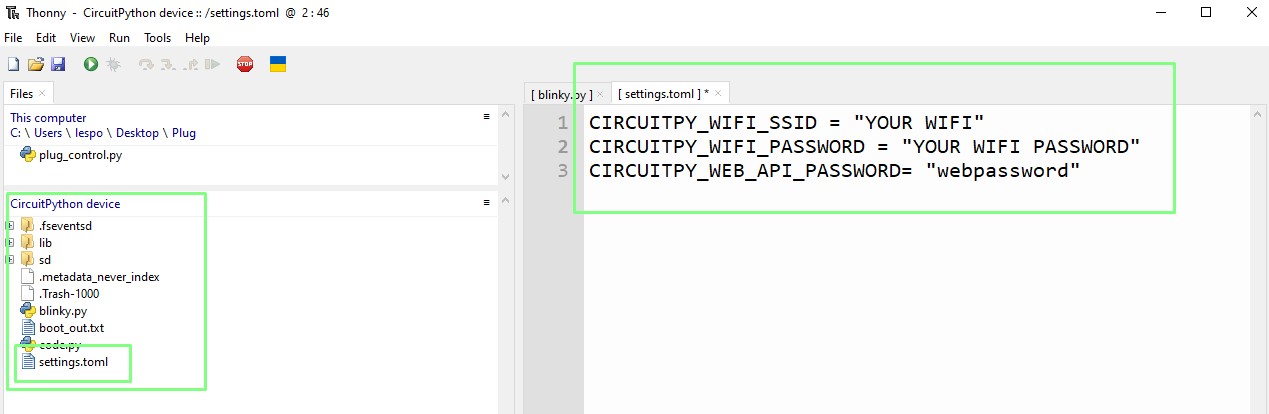
Saving that file and restarting the Baguette S3 saw the device automatically connect to my network. To say that I was shocked is an understatement! That was so easy.

What I have really done is connect the Baguette S3 to my router via Wi-Fi, now I need to write some code to make it do something and for that I need a little help in the form of the official CircuitPython libraries (pre-written code / modules) so that I could get the Baguette S3 to do something with an Internet connection. Because I am using CircuitPython 9, I downloaded the library pack <direct ZIP download> for that release and then extracted the contents to a directory on my computer.
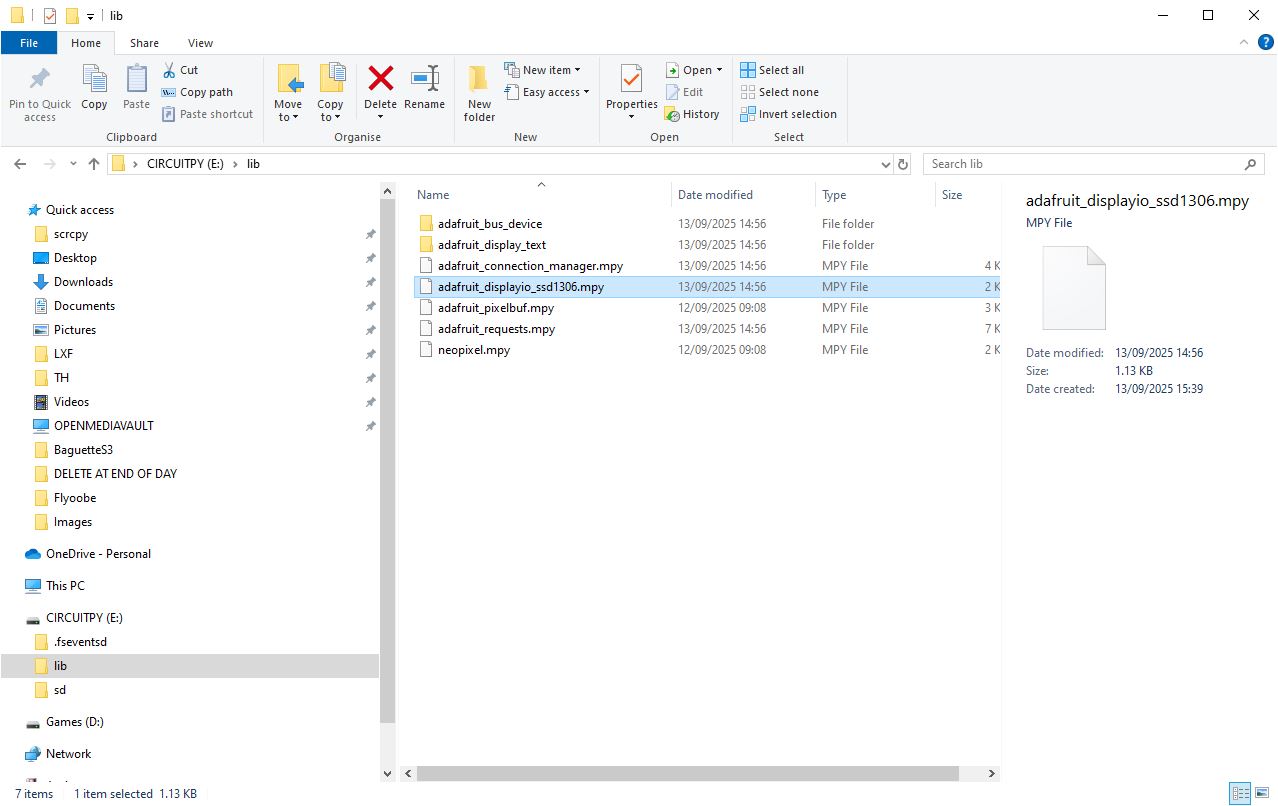
I then copied from extracted libraries the following files
adafruitconnectionmanager.mpy
and
adafruitrequests.mpy
to the /lib/ directory on my CIRCUITPY drive. Here you can see what that looks like on my Windows PC, but it will be the same no matter your OS.
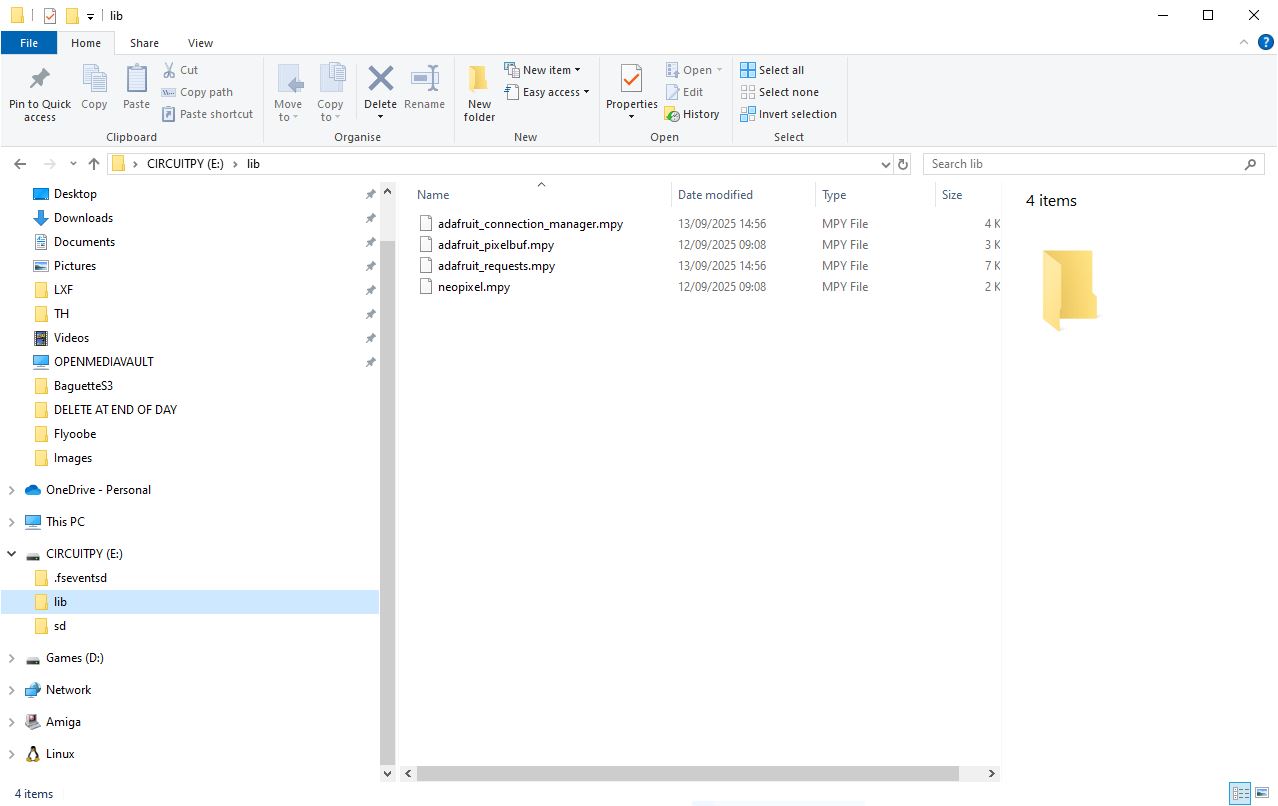
These files enable the Baguette S3 to go make a connection, and then request web data.
So what am I going to do with it?
I'm going to do what I normally do to test a new boards networking capabilities. Look up who is currently on the International Space Station. Handily this data is freely available and it comes in a JSON format, so it is easy to work with.
Open Thonny and lets start coding on the Baguette S3.
Quick nod to Ladyada Limor Fried's excellent script for checking connectivity. I have based my code on that script
We start by importing modules to use the underlying CircuitPython OS, make network connections, use the Wi-Fi hardware and to make HTTP (web) requests in Python.
import os
import adafruit_connection_manager
import wifi
import adafruit_requests
The next step is to read the Wi-FI AP and password details from the settings.toml file that we created earlier.
ssid = os.getenv("CIRCUITPY_WIFI_SSID")
password = os.getenv("CIRCUITPY_WIFI_PASSWORD")
Then we create objects to handle the Wi-Fi and to setup an HTTPS session.
pool = adafruit_connection_manager.get_radio_socketpool(wifi.radio)
https = adafruit_requests.Session(pool, ssl_context = adafruit_connection_manager.get_radio_ssl_context(wifi.radio))
Using the Wi-Fi object we connect the code to the Internet.
wifi.radio.connect(ssid, password)
We set the URL (the link on the Internet) where the ISS astronaut data is stored. Using the URL we request the information and store it in an object called response and then format the data into a JSON format.
url = "http://api.open-notify.org/astros.json"
response = https.get(url)
data = response.json()
We then print the number of people who are onboard the ISS, and start the process of naming them.
print("Number of people in space:", data["number"])
print("Names of astronauts currently on the ISS:")
Using a for loop we iterate over the names of the people onboard the ISS craft.
for person in data["people"]:
    if person["craft"] == "ISS":
        print("-", person["name"])
Finally we close the response object, ending the connection.
response.close()
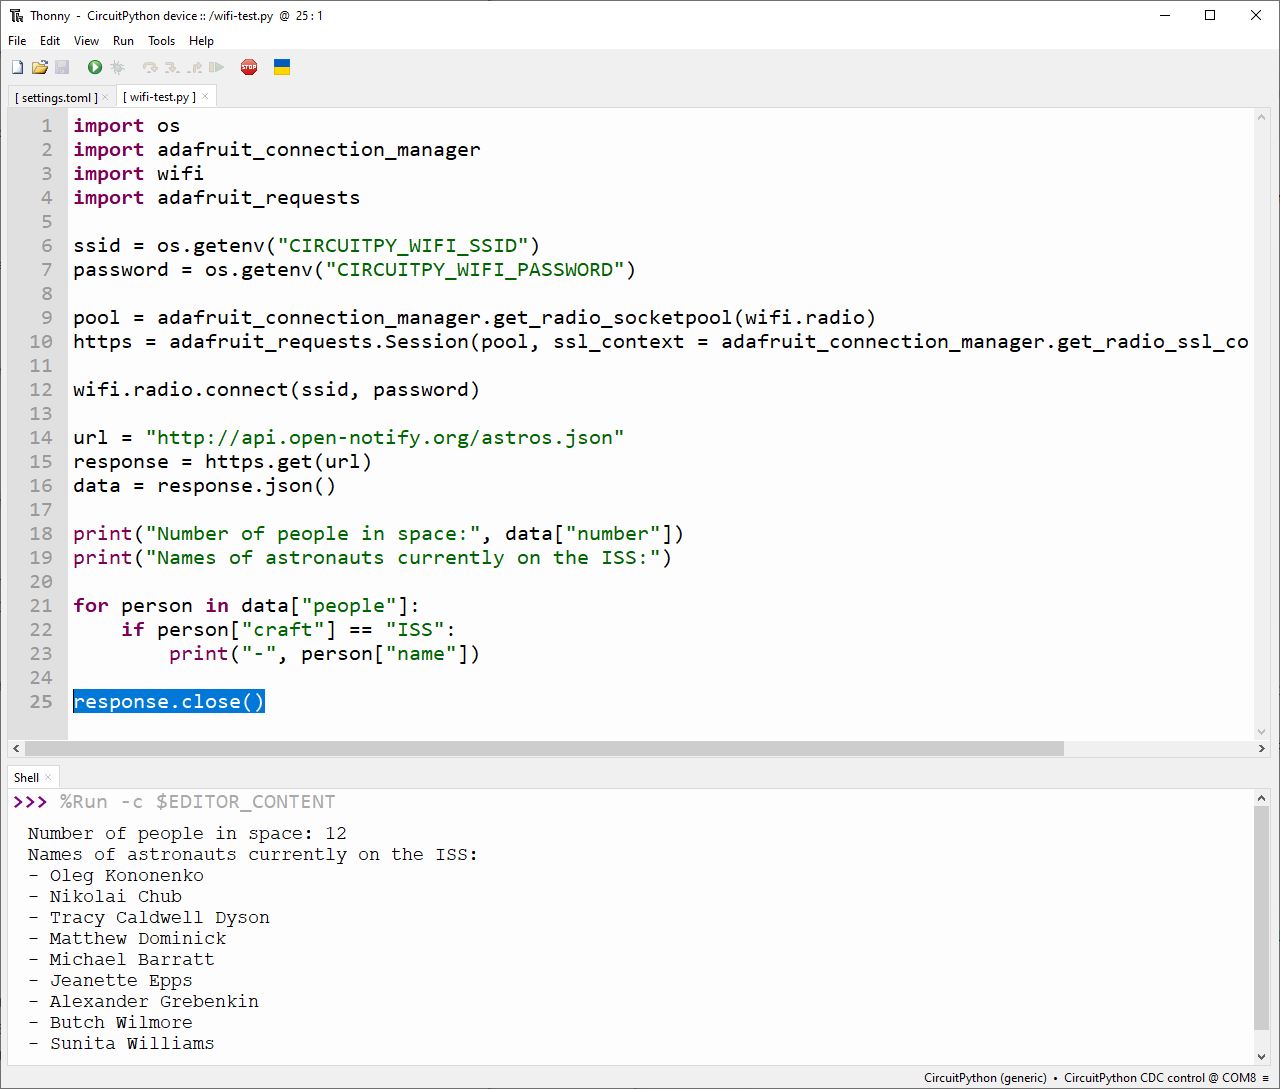
Save the code to the Baguette S3 as wifi-test.py and click on Run >> Run Current Script, or press the green play button. The Baguette S3 will connect to your Wi-Fi (using the settings.toml file) and then get the data.
Your Baguette S3 is now online and can communicate with devices / services via a network connection.
Complete Code Listing
import os
import adafruit_connection_manager
import wifi
import adafruit_requests

ssid = os.getenv("CIRCUITPY_WIFI_SSID")
password = os.getenv("CIRCUITPY_WIFI_PASSWORD")

pool = adafruit_connection_manager.get_radio_socketpool(wifi.radio)
https = adafruit_requests.Session(pool, ssl_context = adafruit_connection_manager.get_radio_ssl_context(wifi.radio))

wifi.radio.connect(ssid, password)

url = "http://api.open-notify.org/astros.json"
response = https.get(url)
data = response.json()

print("Number of people in space:", data["number"])
print("Names of astronauts currently on the ISS:")

for person in data["people"]:
    if person["craft"] == "ISS":
        print("-", person["name"])

response.close()
4:22PM BST Tinkering with I2C and an OLED screen
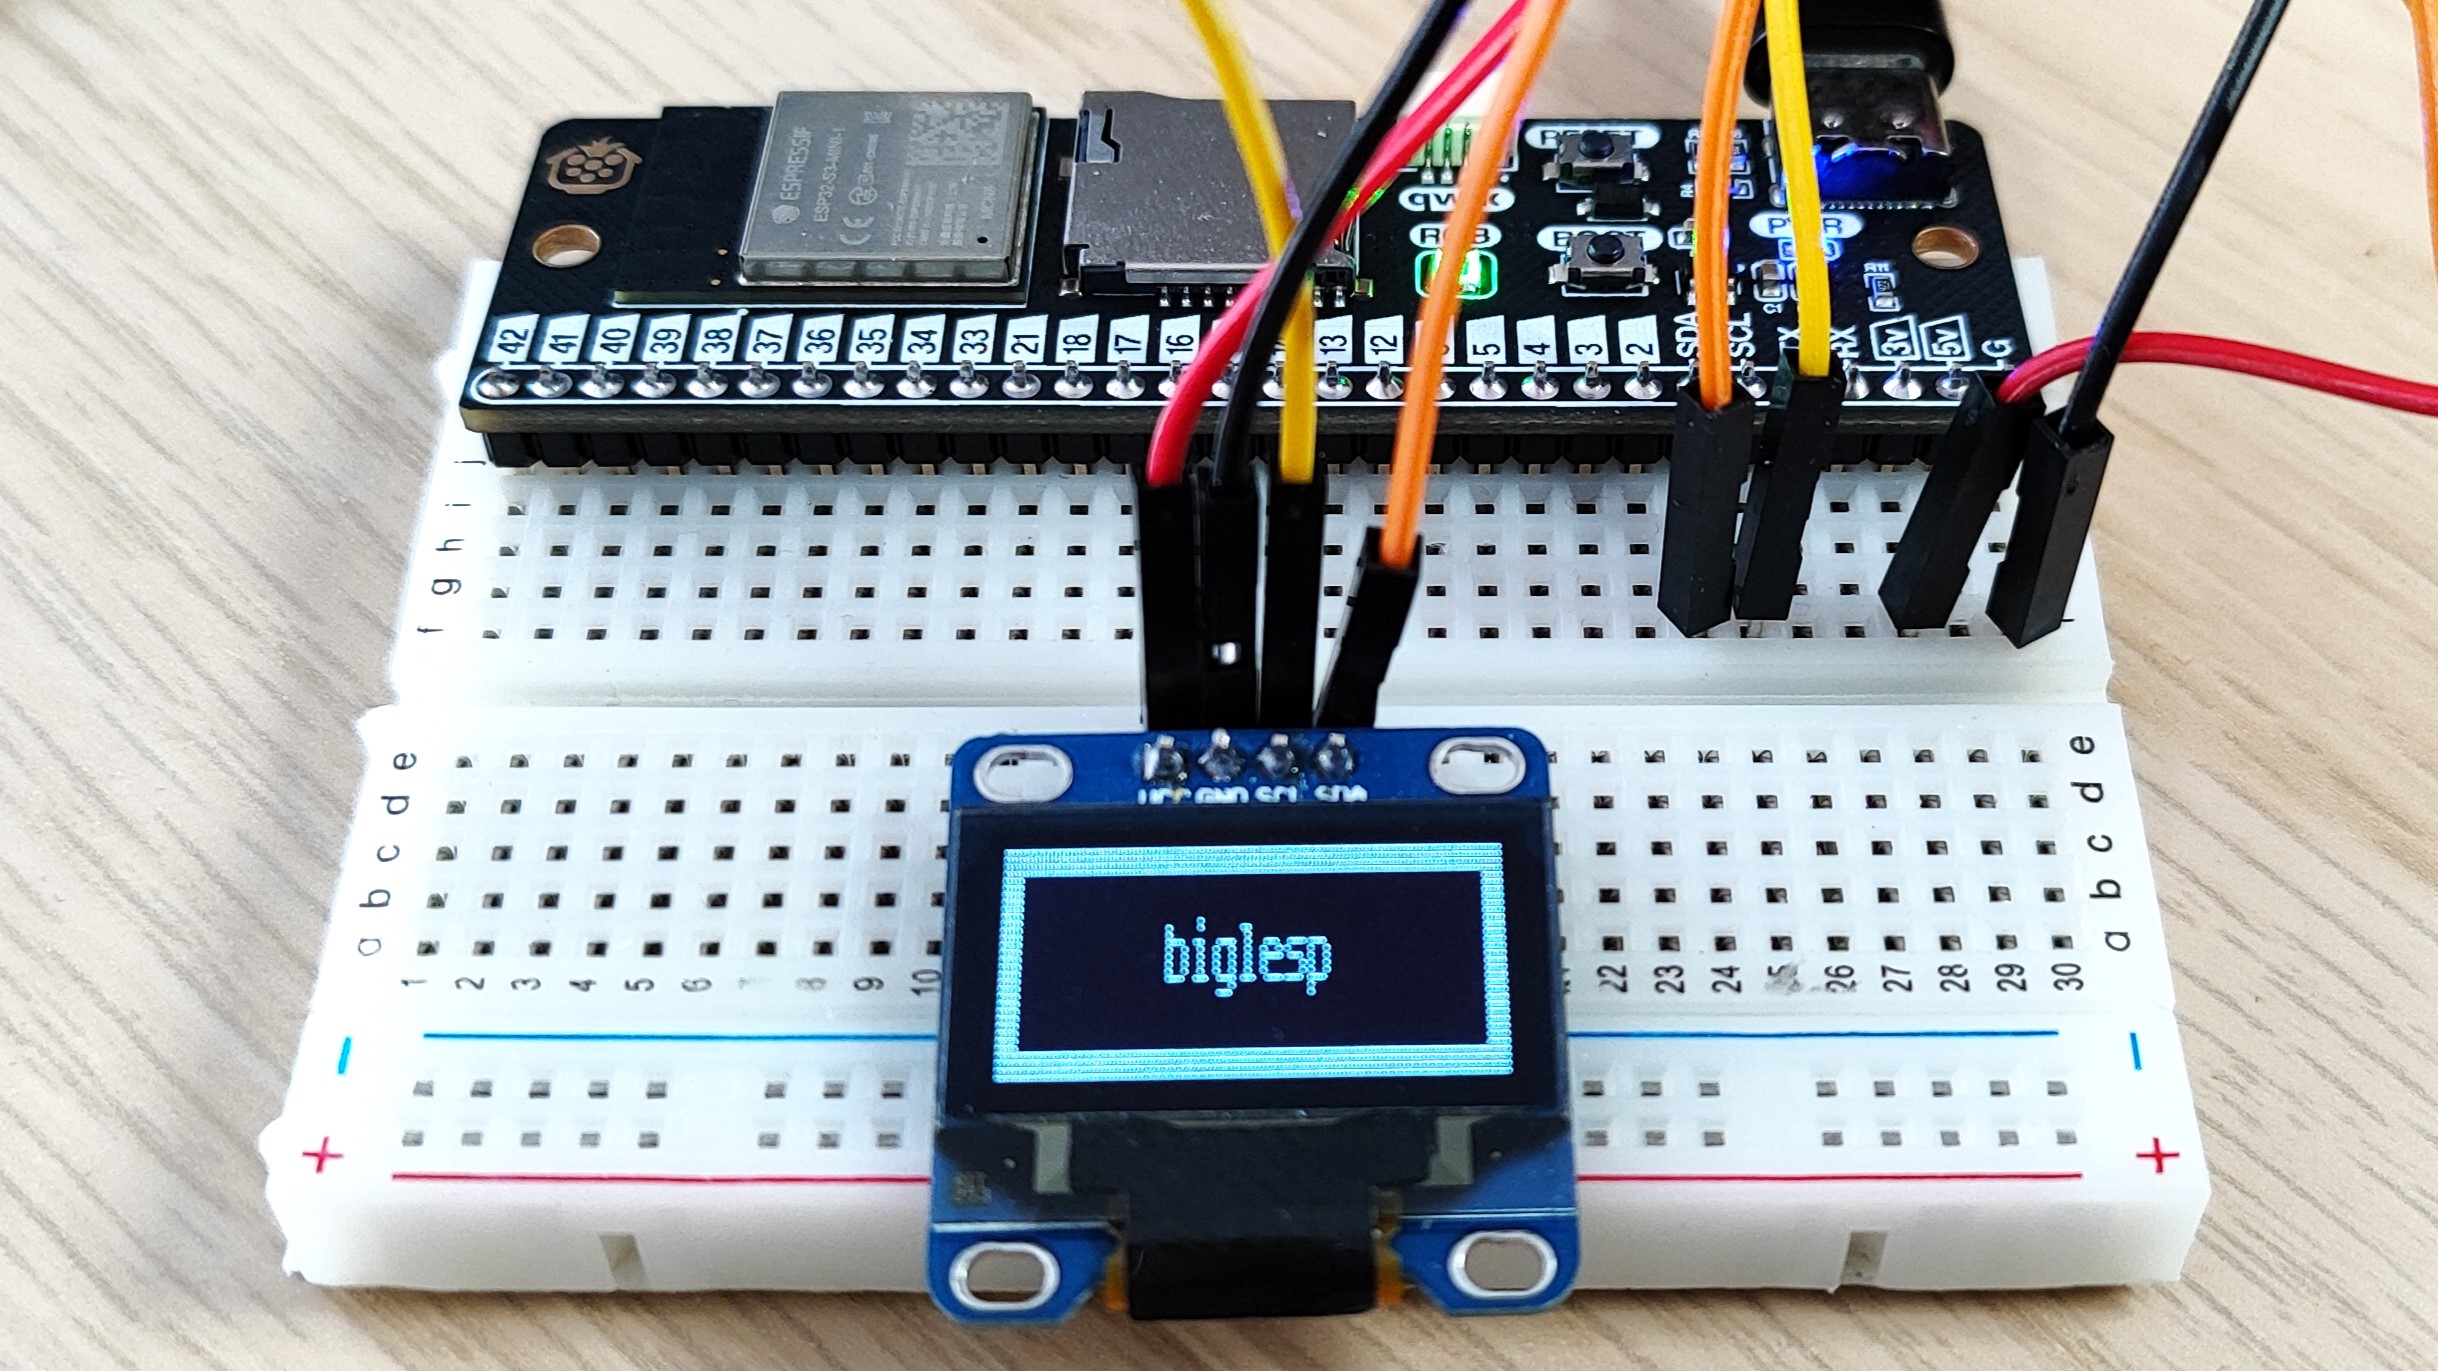
Final update for today! I wanted to test how easy it would be to connect and use an OLED screen with the Baguette S3. It turns out it was easy, but I did trip up along the way. I based my experiment on Adafruit's awesome guide to using OLED screens with CircuitPython and tweaked it to meet my needs. The goal of this project is to show some text, inside of a box on a tiny 128x64 OLED screen that I picked up from Aliexpress many years ago.
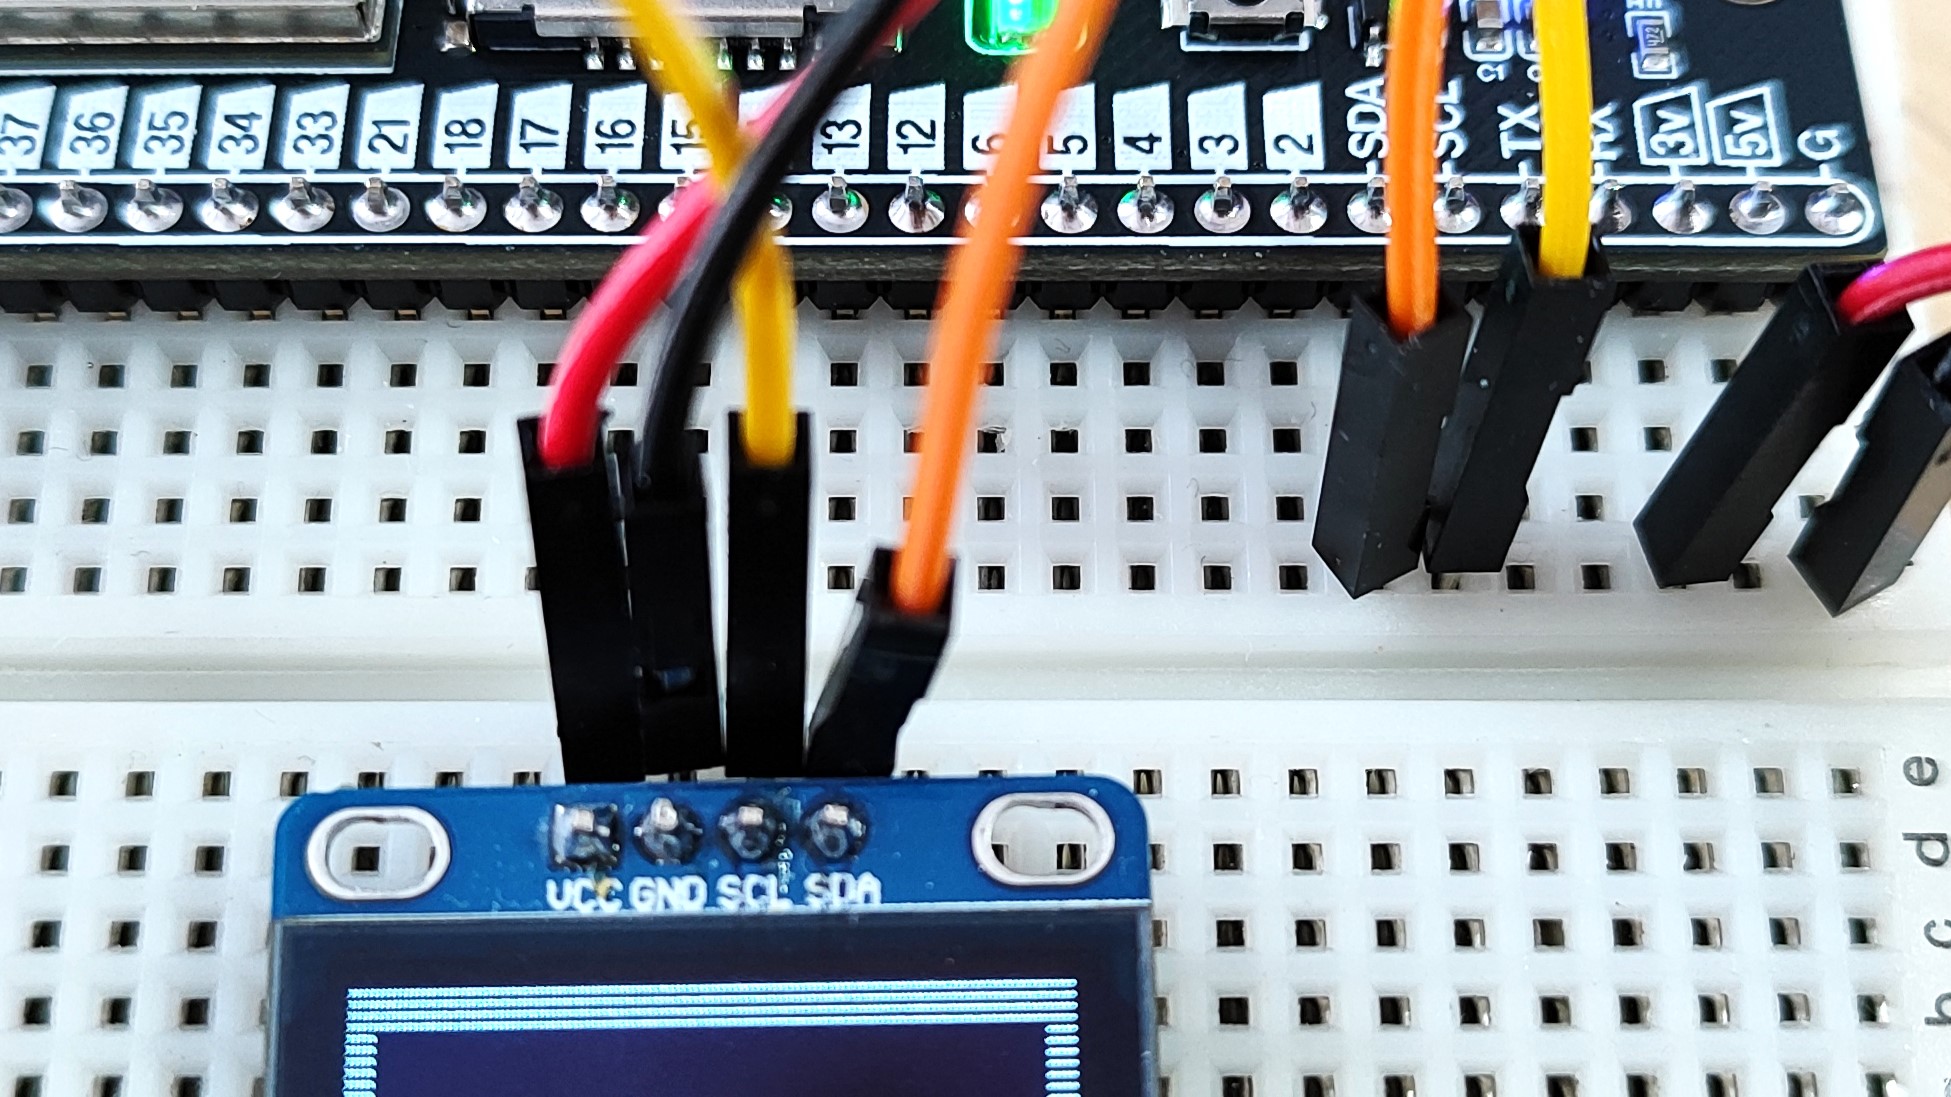
The connections between the screen and the Baguette S3 are clearly marked. Just connect
- VCC to 3V
- GND to GND
- SDA to SDA
- SCL to SCL
Now on to the software, and we're going to need the following libraries copied from the previously downloaded libraries archive.
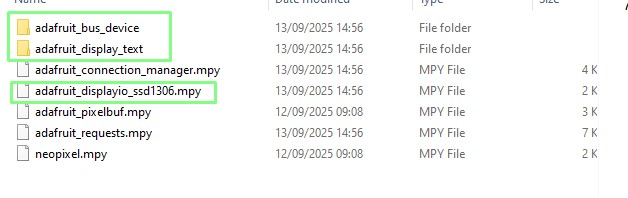
- adafruit_bus_device (this is a folder, copy the folder and its contents to the Baguette S3
- adafruit_display_text (another folder, copy just like the previous)
- adafruit_displayio_ssd1306.mpy
The Baguette S3's lib folder should look something like this now.
Open Thonny and on the Baguette S3 create a new file. We'll start the code by importing modules to work with the GPIO, use I2C, make working with OLED screens easiers, show fonts, draw graphics and to use the I2C bus.
import board
import busio
import displayio
import terminalio
from adafruit_display_text import label
from i2cdisplaybus import I2CDisplayBus
import adafruit_displayio_ssd1306
We then release any previous connections to a display.
displayio.release_displays()
Setup an I2C object and point the object to the GPIO pins used for the connection. This is where I tripped up. Sometimes you can just tell the code to use board.i2c() and it does all the work. But this time I had to specifically tell the code which pins I was using. IO48 is SCL and IO47 is SDA.
i2c = busio.I2C(board.IO48, board.IO47)
We then create an object to tell the code where our OLED screen is on the I2C bus. Then we create an object to setup the resolution (128x64) of the screen.
display_bus = I2CDisplayBus(i2c, device_address=0x3C)
display = adafruit_displayio_ssd1306.SSD1306(display_bus, width=128, height=32)
Next up we create an object called splash and set it up ready for use.
splash = displayio.Group()
display.root_group = splash
Then we setup the screen with a bitmap, and set the color palette to white, so that we can draw on the black background.
color_bitmap = displayio.Bitmap(128, 32, 1)
color_palette = displayio.Palette(1)
color_palette[0] = 0xFFFFFF
Using the previous setup we create and use a sprite.
bg_sprite = displayio.TileGrid(color_bitmap, pixel_shader=color_palette, x=0, y=0)
splash.append(bg_sprite)
We repeat the process, but this time for a black centre rectangle that is slightly smaller.
inner_bitmap = displayio.Bitmap(118, 24, 1)
inner_palette = displayio.Palette(1)
inner_palette[0] = 0x000000  # Black
inner_sprite = displayio.TileGrid(inner_bitmap, pixel_shader=inner_palette, x=5, y=4)
splash.append(inner_sprite)
Then we create an object called test and store a string, in my case "biglesp"
text = "biglesp"
Then we update the text area, the centre of the screen to show the text dead centre.
text_area = label.Label(terminalio.FONT, text=text, color=0xFFFF00, x=42, y=15)
splash.append(text_area)
Finally we use a while True loop to keep the screen active.
while True:
    pass
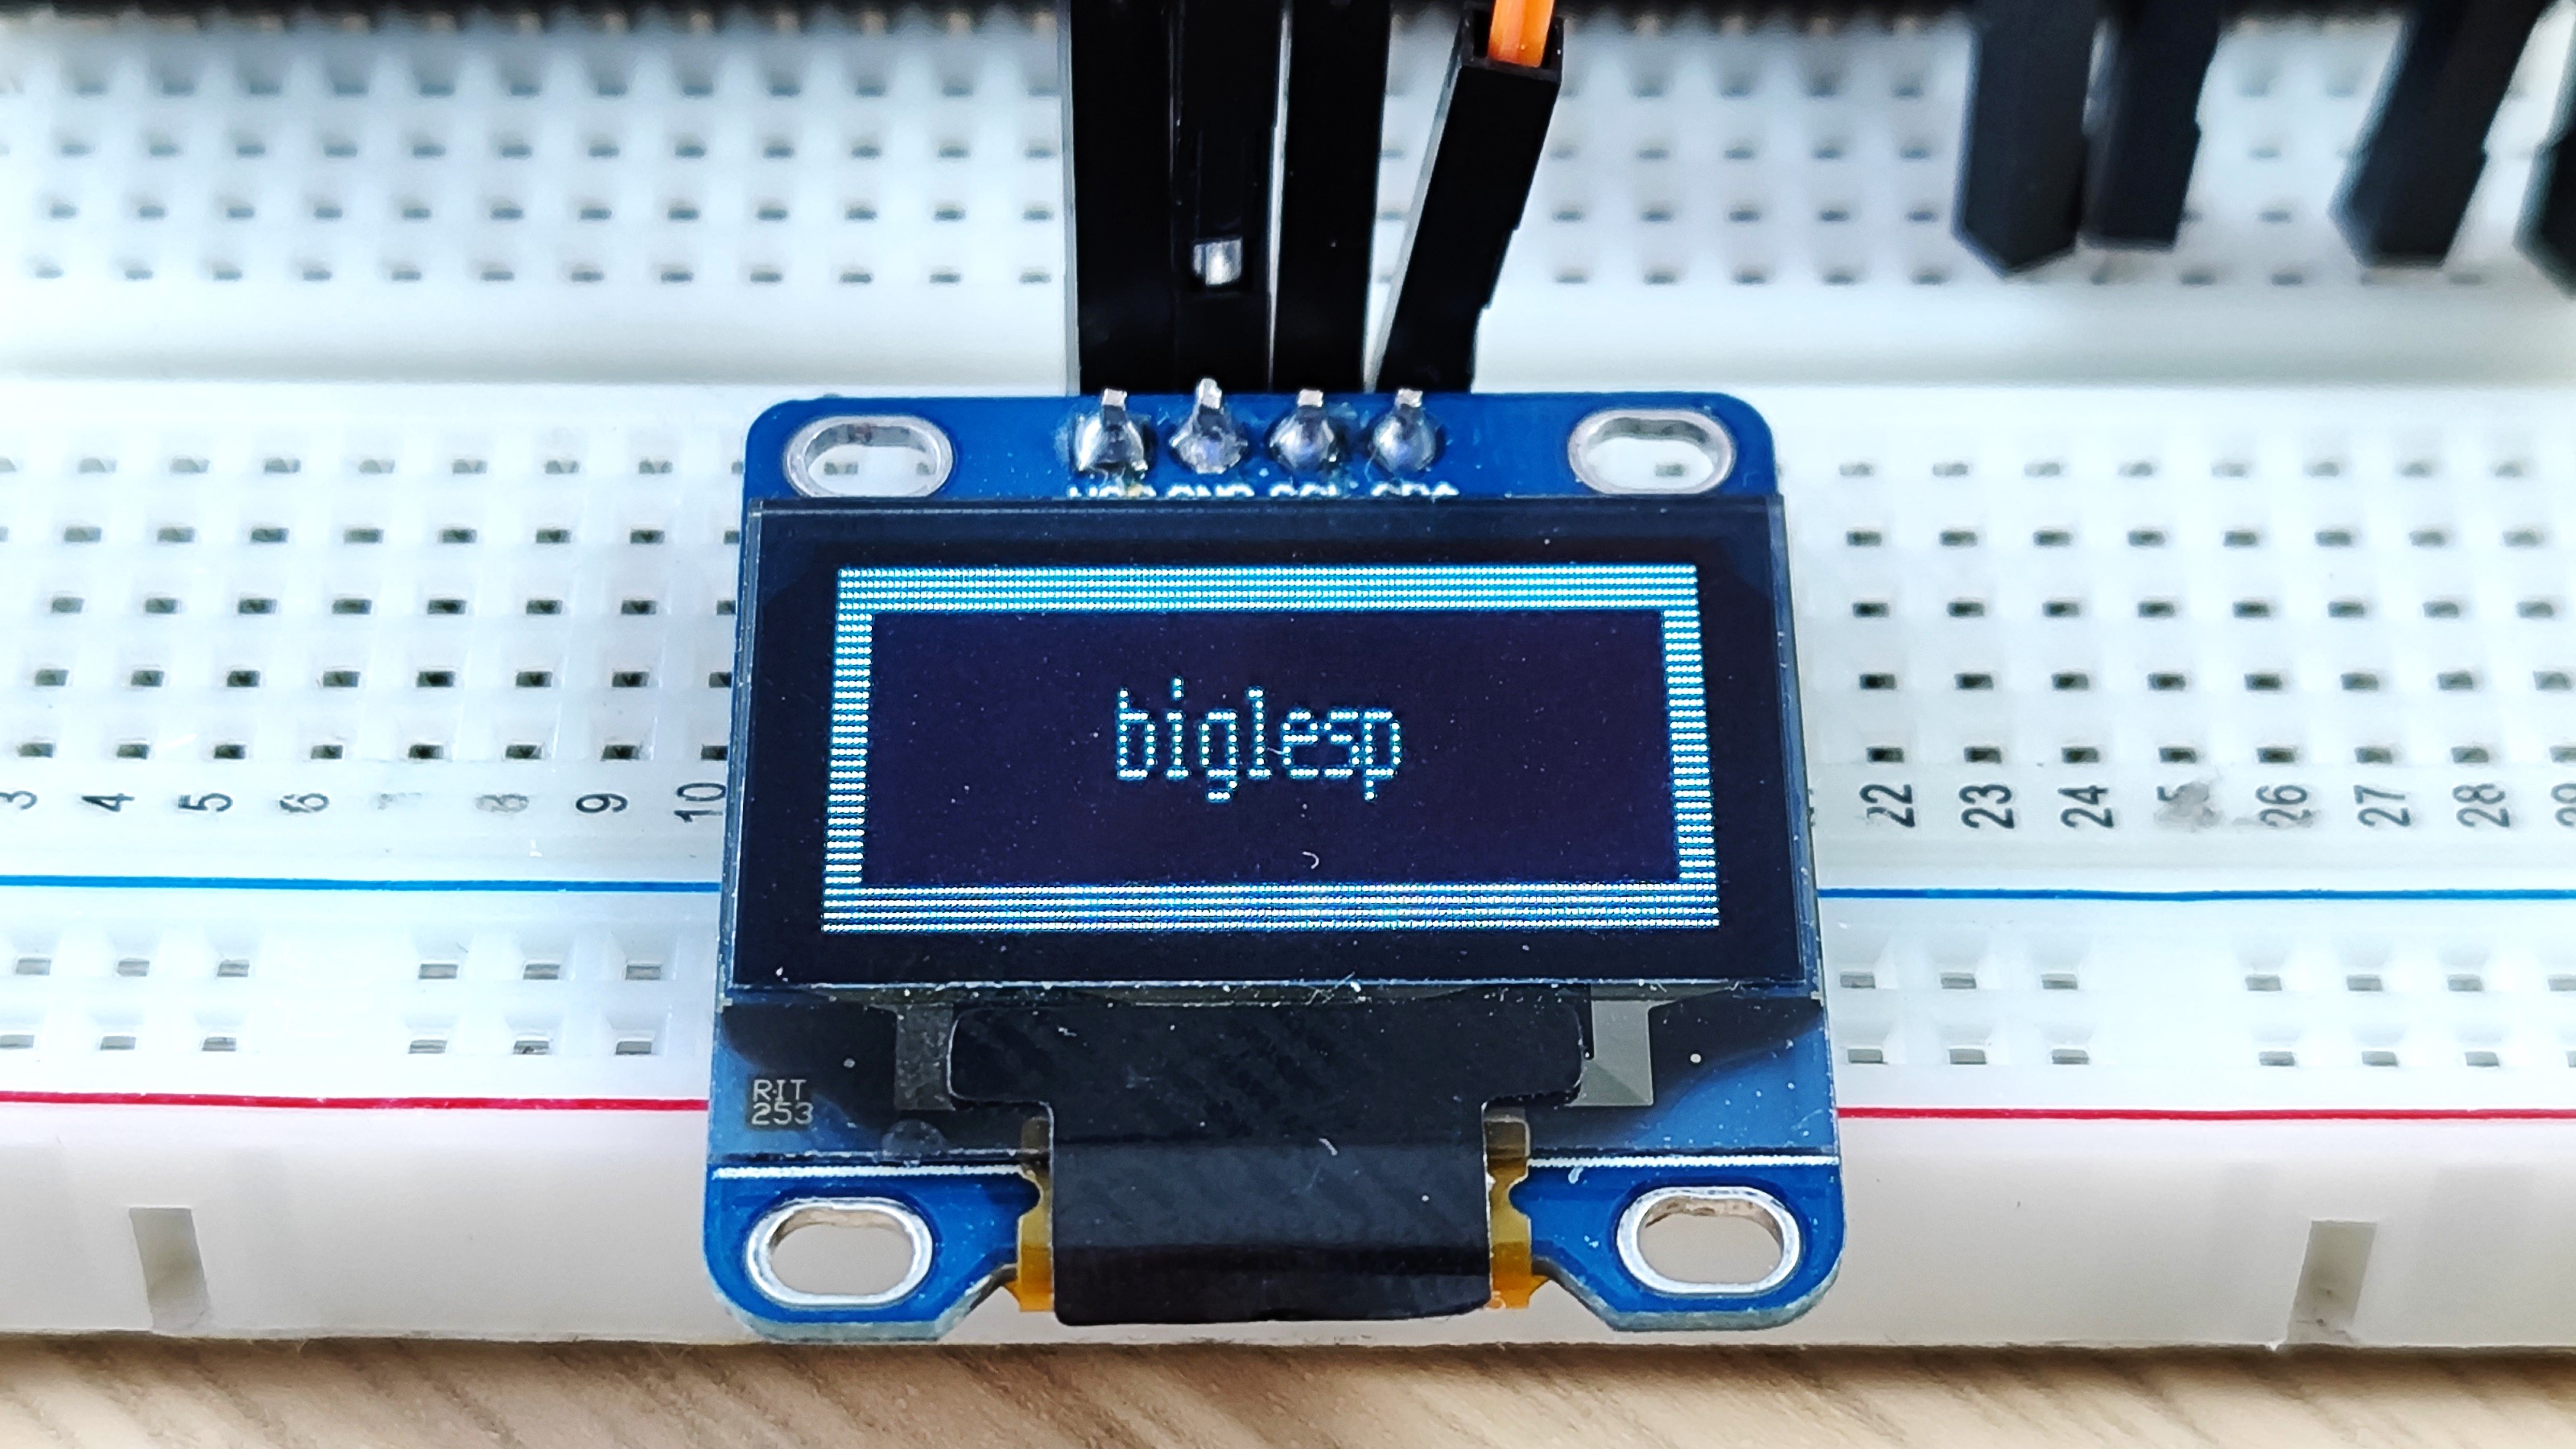
Save the code to the Baguette S3 as oled-test.py and click on Run >> Run Current Script, or press on the green play button to start. Look to the screen and you will see your text clearly printed upon it.
Complete Code Listing
import board
import busio
import displayio
import terminalio
from adafruit_display_text import label
from i2cdisplaybus import I2CDisplayBus
import adafruit_displayio_ssd1306

displayio.release_displays()
i2c = busio.I2C(board.IO48, board.IO47)
display_bus = I2CDisplayBus(i2c, device_address=0x3C)
display = adafruit_displayio_ssd1306.SSD1306(display_bus, width=128, height=32)

splash = displayio.Group()
display.root_group = splash

color_bitmap = displayio.Bitmap(128, 32, 1)
color_palette = displayio.Palette(1)
color_palette[0] = 0xFFFFFF

bg_sprite = displayio.TileGrid(color_bitmap, pixel_shader=color_palette, x=0, y=0)
splash.append(bg_sprite)

inner_bitmap = displayio.Bitmap(118, 24, 1)
inner_palette = displayio.Palette(1)
inner_palette[0] = 0x000000
inner_sprite = displayio.TileGrid(inner_bitmap, pixel_shader=inner_palette, x=5, y=4)
splash.append(inner_sprite)

text = "biglesp"
text_area = label.Label(terminalio.FONT, text=text, color=0xFFFF00, x=42, y=15)
splash.append(text_area)

while True:
    pass
That is all for today!
I've had fun tinkering with the Baguette S3 today. The form factor is pleasing, and very convenient for use with a breadboard. I can see The Pi Hut shifting a few of these boards, especially those of us who want to tinker with an ESP32 and a breadboard.
17/9/2025 9:40am BST: QWIIC Test ;)
If you've followed my early work over at Tom's Hardware, then you may know that I am a big fan of StemmaQT, QWIIC, Maker Port connections. Essentially breaking out the I2C connection into a simple connector. They make rapid prototyping really easy and with companies such as Adafruit, Pimoroni, Sparkfun, Cytron making add-on boards packed with sensors and other delights, they lower the barrier to getting started with electronics.
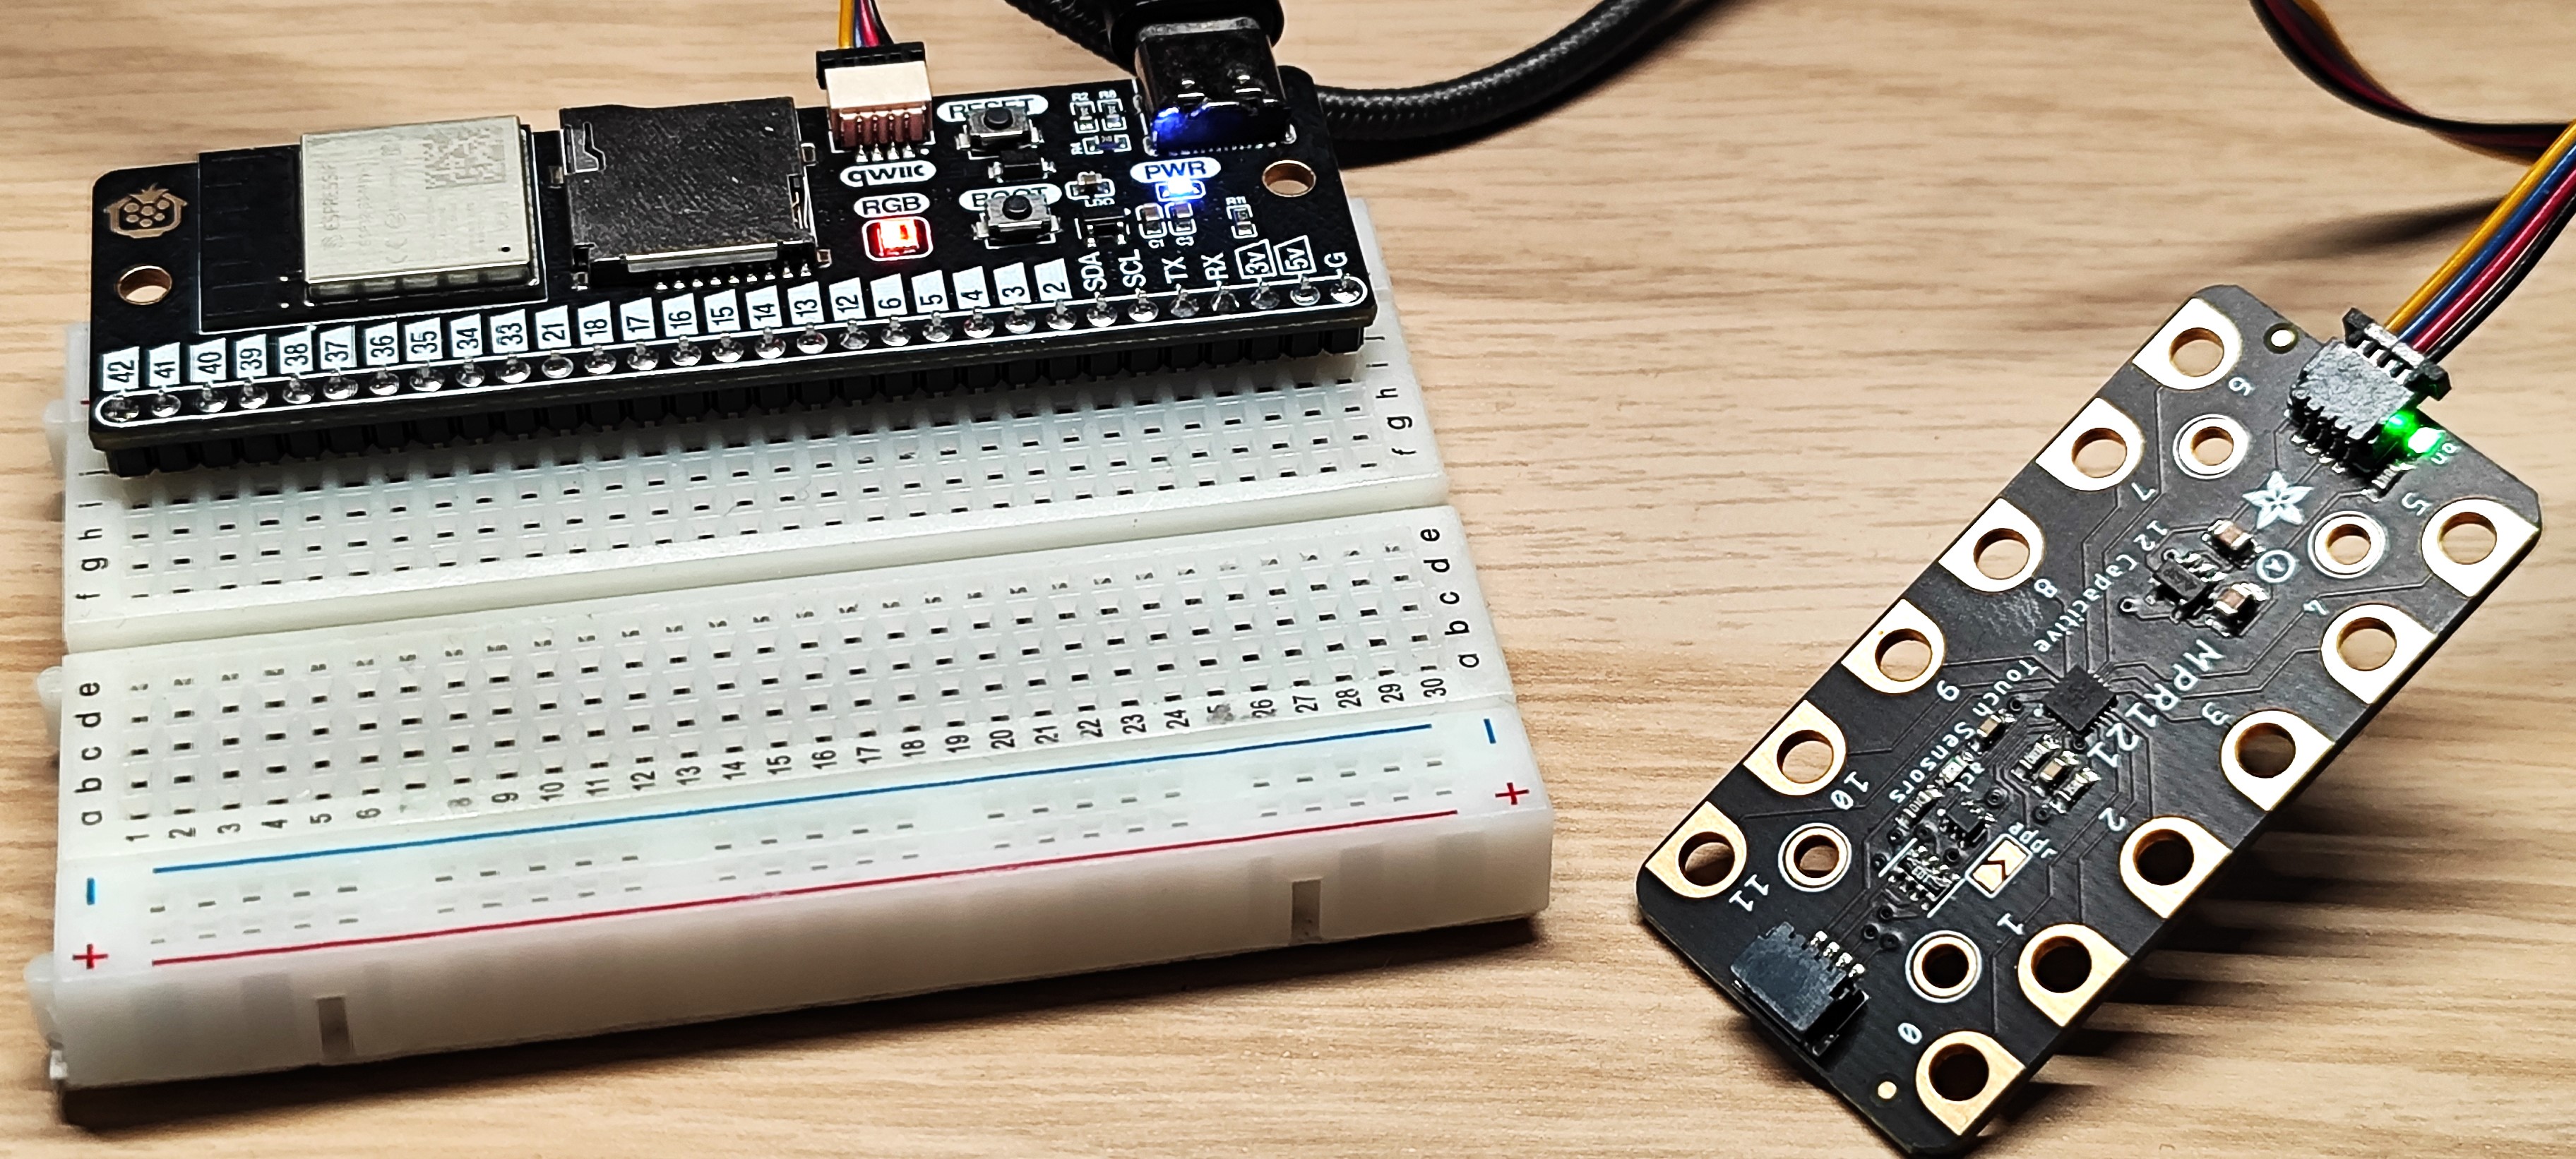
I wanted to test Baguette S3's QWIIC port and so I dug into my stock on boards and pulled out the mighty MPR121 capacitive touch sensor board.
Connecting to the Baguette was simple, just plug in the cable and the green light on the MPR121 lights up!
I used Adafruit's excellent MPR121 example for CircuitPython.
The only change that I needed to make was to change the default
i2c = busio.I2C(board.SCL, board.SDA)
to
i2c = busio.I2C(board.IO48, board.IO47)
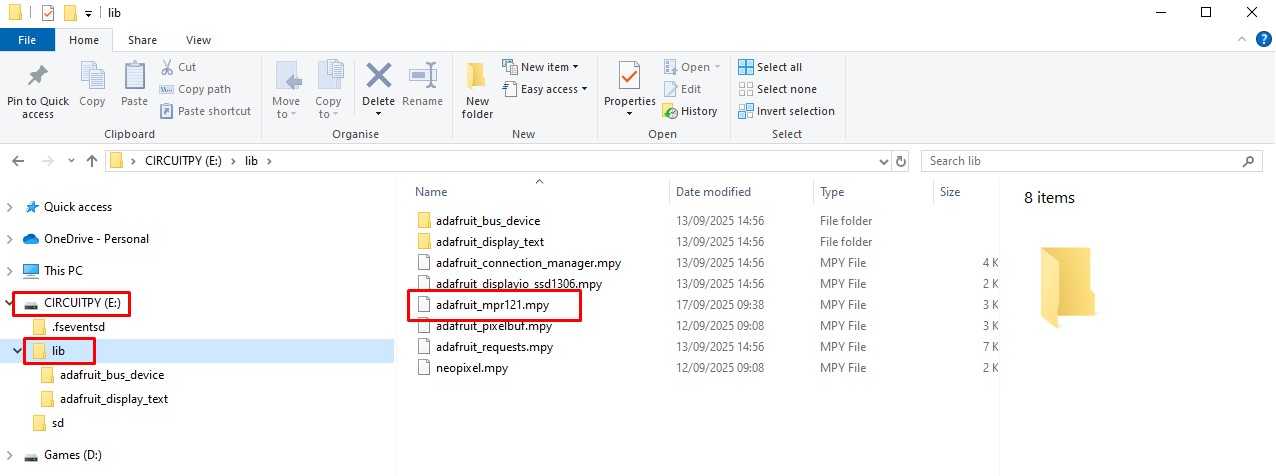
and to copy the adafruit_mpr121.mpy file to the /lib/ directory on my CIRCUITPY drive (the Baguette S3).
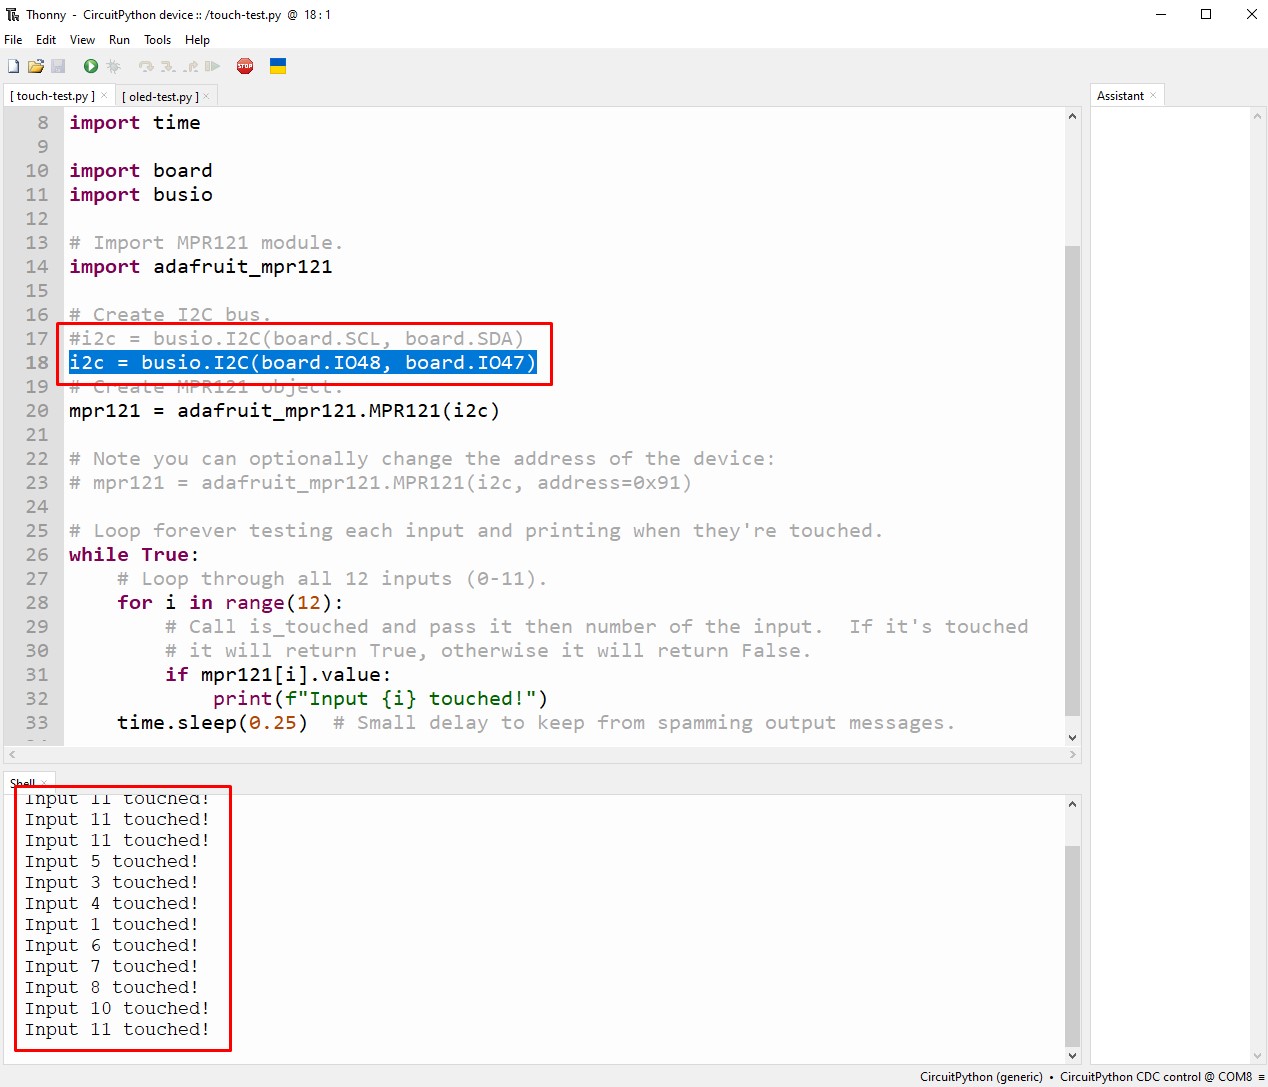
Save the code and click run, then touch the inputs. All working.
Another successful test.
Happy Hacking