Directly Connecting To a Raspberry Pi
At a recent Picademy Bytes CPD session I was asked by Monica
"How can I connect my laptop to a Raspberry Pi?"
Good question!
Monica was keen to take her Pi on holiday and hack around with it, but she didn't fancy taking a large screen with her. So Monica's requirements were
- Connect the Raspberry Pi to a laptop
- Control the Raspberry Pi with a graphical desktop on the laptop screen.
To control a Raspberry Pi remotely we need to use two technologies.
SSH - A protocol that enables remote control of a computer.
VNC - A tool that enables a user to sit at a computer and control the mouse and keyboard of another while receiving a view of the desktop.
Both of these technologies work over a local network connection, but can also be used over great distances, should the need arise.
What equipment will you need?
- A Raspberry Pi Model B, B+ or Pi 2
- A laptop running Windows with an Ethernet port
- A USB to micro USB lead
- An Ethernet cable
Configuring Windows
So where do we begin? Let's start by setting up our Windows laptop.
In this tutorial we used Windows 7 running on a Lenovo x61 laptop. These steps can be reproduced on Windows Vista, 8 and 10.
We start by booting our laptop to the Windows desktop.
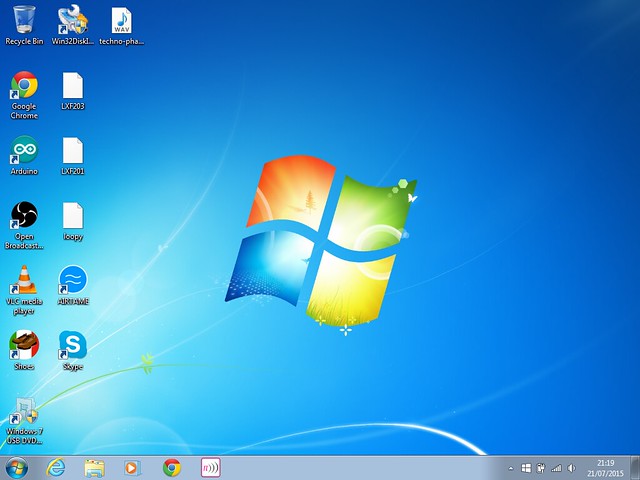
To control our Raspberry Pi over a network we need two pieces of software. SSH and VNC. For Windows we need to source an SSH client, and the most popular is called putty and I use the version from Portableapps.com as it is a single file to download and requires no installation. Download putty and for now don't open it.
The next piece of software that we need is a VNC viewer, and again we use the cream of the crop which is Real VNC To use it you will need to give a few details to the team behind it. For our machine we downloaded the 32-bit EXE version.
So we have the tools that we need, now we need to configure our Ethernet port so that we can communicate with our Raspberry Pi.
Configuring the Ethernet
We need to configure our laptop so that its Ethernet IP address is fixed and to do that we need to use the Network and Sharing Center, you can open this by right clicking on the icon in the bottom right of the screen. Or you can search for Network in the Start menu.
Once opened you will see this.
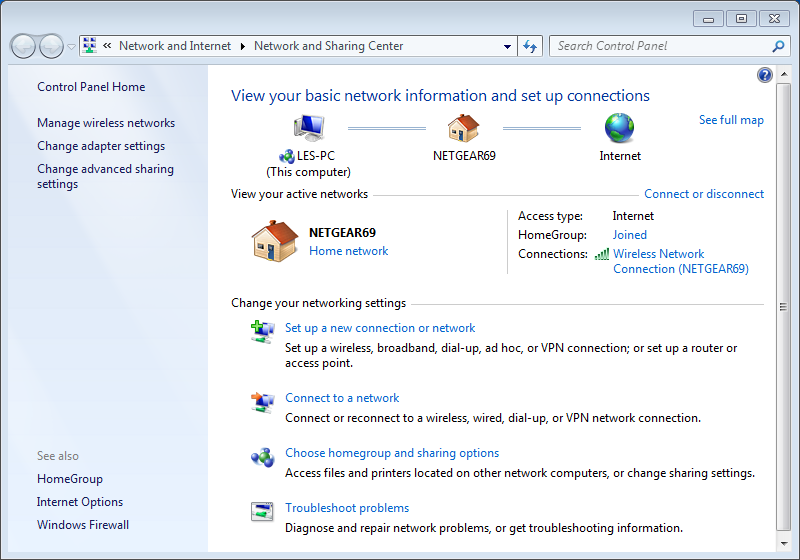
On the left of the screen you can see Change adapter settings left click here and you will now see this screen.
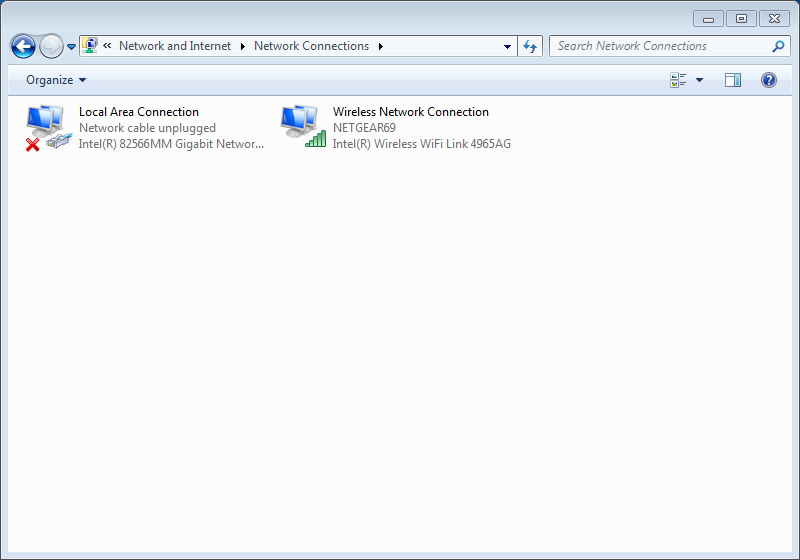
We are interested in the Local Area Connection icon. Double left click on it to view its properties.

So this screen looks a little scary right? It's ok though. We are looking for Internet Protocol Version 4 (TCP/IPv4).
Left click on the text, leave the tick box alone :) then click on Properties to load the next dialog box.
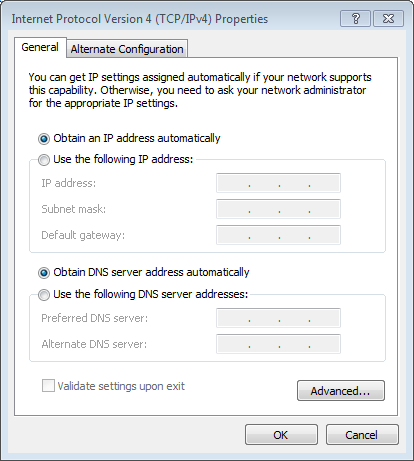
Typically a computer will get an IP address automatically from the router, this is a process known as DHCP (Dynamic Host Configuration Protocol). But for our project we need to set the IP address manually. Click on Use the following IP address and change it to the following.
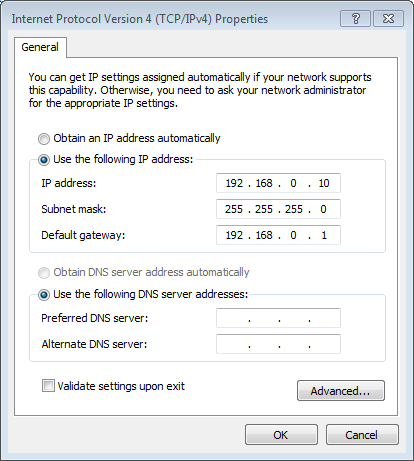
So our laptop has an IP address of 192.168.0.10 and a gatewat of 192.168.0.1 but your laptop may need a different IP address. We also tested 192.168.3.10 and gateway 192.168.3.1 and they both worked a treat. What's important is that you use an IP range that is similar for both the laptop and Raspberry Pi
Make a note of these details before we move on.
You can now close all of the windows / dialog boxes that opened as a result of using the Network and Sharing Center.
Configuring your Raspberry Pi
Compared to configuring Windows our Raspberry Pi configuration is a little more complicated but take it step by step and not much can go wrong.
We used the latest version of Raspbian as it comes with an SSH server already setup.
Our goal in configuring the Raspberry Pi is
- Install a VNC server so we can control our Pi remotely.
- To set a static IP address that is in the same range as we created earlier on Windows.
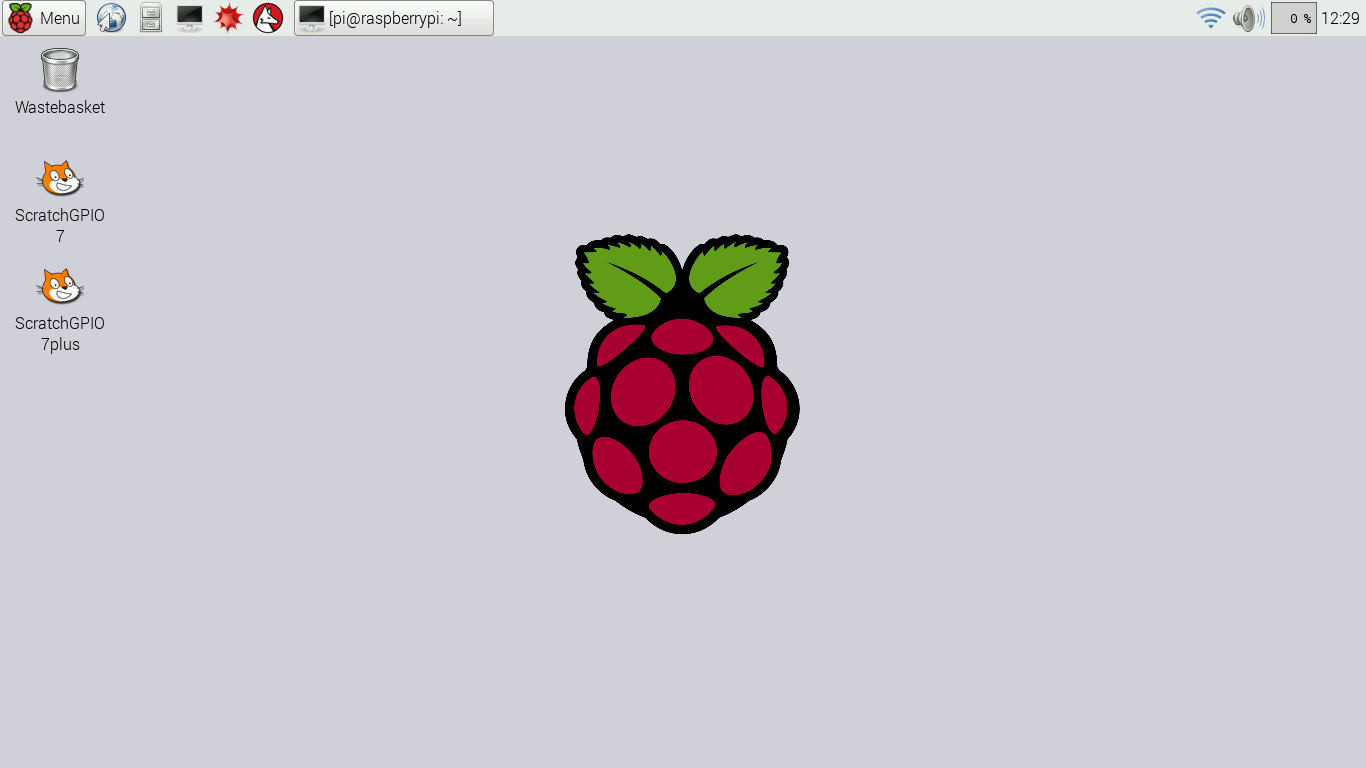
With your Raspberry Pi SD card inserted your Raspberry Pi, boot your Pi to the Raspbian desktop.
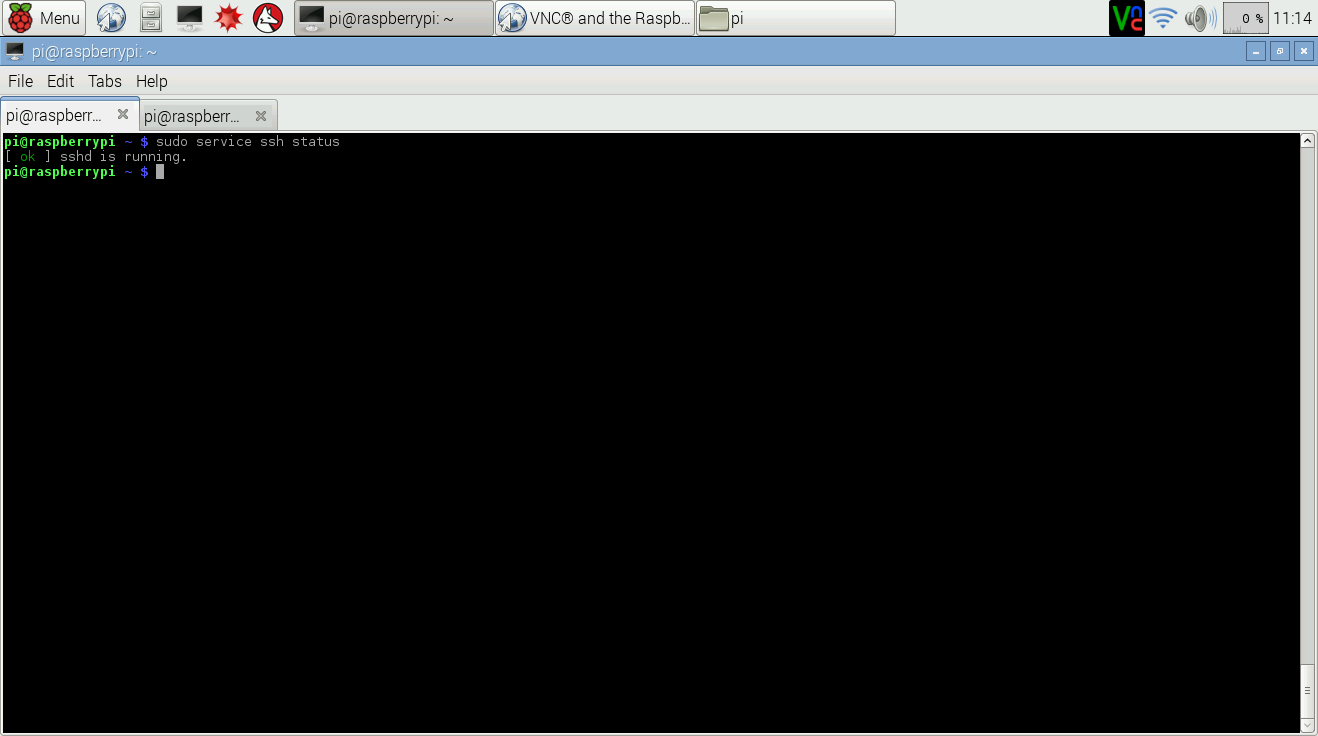
From the desktop open a terminal and lets check that the SSH server is running using this command.
sudo service ssh status
If SSH is running correctly it will return this message.
[ ok ] sshd is running.
SSH not enabled? Follow this guide. If working skip to Install VNC Server section
If your SSH server is not running, then use this command to run raspi-config
sudo raspi-config
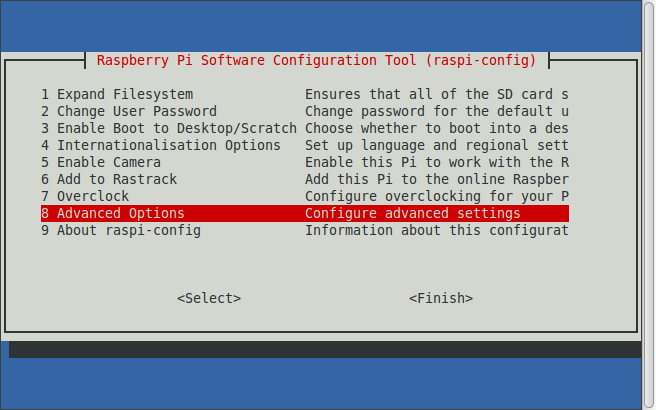
Navigate to option 8 Advanced Options and press Enter.
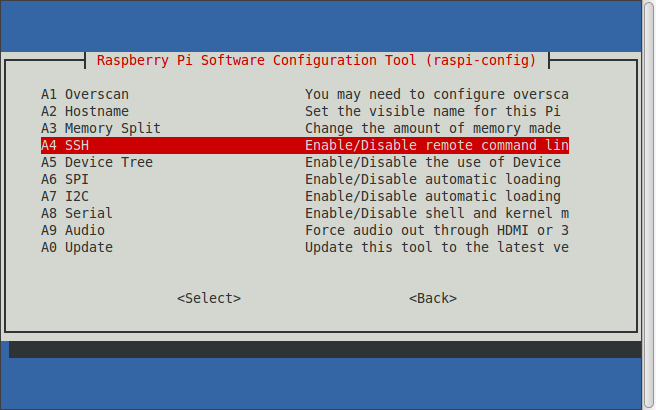
Select option A4 SSH using the cursor keys and press Enter.
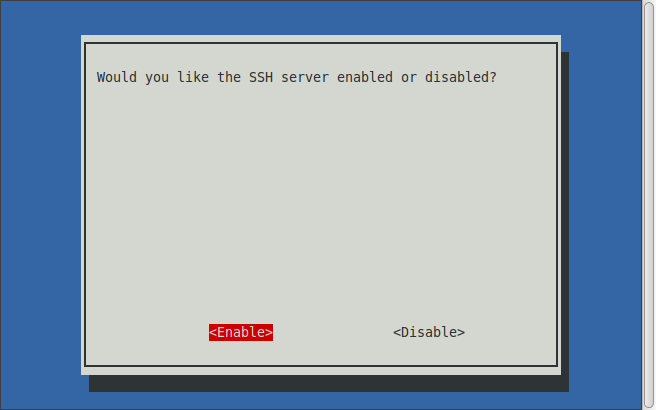
Select to Enable the SSH server and press Enter. Exit raspi-config by clicking on Finish from the menu. You may need to reboot your Raspberry Pi if prompted.
Install VNC Server
With SSH running correctly lets now install a VNC server which will run on our Pi and enable remote control from a tablet/laptop/phone.
We start by downloading the package which contains the software for our Raspberry Pi. In a terminal type the following and press Enter to run.
curl -L -o VNC.tar.gz https://www.realvnc.com/download/binary/latest/debian/arm/
This will download an archive to our Raspberry Pi, now we need to extract the contents.
In a terminal type the following, and press Enter to run.
tar xvf VNC.tar.gz
We now have two new files in our current directory
VNC-Server-5.2.3-Linux-ARM.deb
VNC-Viewer-5.2.3-Linux-ARM.deb
We need to install these onto our Pi and to do that we use the following command.
sudo dpkg -i VNC-Server-5.2.3-Linux-ARM.deb VNC-Viewer-5.2.3-Linux-ARM.deb
Installation should only take a few seconds to complete.
Once done, we stay in the terminal as we need to set a password for our VNC server. Run the following command.
sudo vncpasswd /root/.vnc/config.d/vncserver-x11
For this tutorial we set the password as raspberry as it is easy to remember and we will not be using this connection over an untrusted network.
Lets test that it is working, in a terminal type
sudo /etc/init.d/vncserver-x11-serviced start
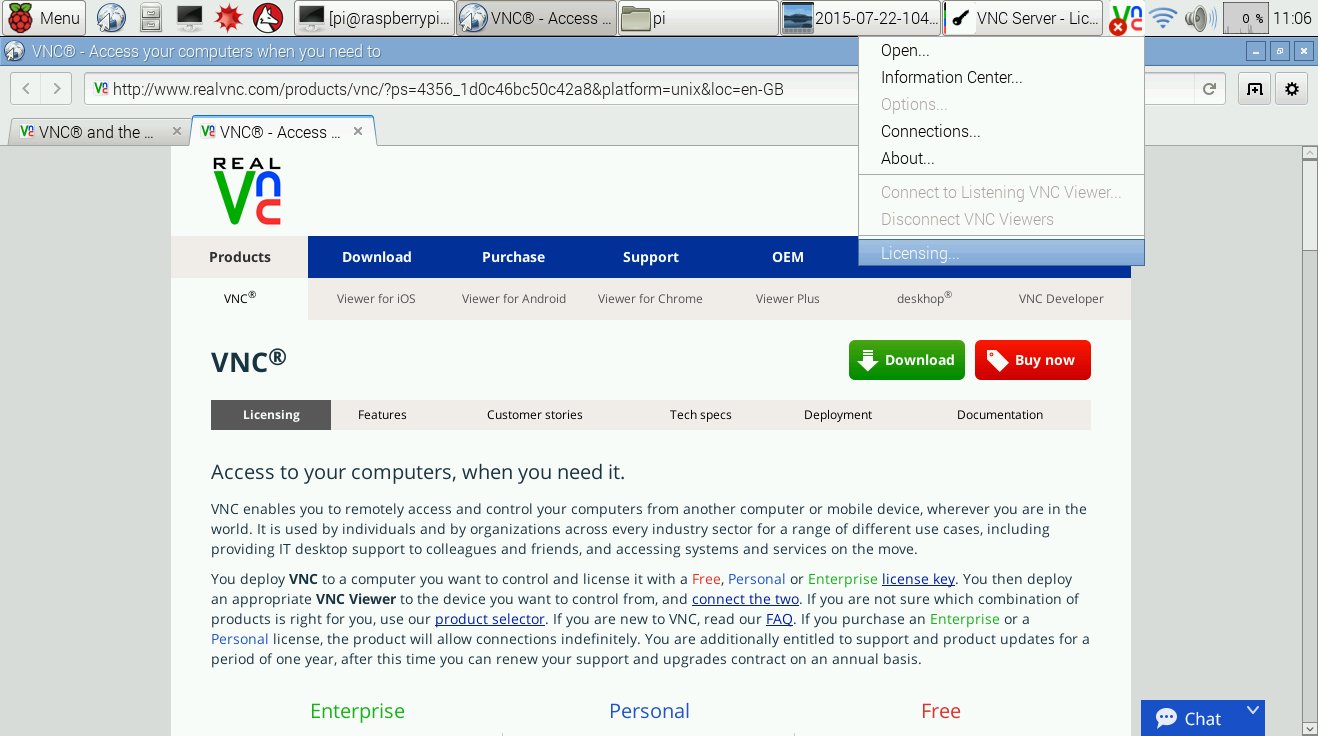
This will trigger the VNC server to run, but we need to add a licence to use it, it's ok though as it is free. In the top right of the screen you will see the VNC logo. Right click on it and choose Licensing. Apply for a free licence and copy the code from the web page to the licensing dialog box. In our test we found that we also needed to open a terminal and use this command to confirm that the license had been saved.
sudo vnclicense -add LICENSE-FROM-VNC-WEBSITE
VNC is now installed but we need to do one last thing before proceeding and that is to set our Raspberry Pi to boot with VNC running and we do that by typing this into a terminal.
sudo update-rc.d vncserver-x11-serviced defaults
Giving our Raspberry Pi a fixed IP address
With SSH running and VNC configured our next task on the Raspberry Pi is to set a static IP address so that we can connect.
The easiest way to do this is to edit cmdline.txt which lives in /boot. To edit we need to use this command.
sudo leafpad /boot/cmdline.txt
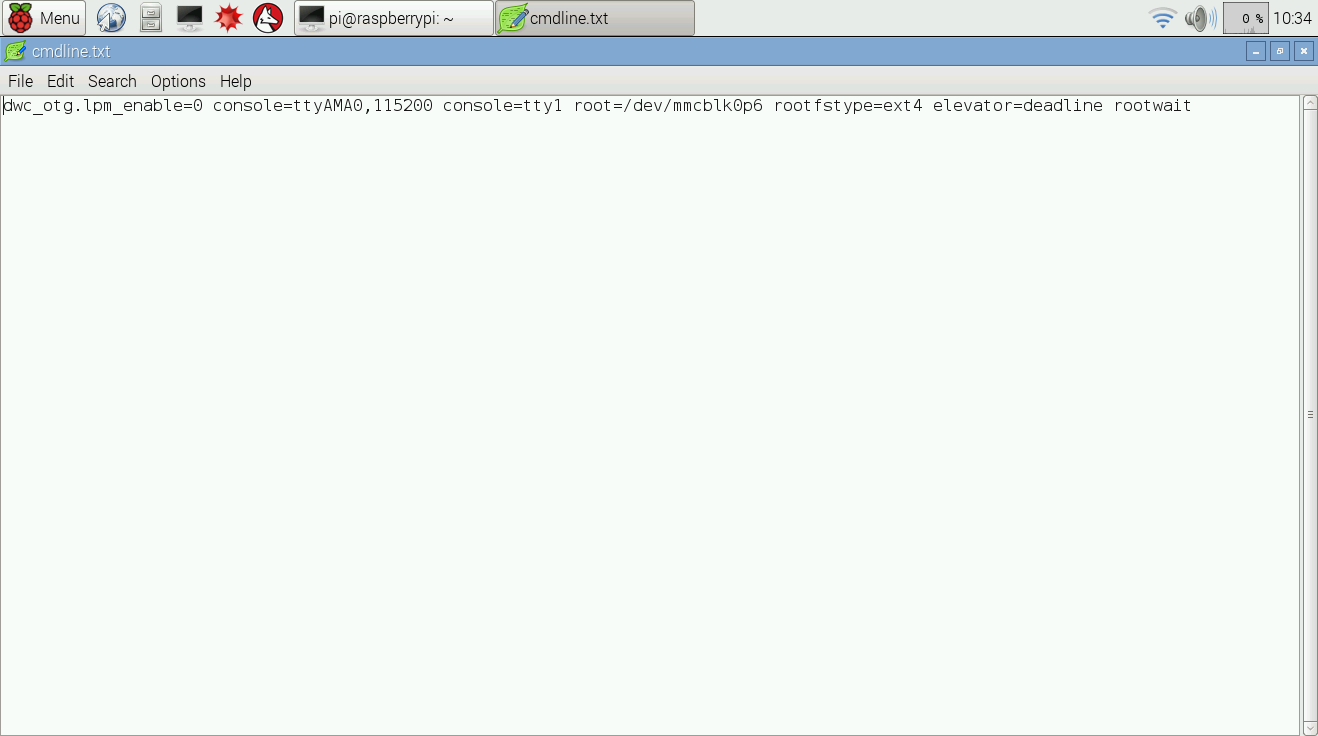
This opens the leafpad text editor with sudo powers and opens the cmdline.txt file. This file contains a long string of information but for now we can ignore it and just move the cursor to the end of the text.
At the end of the text press space and enter the following details.
ip=192.168.0.99
Or change the IP address so that it is similar to the one used on your Windows machine, 192.168.3.99 works well for your Pi
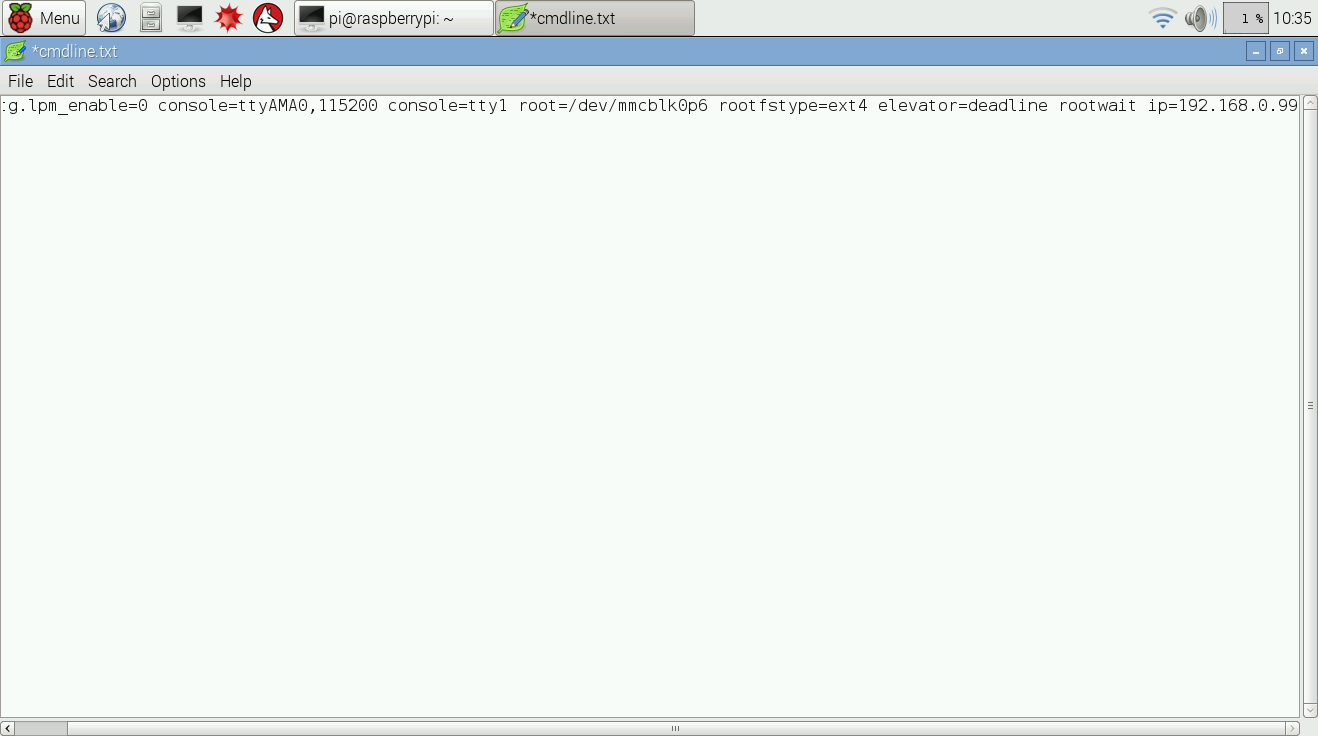
Now save the file and exit.
Last step on our Raspberry Pi is to enable the desktop to boot automatically. In a terminal type the following and press Enter to run.
sudo raspi-config
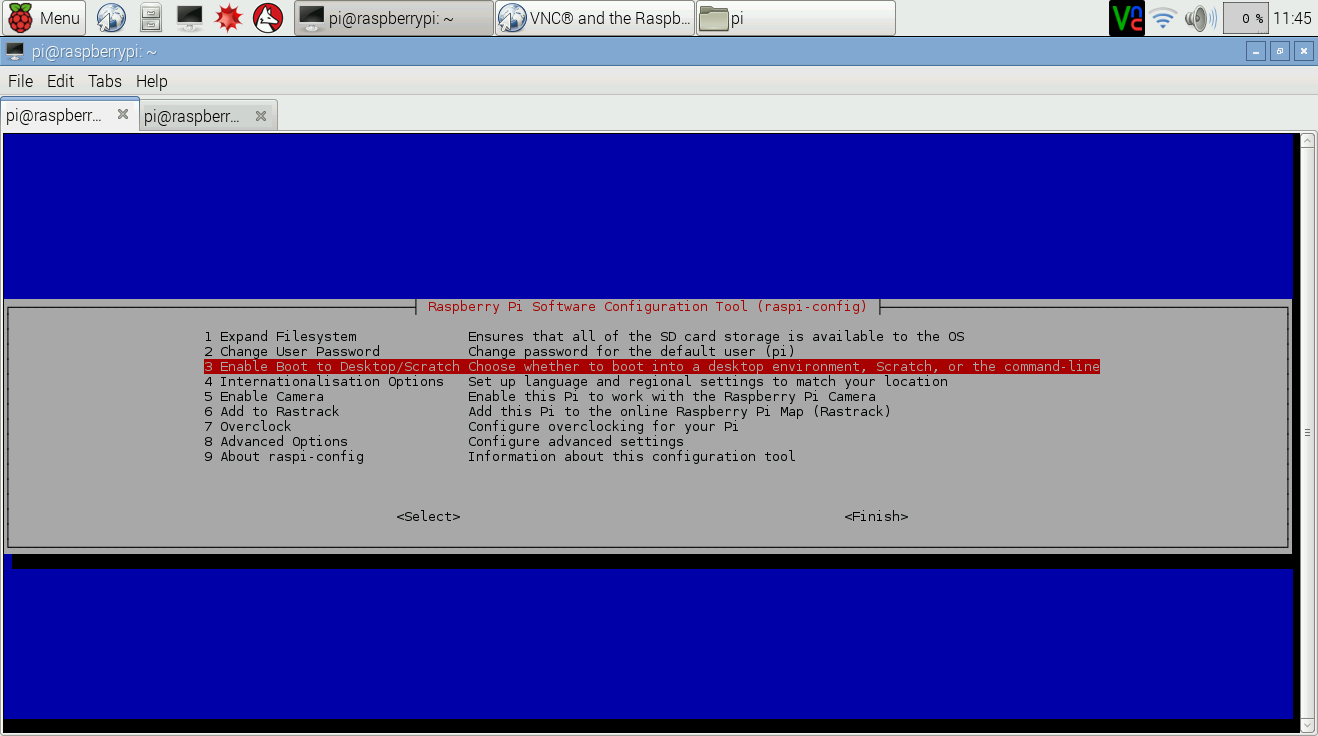
This will open the raspi-config tool which is a suite of tools to tinker with our Raspberry Pi.
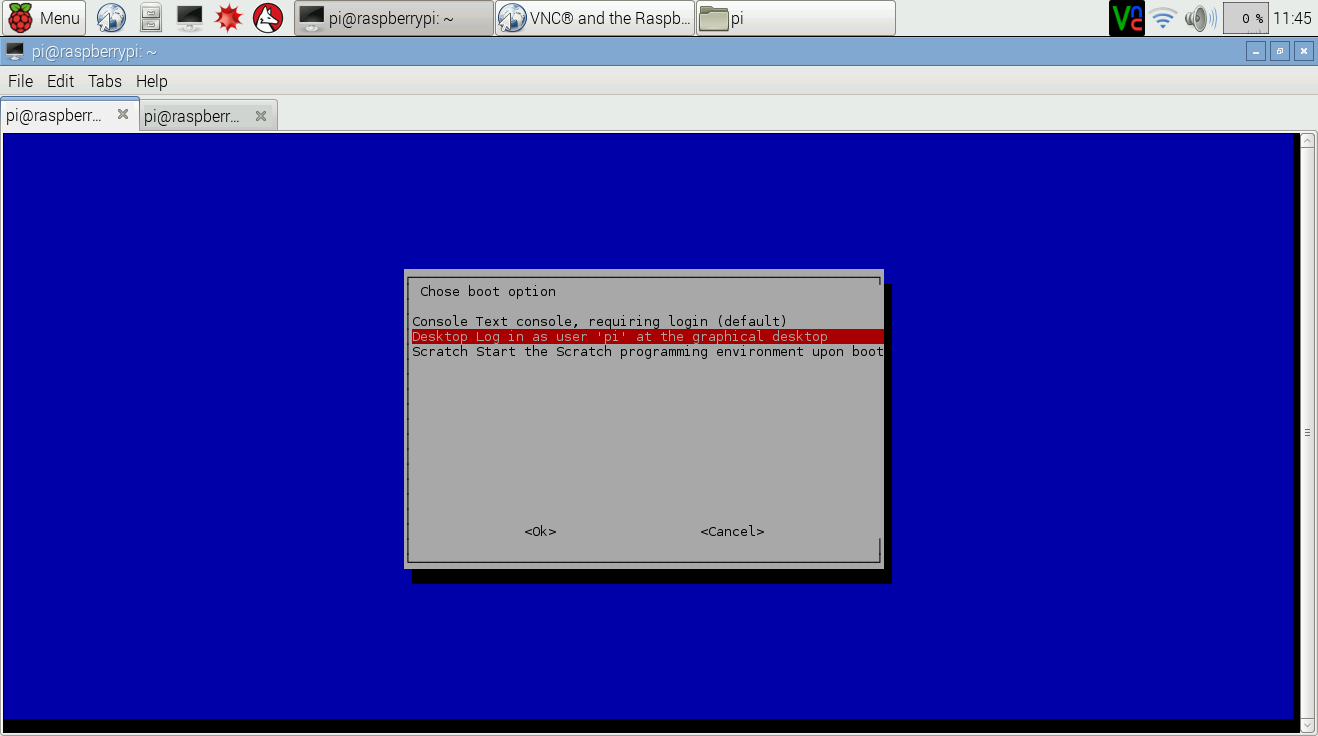
In this instance we will focus on option 3 which changes the boot sequence. Navigate using the cursor keys and press Enter to confirm.
In the next menu look for the entry that states boot to desktop, navigate to it and press Enter. You will be taken back to the main menu, navigate to Finish and you will be asked to reboot your Pi, do so.
Testing, testing!!!
So we have configured our Raspberry Pi to start the VNC server on boot so we need to test it out. Ensure that your Raspberry Pi is powered down. Remove all of the connections from your Pi.
Connect your Raspberry Pi using the Ethernet lead to your Windows laptop. Next connect plug in the micro usb lead into the power socket of your Pi and attach the other end to one of your laptop USB ports. Power up your laptop and your Pi will also spring into life.
As we configured our laptop earlier it will automatically connect to the network which is our Ethernet cable between the Pi and laptop.
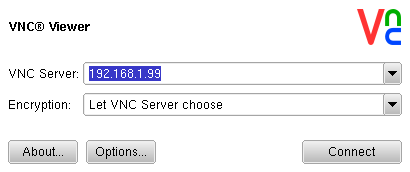
Using the VNC viewer application on Windows is really easy.
Open the application and enter the IP address that you set for your Raspberry Pi.
Click connect and when prompted enter your password. After a few seconds you will then see the Raspbian desktop. Congratulations you are controlling your Pi over a network connection.
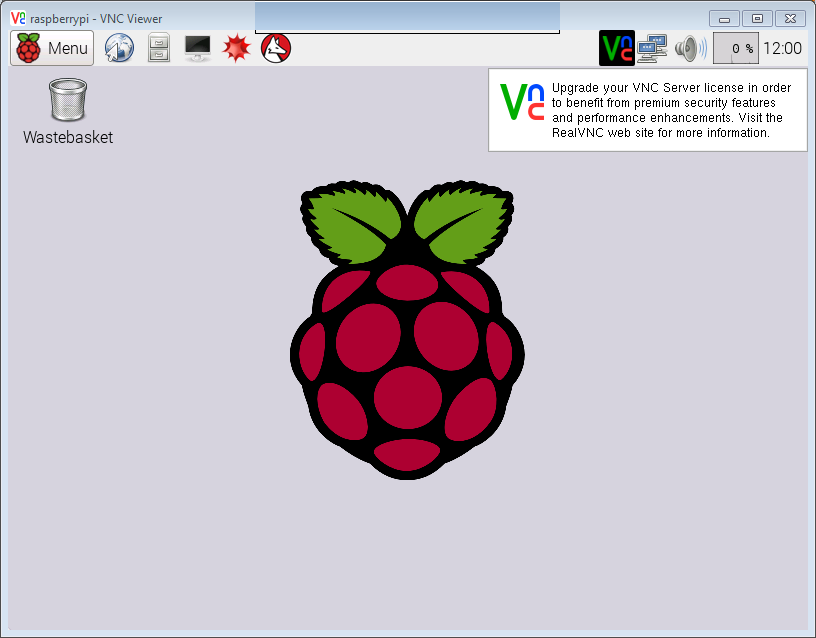
Errr what about SSH Les?
You're right we never really used it, but that's cool as it is there in case things go wrong :)
Using putty on your Windows laptop is easy, navigate to where you saved the file and double click it to run.
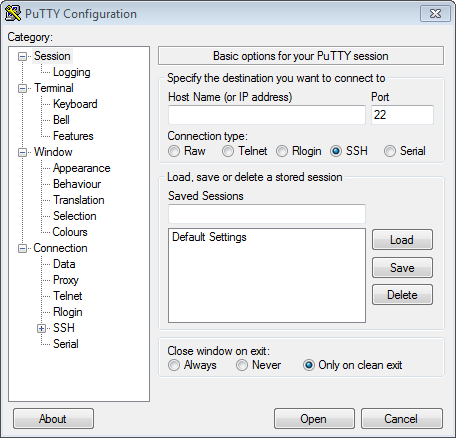
The first screen you will see has a blank box labelled Host Name (or IP address) in here enter the static IP address for your Raspberry Pi. Now click on Open and a new dialog will appear, this is asking who to log in as, in this case it is the user pi and your password is raspberry.
After a few moments you will be logged in to your Raspberry Pi's terminal enabling you to remote control robots or other projects. But you will not be able to launch any graphical applications such as Sonic Pi or Minecraft in this session.
Daily Use
Don't worry we will not have to recreate these steps for day to day use. For normal use.
- Insert the Ethernet cable between the Raspberry Pi and laptop.
- Insert the USB to micro USB lead from laptop to power socket on Pi.
- Power up laptop.
- Start VNC Viewer on Windows
- Enter IP address of your Pi
- Give password
- SUCCESS!!!
You can now hack your Pi while being mobile! Enjoy your new found mobile hack solution!
Limitations
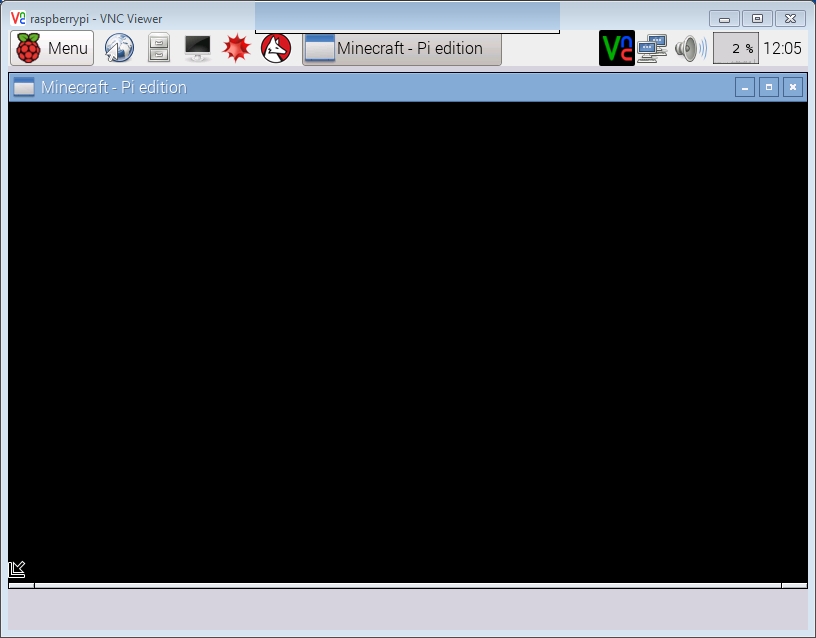
Yeah - this is Minecraft over VNC...totally unusable
VNC is a great tool but it does have limitations, chiefly among those is that Minecraft does not work over a VNC connection, so sad to say there is no Minecraft hacking on the move. Also applications that rely on audio such as Sonic Pi cannot transmit audio over the network. This can be mitigated by plugging a speaker / headphones into the Raspberry Pi.
Troubleshooting
We found during our tests that the resolution of the VNC session was rather low, in fact too low. We hacked a config file that can be found in the /boot directory of your Raspberry Pi. The file, config.txt can be edited like this.
sudo leafpad /boot/config.txt
Look for the line
# uncomment to force a console size. By default it will be display's size minus
# overscan.
#framebuffer_width=1280
#framebuffer_height=720
Edit those lines so they look like this
# uncomment to force a console size. By default it will be display's size minus
# overscan.
framebuffer_width=800
framebuffer_height=600
Save and reboot the Raspberry Pi. Wait for around a minute then reconnect using the VNC viewer for Windows. You should now have a higher resolution screen for your VNC session.