Tooling Tuesday - HCSR04P Ultrasonic Sensor

This Tuesday we take a look at a simple sensor, used throughout the community to build robots, traps and theremins...
tl;dr Where can I buy one?
In the UK you can pick them up for around £2.34 + P&P from 4tronix
So what is it?
The HCSR04P is an ultrasonic sensor that uses a short burst of ultrasonic sound to detect objects in its path.
I've seen these before!

Well you will have seen the HCSR04 (Right in the image above) before, it is a common component in robotics projects, but it has a sting in the tail! It is a 5V compliant device, so that means to use it with a 3V logic board (Raspberry Pi, micro:bit, Adafruit) we need to create a voltage divider.
A what?
In electronics, a voltage divider (also known as a potential divider) is a passive linear circuit that produces an output voltage (Vout) that is a fraction of its input voltage (Vin). Voltage division is the result of distributing the input voltage among the components of the divider. A simple example of a voltage divider is two resistors connected in series, with the input voltage applied across the resistor pair and the output voltage emerging from the connection between them.
Source: Wikipedia
Voltage dividers aren't too difficult, but if I want a class to get making, then if I can skip this step I will (for now) so that they can build a robot / distance sensors / ultrasonic triggered death ray.
Spot the difference
As I said earlier, the HCSR04 and the HCSR04P look very similar and you can easily get the wrong one.
Looking at them face on

On the left is the HCSR04P, on the right the HCSR04. The HCSR04 has a silver component between the "eyes" not present on the P version.
Looking around the back

Around the back we can see that the HCSR04P is named as such in the top left of the sensor, and all of the chips are horizontal! On the HCSR04 the right hand chip is vertical! Be careful purchasing the HCSR04P as some sellers may send the wrong one!
So how does it work?
There are two "eyes" on the sensors. The left eye is the Trigger which sends the pulse of ultrasound forwards to find an obstacle. When the sound hits an obstacle it will bounce back and be received by the echo eye. Then in your language of choice all we need to do is a little maths (So my Maths teacher, Mr Hinchcliffe was right about Maths...damn!) to work out the distance based on the time it took for the journey, then divide it by 2 (as we don't need the distance there, and back!
The Maths Part
So the distance to an object is calculated as
Distance = Speed * Time
So if we are working in Metres, the Speed part of the calculation is the speed of sound in Metres per second, which is 343 m/s and the time is calculated by the subtracting the start time of the pulse, from the end time. This gives us the journey time, or Time.
Give me an example please!
Ok for this we need
- Any model of Raspberry Pi setup ready for use
- Raspbian OS
- HCSR04P
- 4 x Female to Female jumper wires
Connect the sensor
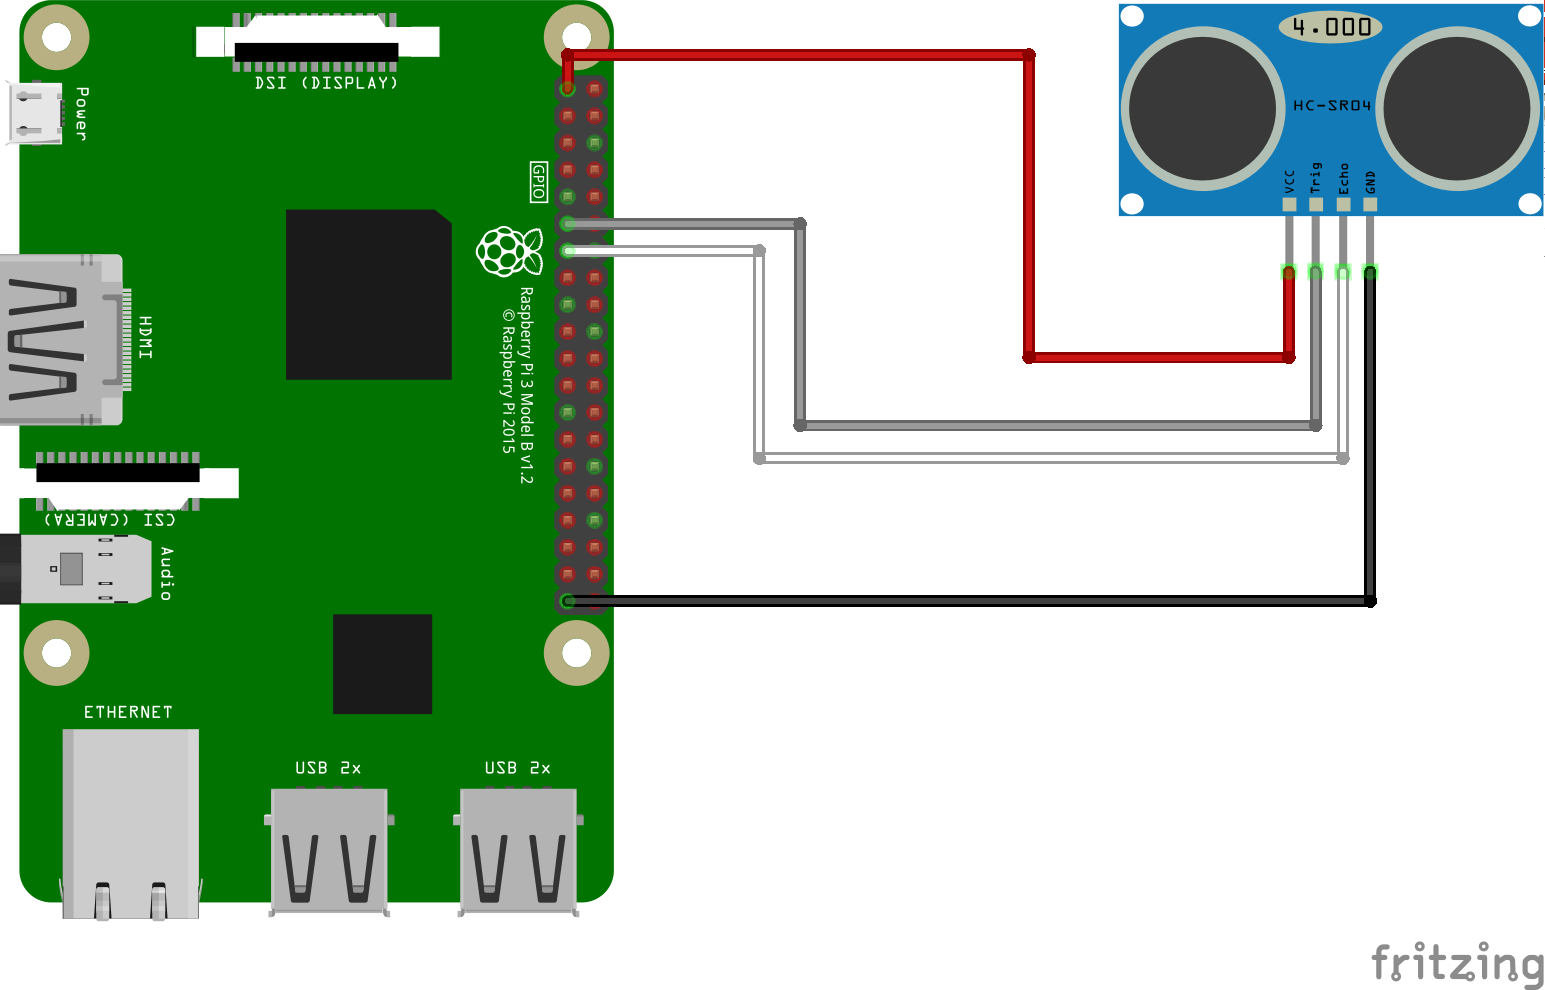
The HCSR04P can be directly connected to the Raspberry Pi with no need for any resistors to form a voltage divider. So the connections are as so
| HCSR04P | Raspberry Pi |
|---|---|
| VCC | 3V3 |
| Trigger | GPIO17 |
| Echo | GPIO27 |
| GND | Any GND |
Circuit Diagram

Power up your Pi!
For this we shall use the GPIO Zero library written by Ben Nuttall, specifically the DistanceSensor class designed for just this type of sensor.
Open your favourite Python editor and lets start writing the code.
First we import the DistanceSensor class from gpiozero, and then import the sleep function from the time library.
from gpiozero import DistanceSensor
from time import sleep
The next step is to tell Python where our HCSR04P sensor is, and for that we create an object called sensor and then we call the DistanceSensor class and pass two arguments, these are the pins that we are using for the Trigger and Echo
sensor = DistanceSensor(trigger=17,echo=27)
So how can we keep checking the distance? Well we need a loop for that, and the most basic loop we can use iswhile True: which will run the code forever.
while True:
The code that will run inside this loop is now indented to show that it belongs in the loop.
In Python we can indent using spaces or tab key presses. Typically one tab press is equal to four spaces. Do not mix them up, or Python will get cranky!
Inside the loop there are two lines, the first is a print statement that will print a message to the Python shell. But inside the message is sensor.distance, this class handles all of the maths needed to calculate the distance from an object. Then at the end of the print statement we add 'm' to denote that all measurements are in metres.
The last line is sleep and we use it to pause the loop for one second.
    print('Distance to nearest object is', sensor.distance, 'm')
    sleep(1)
Complete Code Listing
from gpiozero import DistanceSensor
from time import sleep

sensor = DistanceSensor(trigger=17,echo=27)

while True:
    print('Distance to nearest object is', sensor.distance, 'm')
    sleep(1)
Save the code, and then run it!

Here is the output when I ran it over SSH from my computer.
But what if you want to see the distance in centimetres?
Inside the loop we would need to create a variable called distance and in there store the sensor.distance (in metres) and then multiply it by 100.
distance = sensor.distance * 100
Then we need to change the print statement so that it prints the contents of the distance variable...oh and change 'm' to 'cm'!
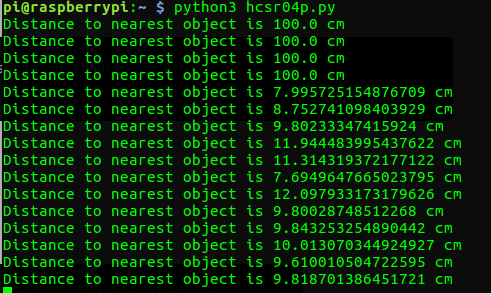
print('Distance to nearest object is', distance, 'cm')

Run the code and you should see this!
Conclusion
The HCSR04P makes using an ultrasonic sensor an utter delight! It is compatible with 3V and 5V logic, so it can be used with Arduino, Pi and micro:bit etc. And we can get them cheap!
Well worth picking up for the bits box!
Where can I buy one?
In the UK you can pick them up for around £2.34 + P&P from 4tronix
Happy hacking!