Friday Fun: Micro Weather Station
Back again with some more Friday Fun!
The weather! A source of conversation that as an Englishman I am well versed in.
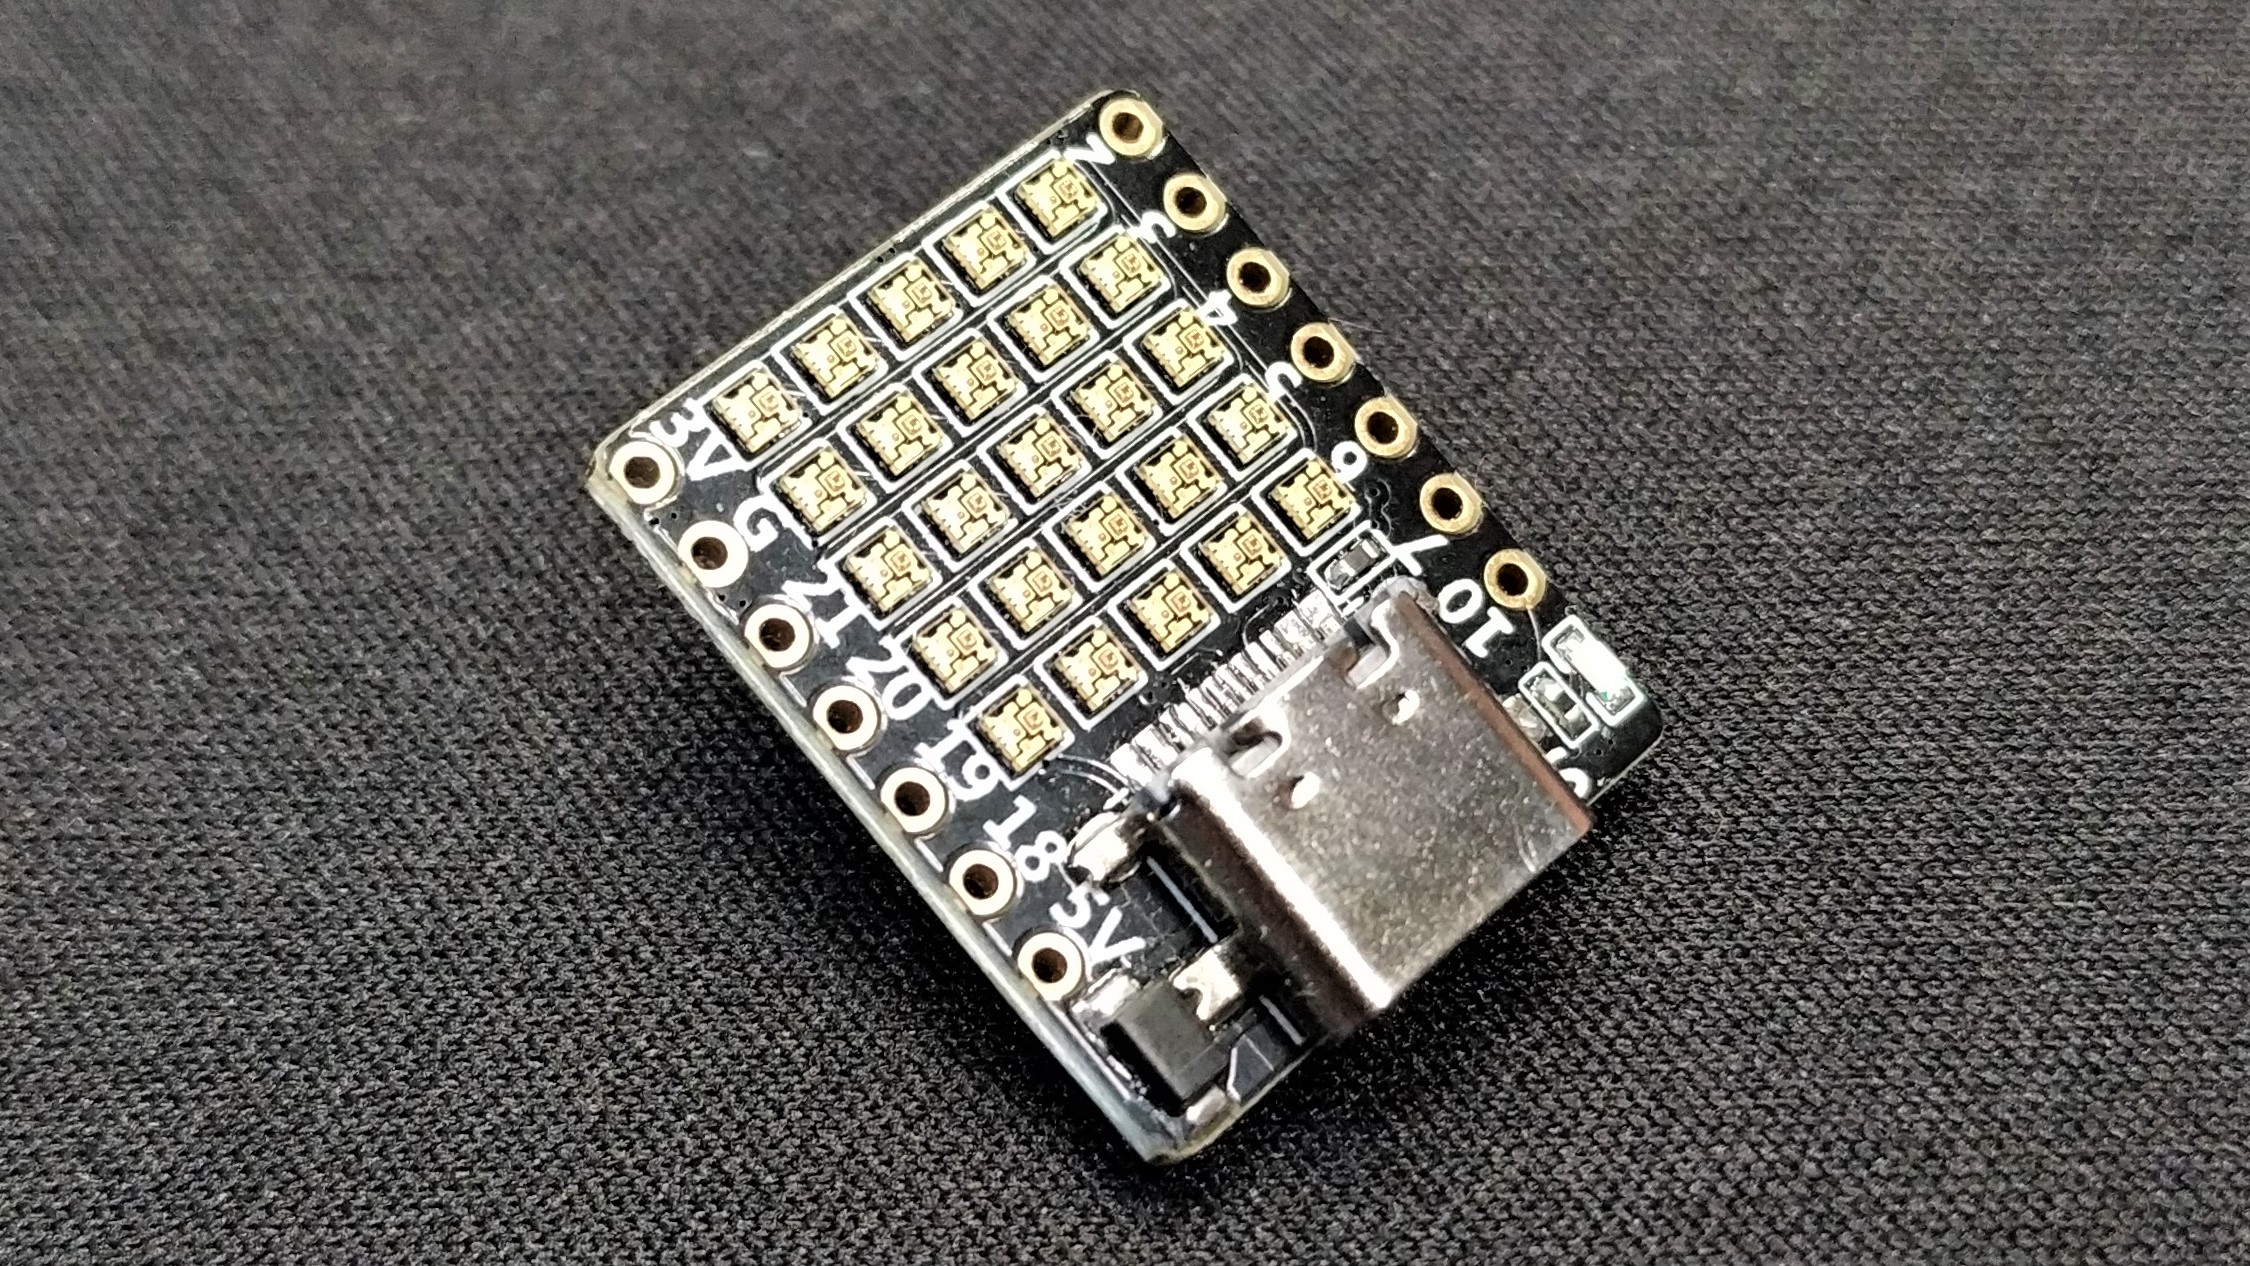
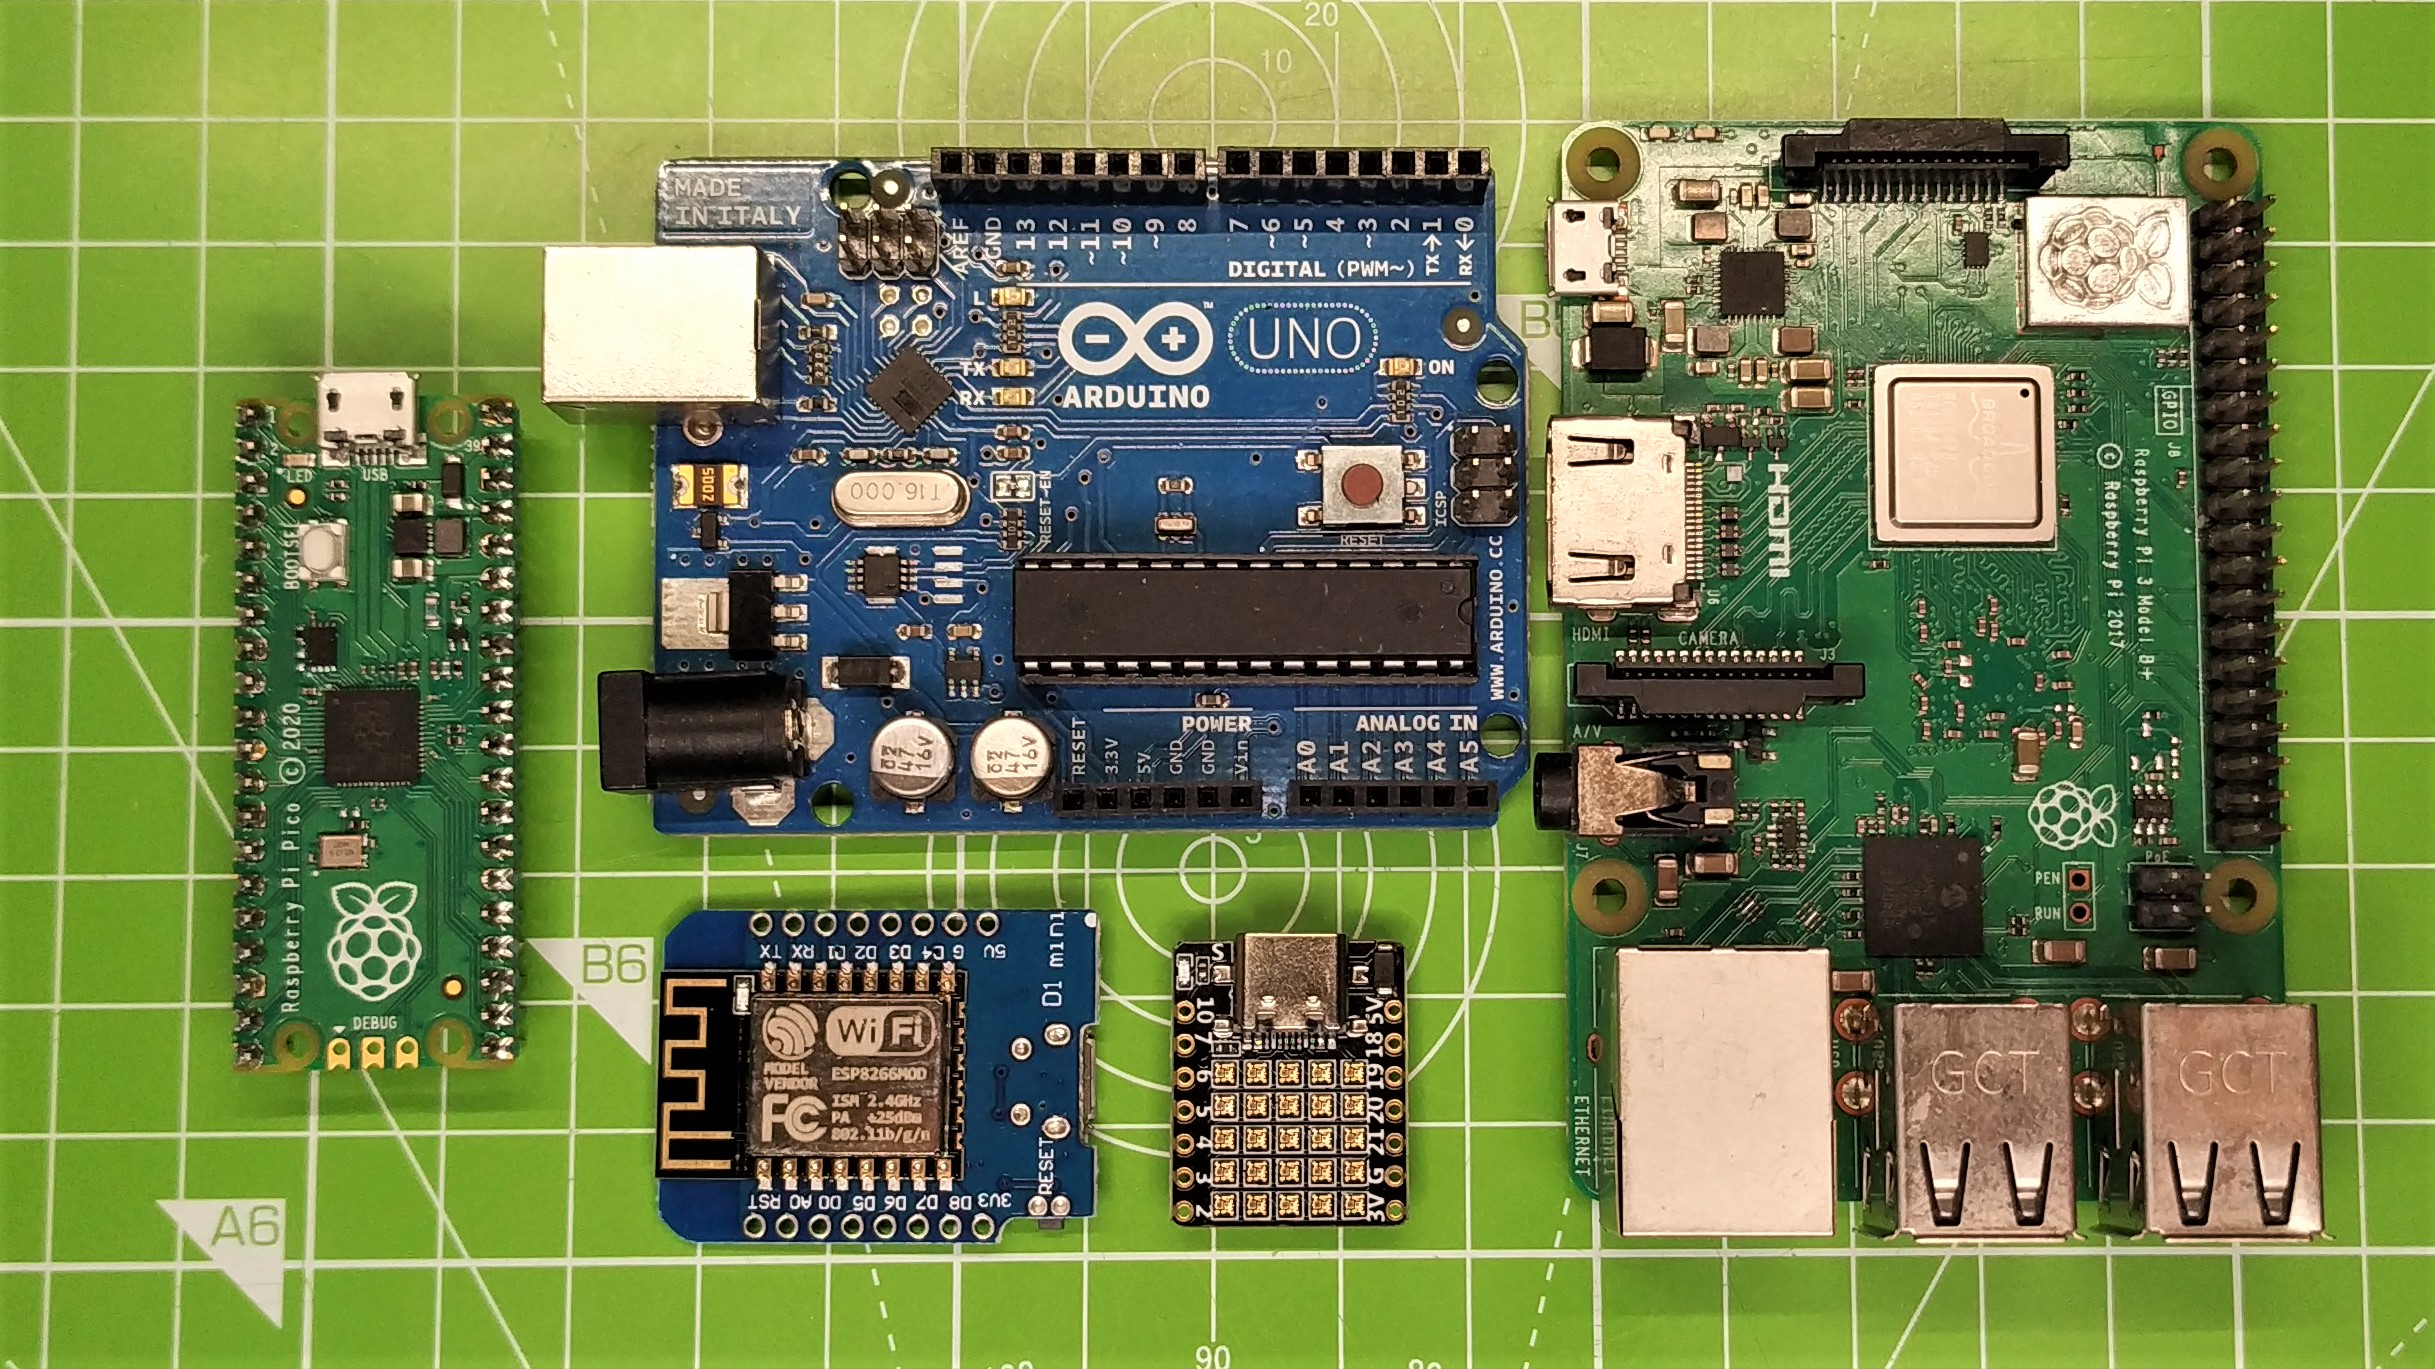
Weather projects are popular citizen science projects. We can build them with an Arduino, ATtiny85, Raspberry Pi and even an ESP8266. But this blog post, (the first Friday Fun since 2020!) we'll test out the new ESP32 C3 powered by a RISC-V processor to create an all-in-one weather station that displays the weather as an icon via the onboard 5x5 WS2812 RGB LED matrix. This board comes from 01space, a company that I have only recently come across. But if this board is anything to go by, we are in good hands.

This project was inspired by an older MicroPython weather station project. for that project I used a Wemos D1 Mini (an ESP8266) along with Pimoroni's Unicorn HAT 8x8 NeoPixel LED matrix and a capacitive touch sensor to show the weather inside a plastic cloud desk toy (#Pounderland).
Thanks
Before we get too far into the project, I want to say thanks to Andy Piper who has done some remarkable work documenting this rather fun little board. Go and read Andy's great work then come back for the hack!
For this project you will need
- ESP32-CH34G-RGB
- Soft drink / coffee as this is a long post.
Quick Video to show the board in action
I collated all of the video from a Twitter thread that I used to document my progress and put them into one handy YouTube video.
Download the code
Disco Mode ACTIVATE! pic.twitter.com/7Zgwd8IicH
— biglesp (@biglesp) April 15, 2022
I've put all of the code in a GitHub repo, ready for use. So if you are in a rush, use that instead. I've also included a special version with added "disco" mode.
ESP32-C3FH4-RGB Specifications
| Purchase Link | Banggood |
|---|---|
| SoC | ESP32-C3FH4 2.4 GHz Wi-Fi Bluetooth 5 (LE) |
| RAM | 400KB SRAM |
| Storage | 4MB Flash |
| GPIO | 11 x General purpose pins |
| Stemma QT / Qwiic compatible connector | |
| 5 x 5 WS2812 / NeoPixel RGB LEDs | |
| Dimensions | 21 x 18mm |
Is it any good?
For £10 this is a great little board. MicroPython support is awesome and we can be up and running rather quickly. If you've been on the fence about the ESP32, then grab one of these and have some fun.
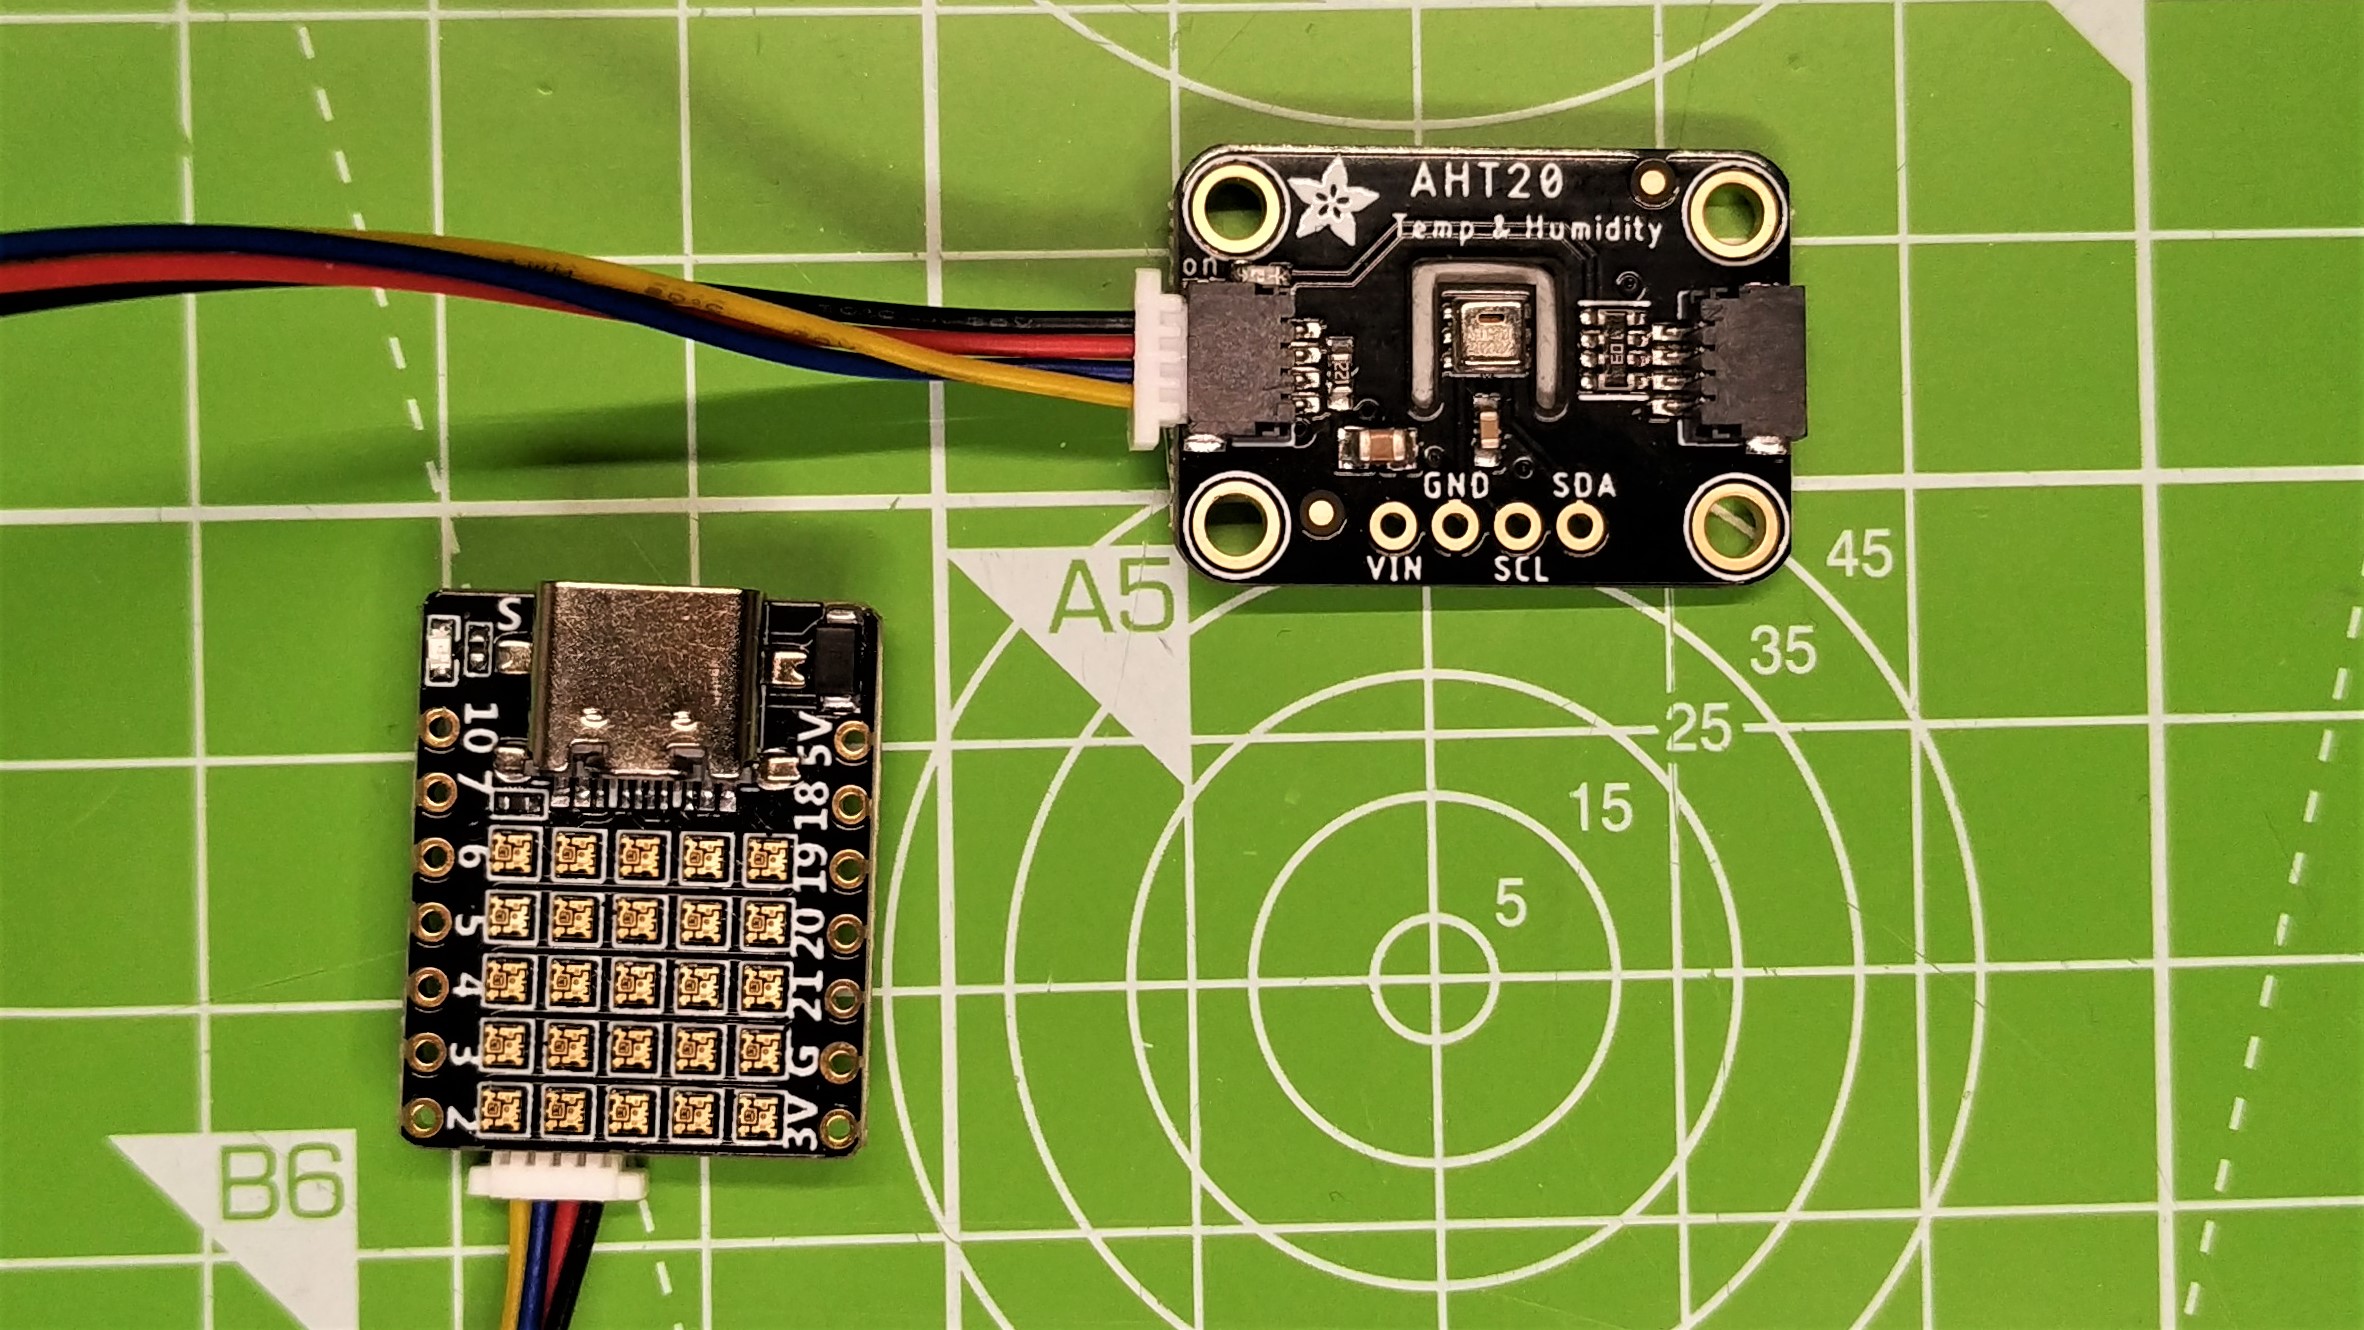
I tested the Stemma QT / Qwiic connector, in reality a four pin I2C connector, with an AHT20 temperature sensor and an MPR121 capacitive touch sensor. Both worked with only minimal software tweaking. I followed Andy's guidance on using SoftI2C and specified the GPIO pins for the connector. Then I tried to use upip to install the modules for the AHT20 and MPR121 but they failed to install, weird. No issue, as I downloaded the files from their respective GitHub repos and manually copied them to the board.
The one thing that this board is missing is a pinout showing the various options for the GPIO pins. There is a schematic on the 01Space Github page but I'd love to learn more about the pins.
5x5 NeoPixel Matrix
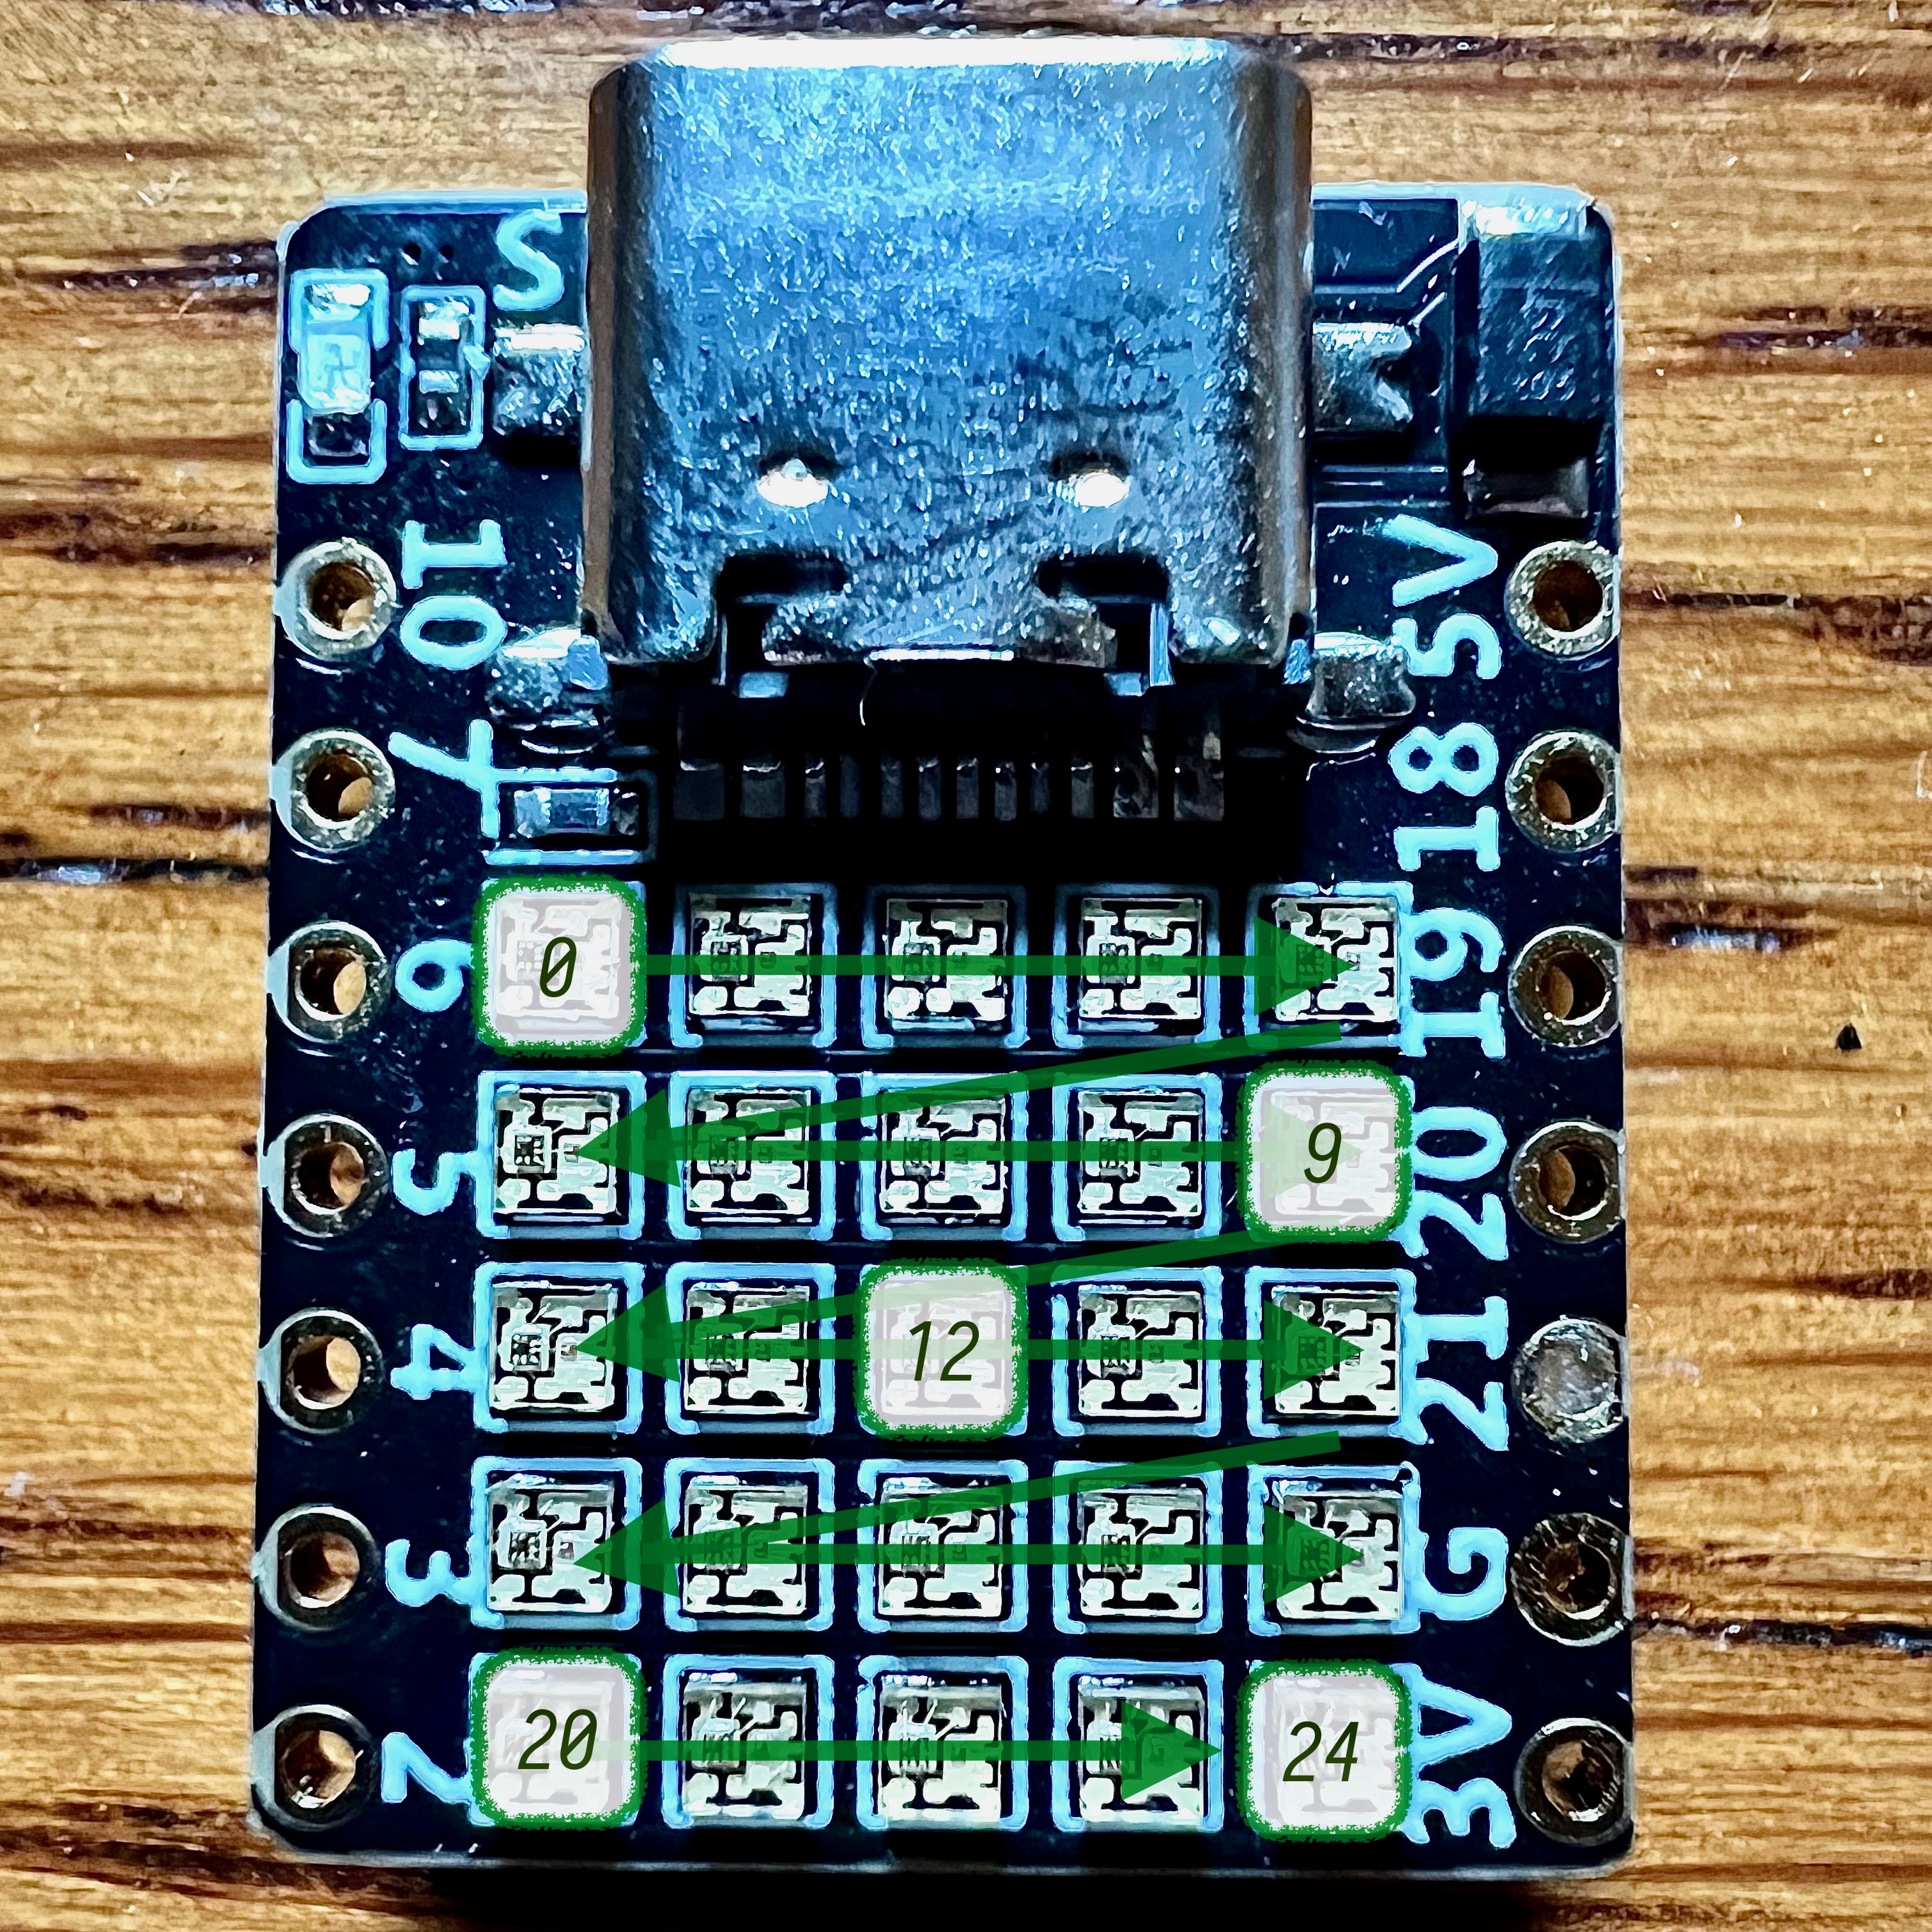
Image Credit: Andy Piper https://github.com/andypiper/fivebyfive
Andy once again saves the day, and has kindly annotated the order in which the Neopixels are laid out. At the top left is 0, bottom right is 24. We move across the pixels from left to right, then move down to the next line to repeat the process.
Thanks Andy!
Setting up your ESP32 C3
Flashing MicroPython to the board
My chosen language for the ESP32 C3 is MicroPython. I've long been a fan of this microcontroller centric version of Python 3 and it enables me to get a project done without much fuss.
The ESP32 C3 doesn't come with MicroPython preinstalled, so we need to download the latest version and flash it to our board.
- Download the latest firmware to your computer. The latest stable release is always behind the nightly builds. I used the latest nightly build (April 14 2022) and had no issues.
- Install esptool.py to your machine using the pip package manager. Developed as a means to flash firmware to Espressif chips, esptool.py is a command line application that is easy to use, but can be daunting for new users.
Linux
sudo pip3 install esptool
Windows
pip install esptool
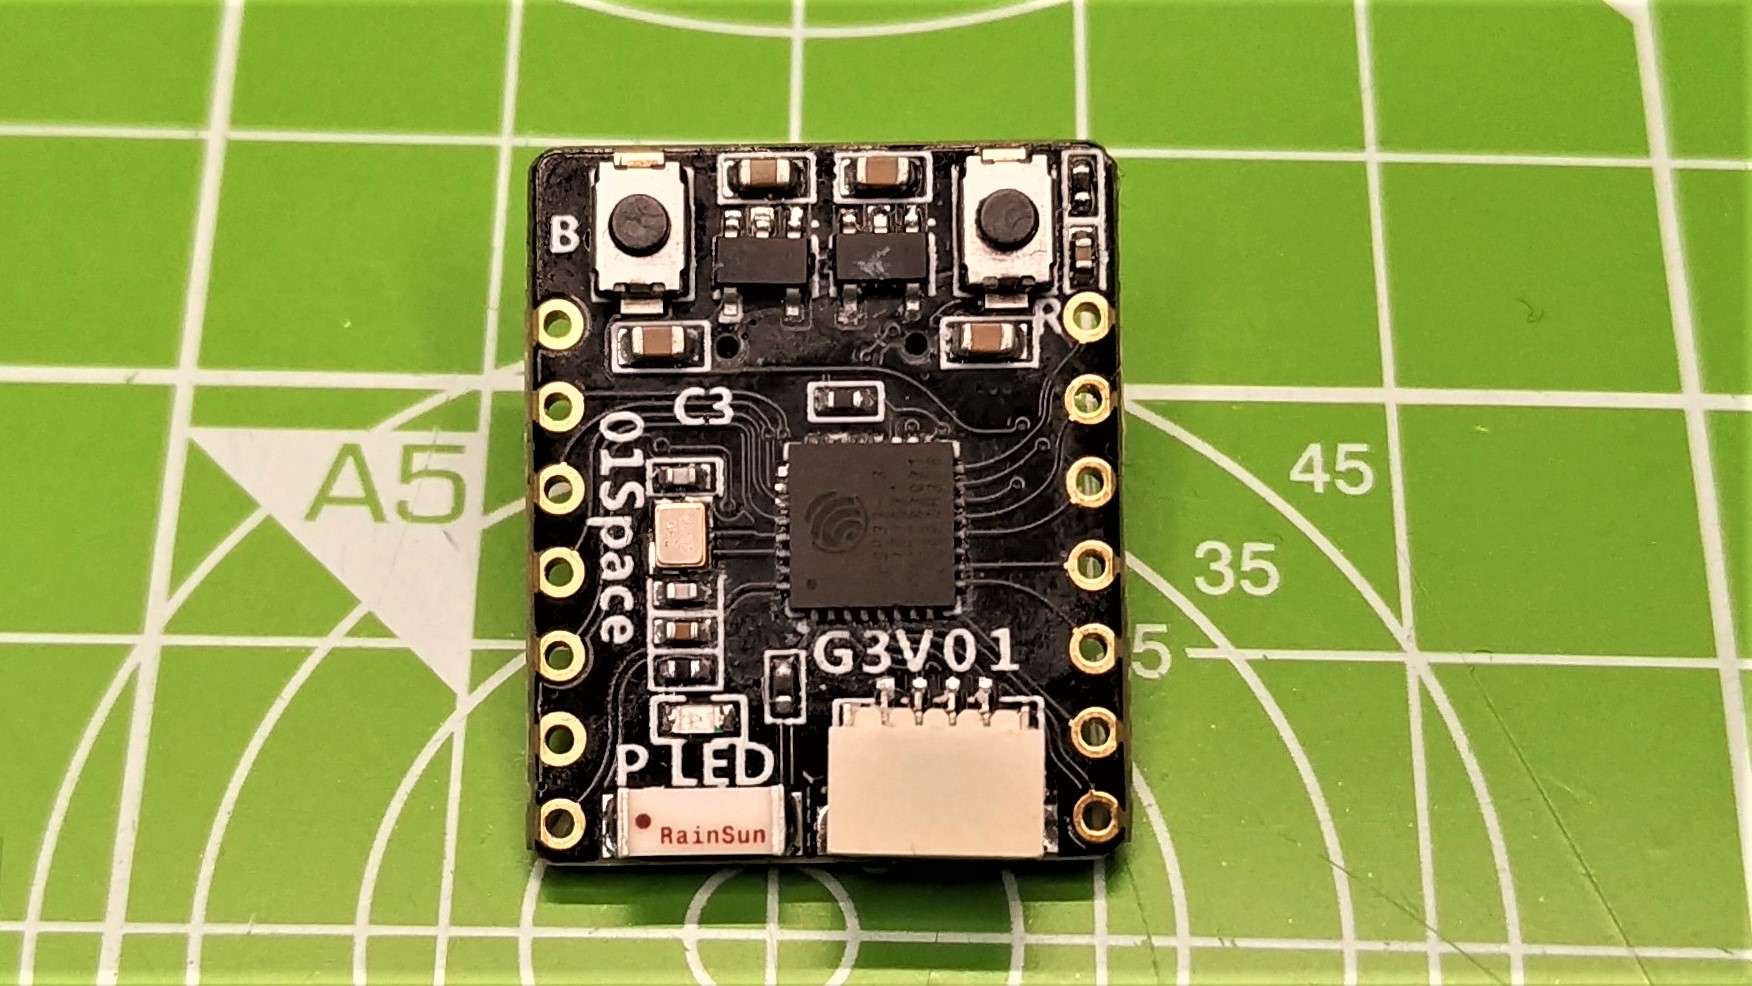
- Connect the ESP32 C3 to the computer using a USB lead. Press and hold button B and then quickly press Reset to go into bootloader mode. This will enable esptool to communicate with the ESP32.
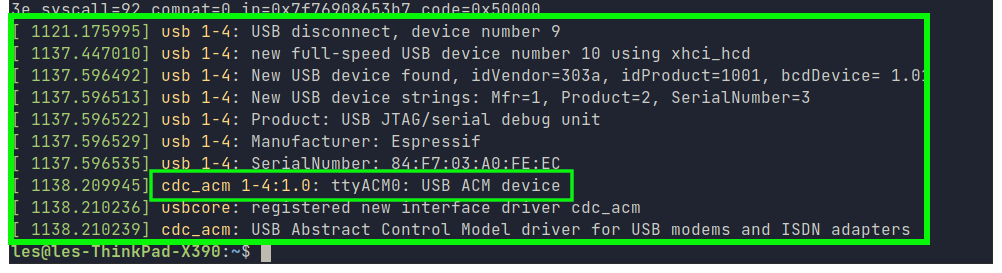
- In a terminal use dmesg to discover the USB port for the board. Make a note of the port as we need it for the next step On Linux this is typically /dev/ttyXXXX. The XXXX can be ACM0 or USB0. Windows users will need to look in the Device Manager to discover the COM port, os you can use this Serial Port Notifier to automatically alert you to the port.
- Use the esptool command to clear the flash storage. Double check that you have the correct device before pressing ENTER. Replace the --port argument with the port of your board. In my case it was /dev/ttyACM0 . Windows users, make sure to change this to the COM port.
esptool.py --chip esp32c3 --port /dev/ttyACM0 erase_flash
- Use the esptool to flash the new firmware. Make sure to use the correct file path and name for the firmware that you downloaded in step 1.
esptool.py --chip esp32c3 --port /dev/ttyACM0 --baud 460800 write_flash -z 0x0 esp32c3-usb-20220415-unstable-v1.18-355-g9ab66b50c.bin
- Leave esptool to do its thing until control of the terminal is returned to you.
- Connect to the ESP32 C3 serial console using tio. Tio is the simplest way to connect to serial console but you can also use screen. Windows users can use PuTTY to make a connection.
- You should now have a MicroPython REPL (Read, Eval, Print, Loop) shell. I used a simple for loop to demonstrate that I can interactively run code.

Setting up Wi-Fi
You'd be forgiven for thinking that it would be tricky to setup Wi-Fi on such a small board, but MicroPython makes it really easy.
I'm going to create two files.
main.py
This is the code that will run when the board is powered up.
secrets.py
In here I will store my Wi-Fi credentials.
I'm going to start with secrets.py.
- In your favourite text editor, create a new blank file called secrets.py.
- Create two variables, SSID and PW. For SSID type in the name of your Wi-Fi access point. For PW type in your Wi-Fi password. Both should be a string.
SSID = "YOUR WIFI HERE"
PW = "YOUR WIFI PASSWORD HERE"
- Save the file to your computer.
Now I move on to main.py. As you can guess, this is the main file for the code that powers the project.
- In your favourite text editor, create a new blank file called main.py.
- Import three modules. The first is network, the second is secrets and the third is time. Network contains the functions that we need to make a Wi-Fi connection. Secrets contains two variables, SSID and PW, which are used to keep Wi-Fi login details separate from the main code. The time module is used to add a pause in the code.
import network
from secrets import SSID, PW
import time
- Create and activate a station interface, a means to use the Wi-Fi chip on the ESP32 C3.
wlan = network.WLAN(network.STA_IF)
wlan.active(True)
- Using the SSID and PW (password) from the secrets module, connect to the Wi-Fi access point.
wlan.connect(SSID, PW)
- Add a short pause of five seconds to enable the Wi-Fi connection to be made.
time.sleep(5)
- Check that the connection has been made. This will print True or False to the REPL.
print(wlan.isconnected())
- **Print the Wi-Fi connection details to the REPL. **This will print the IP address of the ESP32 C3 to the REPL.
print(wlan.ifconfig())
- Save the code to the computer as main.py.
Main.py code listing
import network
from secrets import SSID, PW
import time
wlan = network.WLAN(network.STA_IF)
wlan.active(True)
wlan.connect(SSID, PW)
time.sleep(5)
print(wlan.isconnected())
print(wlan.ifconfig())
Wait! How do I get my code onto the ESP32 C3?
I've found the easiest method is to use Adafruit's ampy, a tool that I have dedicated an entire blog post to. But I'll also do a quick run through here.
- Install Ampy to your computer via pip.
Linux
sudo pip3 install adafruit-ampy
Windows
pip.exe install adafruit-ampy
- In the terminal, go to the directory where the main.py and secrets.py files are located.
- Using Ampy, copy main.py to the ESP32 C3. Linux users, you will need to know the port and specify it as an argument. Windows users do not have to do this.
ampy --port /dev/ttyACM0 put main.py
- Use the same command to copy secrets.py to the ESP32 C3.
ampy --port /dev/ttyACM0 put secrets.py
- Press the Reset button on the ESP32 C3 to load the freshly copied code. In the REPL (Tio will keep this running, but PuTTY may need to reconnect) you will see True followed by the IP address for the ESP32 C3. If you don't see this, then there is an error and you will need to trace the issue.
Get your free Open Weather API Key
I have long been a user of Open Weather. From the back of the classroom at Picademy in 2014 I coded my first weather project. In 2019 I then made the Wemos D1 Mini version, which this ESP32 C3 project supersedes.
To use the great service, you need an API key and to get one all you need to do is sign up.
- Go to Open Weather and sign in / sign up for a free account.

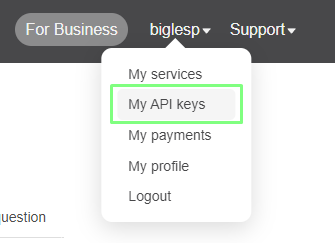
- Click on your username in the top right of the window and select "My API keys".
- If you already have a key, copy the key. If not, create a new key and give it a relevant name.

- Use the key in the project code later in this tutorial.
So now we make a weather station!
Yes we do! We're going to edit the main.py file to create code that will autostart when the ESP32 C3 is powered up.
The startup process will be as follows
- Connect to Wi-Fi
- Create a connection to the onboard 5x5 RGB LED matrix.
- Create a series of lists to store the position of each RGB LED that is used to draw the icon on the matrix.
- If connection works
- Make the 5 x 5 LED matrix flash green three times.
- else:
- Make the 5 x 5 LED matrix flash red three times.
- Create a loop
- Get the weather data as a JSON object.
- Grab the main weather headline
- Use an if, elif, else conditional test to show the correct weather icon.
- Sleep for 10 seconds.
- Loop back.
- Import a series of modules to enable the project. Network for our Wi-Fi, time to control the project's pace, urequests to download the weather data. The Pin class from machine is used to control the GPIO pins. NeoPixel to control the 5x5 RGB LED matrix and secrets for the SSID and Wi-Fi password.
import network
import time
import urequests
from machine import Pin
from neopixel import NeoPixel
from secrets import SSID, PW
- Setup the NeoPixel RGB matrix and create a connection between the code and the LEDs. The NeoPixels are connected to GPIO pin 8, and there are 25 (55) pixels in total.
neopin = Pin(8, Pin.OUT)
pixels = 25
np = NeoPixel(neopin, pixels)
- Create lists that will create icons to cover the possible weather types. Each list tells the code which pixels should be lit to make the icons. We'll specify the colour later. Some icons, such as rain1, rain2 lightning_cloud, lightning and fail, fail2 have two lists so that we can animate the icons. I used a spreadsheet to work out the values for each icon.
sun = [2,6,7,8,10,11,12,13,14,16,17,18,22]
cloudy = [7,11,12,13,15,16,17,18,19]
rain_cloud = [7,11,12,13,15,16,17,18,19]
rain1 = [0,4,5,9,10,12,14,17,22]
rain2 = [2,7,10,12,14,15,19,20,24]
lightning_cloud = [2,6,7,8,10,11,12,13,14,16,18,20,22]
lightning = [3,7,11,12,13,17,21]
snow_ice = [0,2,4,7,10,11,12,13,14,17,20,22,24]
fail = [0,4,6,8,12,16,18,20,24]
fail2 = [2,7,10,11,12,13,14,17,22]
- Setup the Wi-Fi. This is the same as in our test before.
wlan = network.WLAN(network.STA_IF)
wlan.active(True)
wlan.connect(SSID, PW)
time.sleep(5)
print(wlan.isconnected())
print(wlan.ifconfig())
- Create a loop that will flash the RGB LEDs green, three times for a successful Wi-Fi connection. The np.fill() function takes RGB colour codes, in this case R = 0, G = 16 and B = 0. This creates a low brightness green flash. Don't set it too high, these NeoPixels are really bright!
if wlan.isconnected() == True:
	for i in range(3):
		np.fill((0,16,0))
		np.write()
		time.sleep(0.1)
		np.fill((0,0,0))
		np.write()
		time.sleep(0.1)
- Add an else condition to indicate when the ESP32 C3 fails to connect to Wi-Fi. If the Wi-Fi fails to connect, we want to see three red flashes.
else:
	for i in range(3):
		np.fill((16,0,0))
		np.write()
		time.sleep(0.1)
		np.fill((0,0,0))
		np.write()
		time.sleep(0.1)
- Add a three second pause to the code.
time.sleep(3)
- Create a loop to run the weather fetching part of the code.
while True:
- Download the latest weather data as a JSON object from the Open Weather service using your API key and location. Make sure to replace --YOUR OPEN WEATHER API KEY HERE-- with your real API key. I set my location to Blackpool, UK. Make sure to change it to your location. We use urequests, a version of Python's requests for micro-controllers to get the JSON data from Open Weather's API.
r = urequests.get("http://api.openweathermap.org/data/2.5/weather?q=Blackpool,UK&appid=--YOUR OPEN WEATHER API KEY HERE--").json()
- Strip out the main weather type from the returned data and save it to a variable called weather then print the contents to the REPL. The JSON object is essentially a Python dictionary and we can pull exact values from the object by knowing the keys. Here we pull the "main", "weather" values and save them to the weather variable.
    weather = r["weather"][0]["main"]
    print(weather)
- If the weather is Clear (sunny) then we use the values stores in the sun list to draw a simple sun icon and set the colour to orange (almost), then we pause for 10 seconds before turning off all the LEDs.
	if weather == "Clear":
		for value in sun:
			np[value] = (255,265,0)
			np.write()
		time.sleep(10)
		np.fill((0,0,0))
		np.write()
- If the weather is "Clouds" then we draw a cloud to the LED matrix.
	elif weather == "Clouds":
		for value in cloudy:
			print(value)
			np[value] = (8,8,8)
			np.write()
		time.sleep(10)
		np.fill((0,0,0))
		np.write()
- If the weather is "rain" then we use two for loops to create an animation. The first will create an icon using the values in rain 1, then pause for 0.5 seconds before using the values in rain2. By doing this quickly and looping 10 times it create a basic animation of rain.
	elif weather == "Rain":
		for i in range(10):
			for value in rain1:
				np[value] = (0,8,8)
				np.write()
			time.sleep(0.5)
			np.fill((0,0,0))
			np.write()
			for value in rain2:
				np[value] = (0,8,8)
				np.write()
			time.sleep(0.5)
			np.fill((0,0,0))
			np.write()
- Use another series of for loops to create a thunderstorm animtion. If the weather is a thunder / lightning then we get another animation of a thunder cloud and lightning flash.
	elif weather == "Thunderstorm":
		for i in range(10):
			for value in lightning_cloud:
				np[value] = (8,8,8)
				np.write()
			time.sleep(0.5)
			np.fill((0,0,0))
			np.write()
			for value in lightning:
				np[value] = (8,8,0)
				np.write()
			time.sleep(0.5)
			np.fill((0,0,0))
			np.write()
- Create an icon for when the weather is "Snow". This will draw a snowflake on the LED matrix.
	elif weather == "Snow":
		for value in snow_ice:
			np[value] = (0,8,8)
			np.write()
		time.sleep(10)
		np.fill((0,0,0))
		np.write()
- Create a fail animation, triggered when the code fails to get the weather data. This animation is a rotating red cross. In reality it is a red + and x that appears to rotate.
	else:
		print("No Weather Data")
		for i in range(10):
			for value in fail:
				np[value] = (128,0,0)
				np.write()
			time.sleep(0.5)
			np.fill((0,0,0))
			np.write()
			for value in fail2:
				np[value] = (128,0,0)
				np.write()
			time.sleep(0.5)
			np.fill((0,0,0))
			np.write()
- Finally add a pause to the loop. The demo is set to 10 seconds, but for real life projects set this to 30 minutes / one hour.
time.sleep(10)
- Save the code to your computer as main.py
- Copy the code to the ESP32 C3 using Ampy. Remember to swap /dev/ttyACM0 to your port!
ampy --port /dev/ttyACM0 put main.py
Complete Code Listing
import network
import time
import urequests
from machine import Pin
from neopixel import NeoPixel
from secrets import SSID, PW # secrets.py file contains Wi-Fi details
from random import randint


#NeoPixel Setup
neopin = Pin(8, Pin.OUT)
pixels = 25
np = NeoPixel(neopin, pixels)

#Weather Icons
sun = [2,6,7,8,10,11,12,13,14,16,17,18,22]
cloudy = [7,11,12,13,15,16,17,18,19]
rain_cloud = [7,11,12,13,15,16,17,18,19]
rain1 = [0,4,5,9,10,12,14,17,22]
rain2 = [2,7,10,12,14,15,19,20,24]
lightning_cloud = [2,6,7,8,10,11,12,13,14,16,18,20,22]
lightning = [3,7,11,12,13,17,21]
snow_ice = [0,2,4,7,10,11,12,13,14,17,20,22,24]
fail = [0,4,6,8,12,16,18,20,24]
fail2 = [2,7,10,11,12,13,14,17,22]

#Wi-Fi Setup
wlan = network.WLAN(network.STA_IF)
wlan.active(True)
wlan.connect(SSID, PW)
time.sleep(5)
print(wlan.isconnected())
print(wlan.ifconfig())
if wlan.isconnected() == True:
	for i in range(3):
		np.fill((0,16,0))
		np.write()
		time.sleep(0.1)
		np.fill((0,0,0))
		np.write()
		time.sleep(0.1)
else:
	for i in range(3):
		np.fill((16,0,0))
		np.write()
		time.sleep(0.1)
		np.fill((0,0,0))
		np.write()
		time.sleep(0.1)
time.sleep(3)

while True:
	#Get the weather data
	r = urequests.get("http://api.openweathermap.org/data/2.5/weather?q=Blackpool,UK&appid=--YOUR OPEN WEATHER API KEY HERE--").json()
	weather = r["weather"][0]["main"]
	#Change the weather here to test the conditional tests.
	#weather = "Cats and dogs"
	print(weather)
	if weather == "Clear":
		for value in sun:
			np[value] = (255,265,0)
			np.write()
		time.sleep(10)
		np.fill((0,0,0))
		np.write()
	elif weather == "Clouds":
		for value in cloudy:
			print(value)
			np[value] = (8,8,8)
			np.write()
		time.sleep(10)
		np.fill((0,0,0))
		np.write()
	elif weather == "Rain":
		for i in range(10):
			for value in rain1:
				np[value] = (0,8,8)
				np.write()
			time.sleep(0.5)
			np.fill((0,0,0))
			np.write()
			for value in rain2:
				np[value] = (0,8,8)
				np.write()
			time.sleep(0.5)
			np.fill((0,0,0))
			np.write()
	elif weather == "Thunderstorm":
		for i in range(10):
			for value in lightning_cloud:
				np[value] = (8,8,8)
				np.write()
			time.sleep(0.5)
			np.fill((0,0,0))
			np.write()
			for value in lightning:
				np[value] = (8,8,0)
				np.write()
			time.sleep(0.5)
			np.fill((0,0,0))
			np.write()
	elif weather == "Snow":
		for value in snow_ice:
			np[value] = (0,8,8)
			np.write()
		time.sleep(10)
		np.fill((0,0,0))
		np.write()
	else:
		print("No Weather Data")
		for i in range(10):
			for value in fail:
				np[value] = (128,0,0)
				np.write()
			time.sleep(0.5)
			np.fill((0,0,0))
			np.write()
			for value in fail2:
				np[value] = (128,0,0)
				np.write()
			time.sleep(0.5)
			np.fill((0,0,0))
			np.write()
	time.sleep(10)
    ```

# Happy Hacking!