Monday Microcontroller: Adafruit CLUE
It looks like a micro:bit but what can an Adafruit CLUE-do ;) that a micro:bit can't?
So what is CLUE?
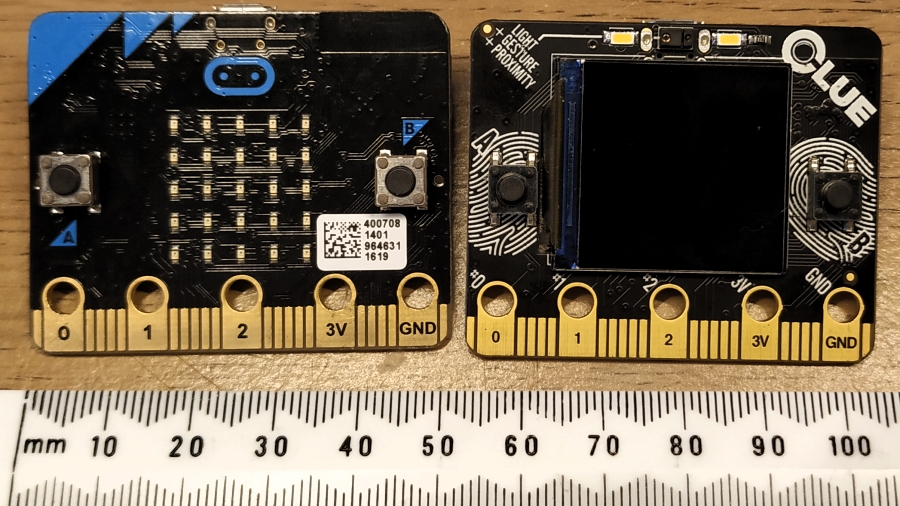
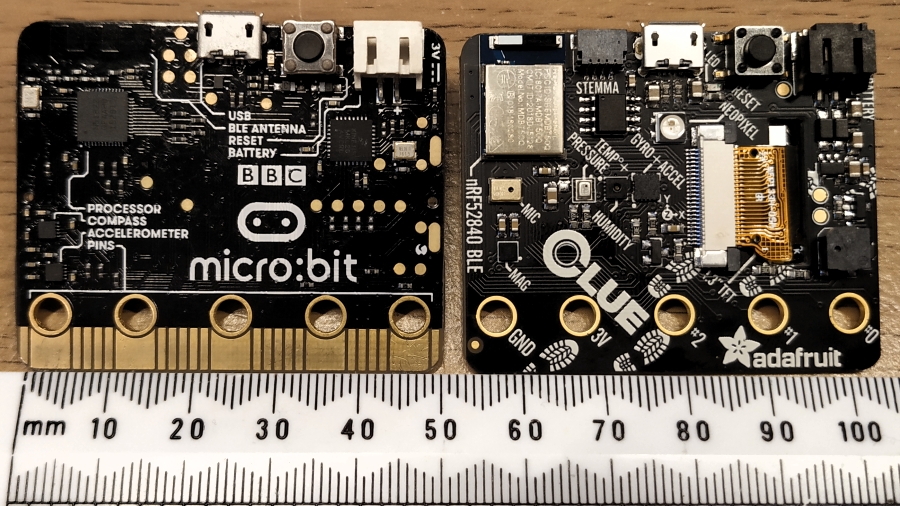
Adafruit's CLUE is the same size as a micro:bit but it features a lot more tech.
Tech Specs
- Nordic nRF52840 Bluetooth LE processor - 1 MB of Flash, 256KB RAM, 64 MHz Cortex M4 processor
- 1.3″ 240×240 Color IPS TFT display for high resolution text and graphics
- Power it from any 3-6V battery source (internal regulator and protection diodes)
- Two A / B user buttons and one reset button
- Tons of sensors!
- ST Micro series 9-DoF motion - LSM6DS33 Accel/Gyro + LIS3MDL magnetometer
- APDS9960 Proximity, Light, Color, and Gesture Sensor
- PDM Microphone sound sensor
- SHT Humidity
- BMP280 temperature and barometric pressure/altitude
- RGB NeoPixel indicator LED
- 2 MB internal flash storage for datalogging, images, fonts or CircuitPython code
- Buzzer/speaker for playing tones and beeps
- Two bright white LEDs in front for illumination / color sensing.
- Qwiic / STEMMA QT connector for adding more sensors, motor controllers, or displays over I2C. You can plug in GROVE I2C sensors by using an adapter cable.
- Programmable with Arduino IDE or CircuitPython
So how much is it?
Adafruit CLUE is £39 in the UK and available from Pimoroni. In the USA you can buy from Adafruit directly for $39.95.
You've done the math, and seen that CLUE is three times more expensive than micro:bit, but take a look at what we get with this board and we can see why that is so.
I still recommend micro:bit as the ideal starter board. It is cheap, easy to use and provides quite a lot of educational opportunities.
Adafruit's CLUE is the next step in the journey. Or for those who want to push themselves.

Hi reader!
So how do I code it?
Arduino
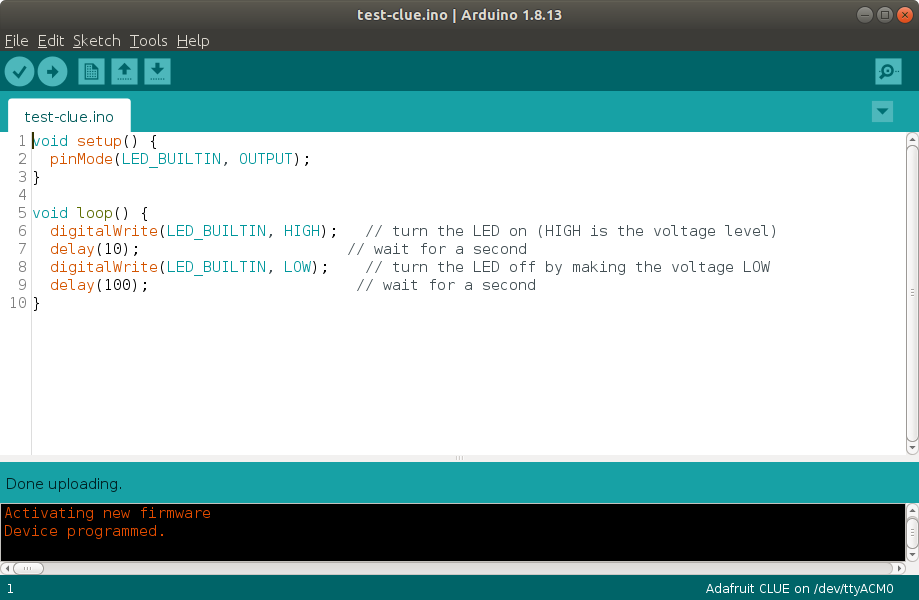
I had a play with the Arduino IDE following the guidance on Adafruit's website. And it worked well.

There were a few issues uploading code, but after a few attempts I had flashing LEDs running.
I need to delve more into the Arduino side of this board, as I have mainly focused on...
CircuitPython
I've been a fan of CircuitPython since PyCon 2018 where I took part in a session with Katnii and Scott from Adafruit and lucky for me that CLUE can also be programmed in CircuitPython.
Writing code in CircuitPython is very similar to MicroPython and Python 3, so I am right at home. We need to use an editor such as Nicholas Tollervey's Mu, or Visual Studio Code if you are a more seasoned hacker.
The example script to flash the on board LED was as follows.
import board
import digitalio
import time

led = digitalio.DigitalInOut(board.D17)
led.direction = digitalio.Direction.OUTPUT

while True:
    led.value = True
    time.sleep(0.5)
    led.value = False
    time.sleep(0.5)
I plugged in the CLUE and saved the code as code.py and then the board rebooted to run the code. I saw a blinking LED!
CLUE Library
There is a handy library which is used to access the internal components.
adafruit_clue is the library and it is imported by typing from adafruit_clue import clue and in there we can access
clue.acceleration which returns acceleration forces on the x,y and z axis.
clue.gyro which returns the orientation of the board.
clue.magnetic provides a compass heading or it can be used as a switch with a magnet.
clue.pressure gives us the current air pressure.
clue.altitude provides the altitude based on sea level pressure, so that needs to be calibrated before use.
clue.temperature current temperature from the BME280. Value returned is in C.
clue.humidity how much moisture is in the air, find out with this. Value returned is a percentage.
clue.proximity how close is something? This uses the sensor above the screen. Values returned are between 0 and 255.
clue.gesture returns the gesture value based on what the sensor can see. 0 = Nothing, 1 = Up, 2 = Down, 3 = Left 4 = Right
clue.color Returns numerical values representing the colour that the sensor can see. Works best with the white LEDs on. < HINT --- Use this to change the colour of NeoPixels for a cool interactive experience>
clue.button_a and clue.button_b have buttons a or b been pressed? If a button is pressed it returns True, if not then False.
clue.touch_0 and clue.touch_1 and clue.touch_2 refer to pins 0,1 and 2 which are capacitive touch enabled. If touched they return True, else they are False. < HINT --- This can be used with fruit to make fun inputs>
clue.loud_sound use the microphone to detect sound.
clue.pixel.fill control the on board NeoPixel.
clue.play_tone play "music" with the on board piezeo speaker.
clue.simple_text_display show text on the built in screen.
Where can I get CircuitPython documentation?
Adafruit has a great guide here
So if this looks like a micro:bit...can I use micro:bit add ons?
Short answer, yes. But some may not be fully compatible so always check before making a purchase.
4tronix DRIVE:BIT
So it works with @4tronix_uk DRIVE:BIT pic.twitter.com/8o4K2HYX9j
— biglesp (@biglesp) June 28, 2020
I love building robots and the 4tronix DRIVE:BIT is a solid board for simple robotics. So I paired up my CLUE with DRIVE:BIT. Wrote a little CircuitPython and it worked!
Here's the code which I wrote.
import board
import digitalio
import time

m1a = digitalio.DigitalInOut(board.D12)
m1b = digitalio.DigitalInOut(board.D13)
m2a = digitalio.DigitalInOut(board.D14)
m2b = digitalio.DigitalInOut(board.D15)

m1a.direction = digitalio.Direction.OUTPUT
m1b.direction = digitalio.Direction.OUTPUT
m2a.direction = digitalio.Direction.OUTPUT
m2b.direction = digitalio.Direction.OUTPUT

while True:
    m1a.value = True
    m1b.value = False
    m2a.value = True
    m2b.value = False
    print("FWD")
    time.sleep(1.0)
    m1a.value = False
    m1b.value = True
    m2a.value = False
    m2b.value = True
    print("BCK")
    time.sleep(1.0)
    m1a.value = False
    m1b.value = False
    m2a.value = False
    m2b.value = False
    print("STOP")
    time.sleep(2)
PROTO-PIC micro:pixel
![]()
PROTO-PIC micro:pixel works! All we need to do is use the NeoPixel CircuitPython library.
I used Adafruit's standard NeoPixel test script. Altering the pixel_pin variable to be board.D0 then changing the max pixels to match the number on the board.
![]()
import time
import board
import neopixel

pixel_pin = board.D0
num_pixels = 32

pixels = neopixel.NeoPixel(pixel_pin, num_pixels, brightness=0.3, auto_write=False)


def wheel(pos):
    # Input a value 0 to 255 to get a color value.
    # The colours are a transition r - g - b - back to r.
    if pos < 0 or pos > 255:
        return (0, 0, 0)
    if pos < 85:
        return (255 - pos * 3, pos * 3, 0)
    if pos < 170:
        pos -= 85
        return (0, 255 - pos * 3, pos * 3)
    pos -= 170
    return (pos * 3, 0, 255 - pos * 3)


def color_chase(color, wait):
    for i in range(num_pixels):
        pixels[i] = color
        time.sleep(wait)
        pixels.show()
    time.sleep(0.5)


def rainbow_cycle(wait):
    for j in range(255):
        for i in range(num_pixels):
            rc_index = (i * 256 // num_pixels) + j
            pixels[i] = wheel(rc_index & 255)
        pixels.show()
        time.sleep(wait)


RED = (255, 0, 0)
YELLOW = (255, 150, 0)
GREEN = (0, 255, 0)
CYAN = (0, 255, 255)
BLUE = (0, 0, 255)
PURPLE = (180, 0, 255)

while True:
    pixels.fill(RED)
    pixels.show()
    # Increase or decrease to change the speed of the solid color change.
    time.sleep(1)
    pixels.fill(GREEN)
    pixels.show()
    time.sleep(1)
    pixels.fill(BLUE)
    pixels.show()
    time.sleep(1)

    color_chase(RED, 0.1)  # Increase the number to slow down the color chase
    color_chase(YELLOW, 0.1)
    color_chase(GREEN, 0.1)
    color_chase(CYAN, 0.1)
    color_chase(BLUE, 0.1)
    color_chase(PURPLE, 0.1)

    rainbow_cycle(0)  # Increase the number to slow down the rainbow
Can I use a breakout board for the pins?
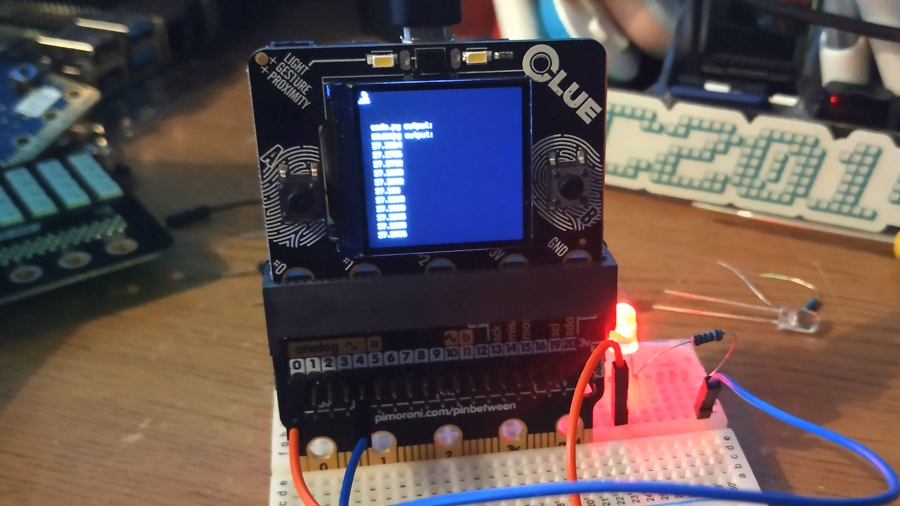
Yes! I used Pimoroni's PinBetween to connect up a LED in a breadboard. I wrote a short piece of code to read the inbuilt temperature sensor and turn on the LED if the temp goes about 27C.
from adafruit_clue import clue
import board
import digitalio
import time

led = digitalio.DigitalInOut(board.D0)
led.direction = digitalio.Direction.OUTPUT

while True:
    temperature = clue.temperature
    print(temperature)
    if temperature > 27:
        led.value = True
        time.sleep(5)
        led.value = False
    else:
        print(temperature)
        time.sleep(1)
Can I access the board via the REPL?

Yes!
I used Tio to enter the REPL and read the on board temperature and humidity sensor.
Final Thoughts
A great board, lots of fun and worth the money.
Bigles approves of this board!