Microcontroller Monday - Read and Write to an SD card with Arduino
For this post we take a quick look at working with SD cards on the humble Arduino.
SD cards are ubiquitous. We have them in our phones, cameras and Raspberry Pi. But did you ever think about how we can use them to record data in a project? On a Pi this is easy as the operating system is contained on an SD card. So all we need to do is save the file. But what about other devices? Can we use SD cards with them?
Lets have some fun with an Arduino UNO and see if we can use it.
For this project you will need
- An Arduino UNO (In the project I assume that you know how to upload code to it.)
- An SD / micro SD card reader
- A blank SD / micro SD card of any capacity (I used a 1GB card)
- Six Male to male wires
- Breadboard
- Arduino IDE installed on your machine
Wiring it up
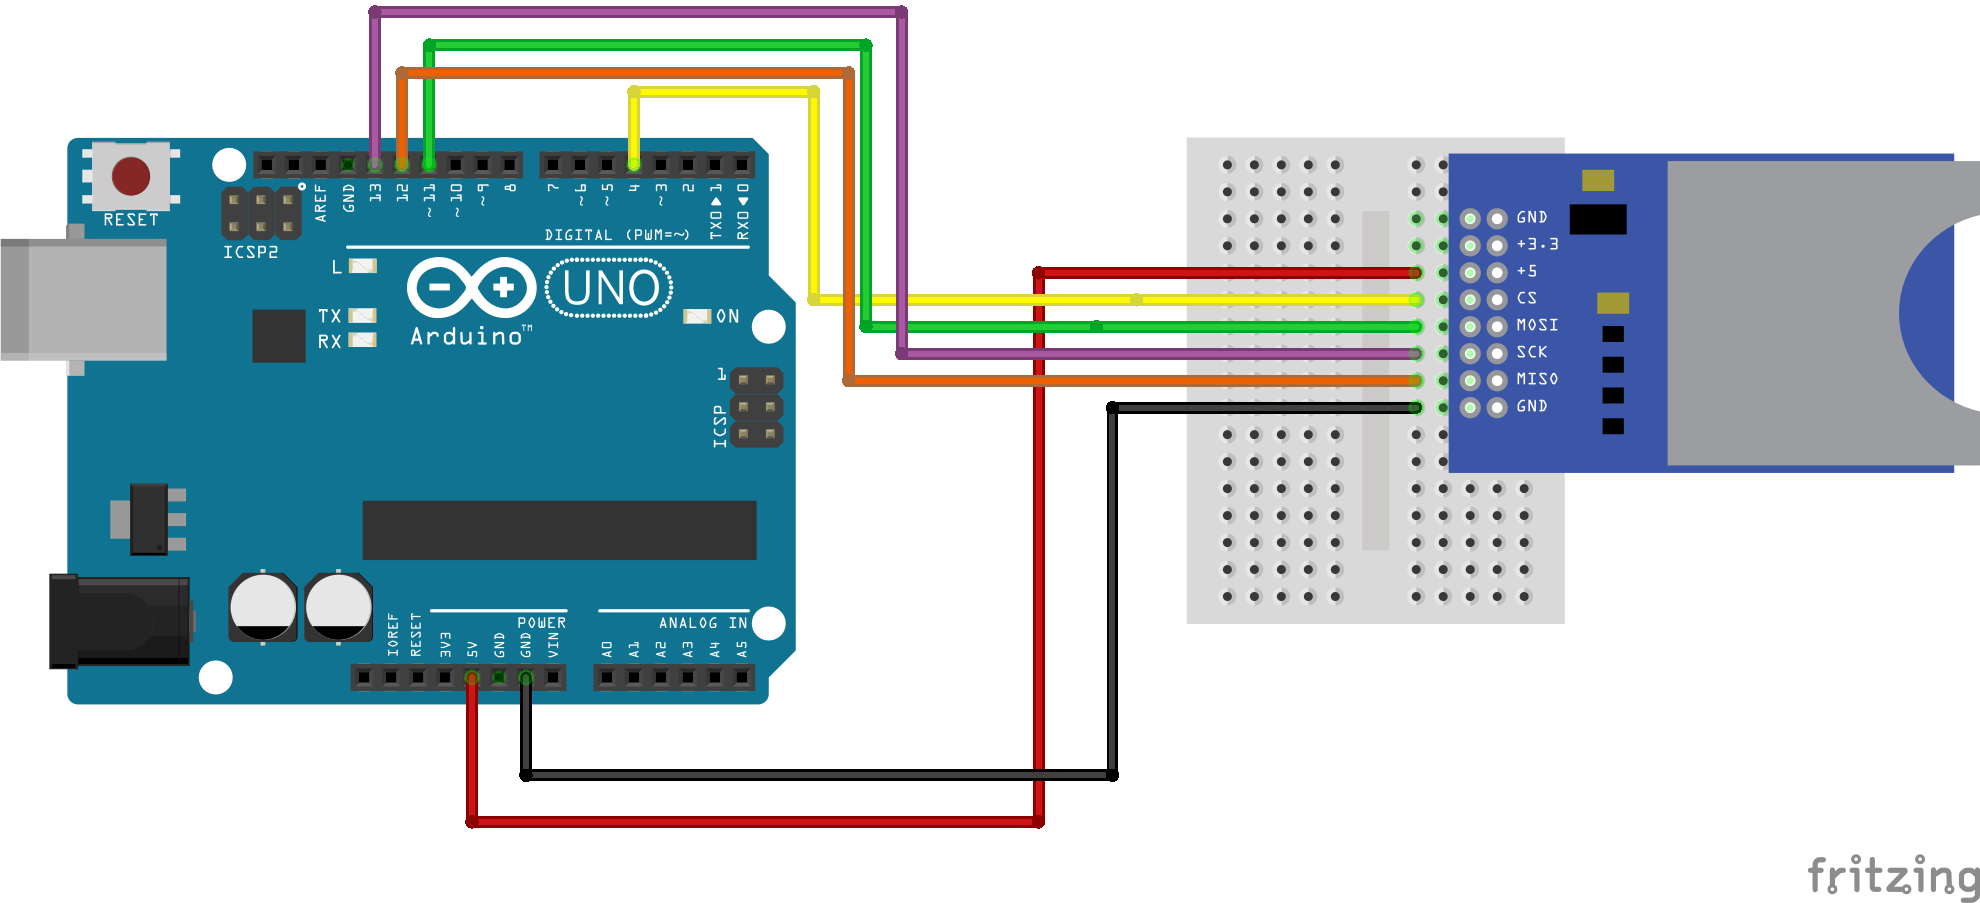
Wiring up the project is simple as we only need six wires. These connect the 5V power and GND from our Arduino to the reader.
Always check the power requirement for your reader BEFORE connecting. Some work with 5V, others with 3V. Check first! If unsure try a lower voltage (3V) and see if it works.
We then connect pin 4 of the Arduino to Chip Select (CS) on the reader. This tells the Arduino that an SD card reader is there.
SCK / SCLK is a connection to ensure that data is written correctly. It is a clock that synchronises the timing needed by the interface. Without it, it would be like listening to one conversation in a noisy room....Impossible.
MOSI and MISO are input / output connections between the Arduino and SD card reader. They enable us to read and write data from the card.
Writing some code
Ok lets start writing some code for this project. Insert your SD card into the reader. Now open the Arduino application and we shall start by...
Writing to an SD card
Writing data takes very little code to work. We start by including two libraries of code. The first enables us to use SPI devices (our SD card reader is one) and the second is a special library to work with SD cards.
#include <SPI.h>
#include <SD.h>
Now we create an object called dataFile that will store the data that we wish to write as a file to the SD card.
File dataFile;
Now we move into the setup function, this is code that will run once, when the Arduino is powered up.
void setup() {
  // put your setup code here, to run once:
Inside the setup function we first tell the Arduino that we are using an SD card reader on the SPI bus. This is handled via the Chip Select (CS) at pin 4.
SD.begin(4);
Ok so the Arduino knows we have an SD card reader attached. But we now need to tell it which file to open, and what to do with it. For this we use our dataFile object to create a connection that will open a file, called data.txt on the SD card. If the file does not exist then it will create it. Then we tell the Arduino that we wish to write to the file (this also gives us full read / write access.)
dataFile = SD.open("data.txt", FILE_WRITE);
To write data to the file we write to the dataFile object. In this case I wrote "@biglesp woz ere" but you will also notice \n in there. This will insert a new line after the text! Otherwise we get garbled text as the file is updated.
dataFile.write("@biglesp woz ere\n");
With the file updated we now need to close it to ensure that it is saved correctly. Think of it in the same way that we eject USB drives from our PC before removing them. This is also the last part of the code for the setup function, so we close the function with curly bracket.
  dataFile.close();
}
Arduino code has another function. Called loop() this function runs the code within in the same way as while True: in Python and forever in Scratch. We do not use that code in this file, but it is left there in case you wish to tinker.
void loop() {
  // put your main code here, to run repeatedly:

}
Complete Code Listing: Writing to an SD card
#include <SPI.h>
#include <SD.h>
File dataFile;

void setup() {
  // put your setup code here, to run once:
  SD.begin(4);
  dataFile = SD.open("data.txt", FILE_WRITE);
  dataFile.write("@biglesp woz ere\n");
  dataFile.close();
}

void loop() {
  // put your main code here, to run repeatedly:

}
Save the code on your computer and then upload the code to your Arduino. After a few seconds the process should be complete. Now press the RESET button on the Arduino, wait for two seconds, then press it again. This will add three lines of text to the test.txt file.
Power off the Arduino, remove the SD card and open the file on your PC. You should have a file with @bigles woz ere in it three times. Nice work!
Reading an SD card
To read the same file on the SD card we will create a new file, that way we can keep the code clear for ease of use. There is nothing to stop us merging the two, but that is an exercise for yourselves. :)
We start with the same libraries and the same dataFile object as before.
#include <SPI.h>
#include <SD.h>
File dataFile;
Inside the setup function we create a connection to the serial console at 9600bps.
void setup() {
  // put your setup code here, to run once:
  Serial.begin(9600);
We then tell the Arduino that we have an SD card reader at pin 4. Then open the file data.txt on the SD card. Note that we do not open it with any special instructions.
  SD.begin(4);
  dataFile = SD.open("data.txt");
The next step is something new. This is a while loop that will run while there is a file to read, and it will ensure that all of the file is read.
while (dataFile.available()) {
Inside this while loop we write the contents of the file to the serial console. To do this we use Serial.write and in the argument for that command we use dataFile.read() to read the file on the SD card, letter by letter. We then close the loop with }.
    Serial.write(dataFile.read());
    }
We then close the file to ensure there is no corruption and then close the setup function.
  dataFile.close();
}
As with the write example, I've left the loop function intact for clarity.
void loop() {
  // put your main code here, to run repeatedly:

}
Complete Code Listing: Read from an SD card
#include <SPI.h>
#include <SD.h>
File dataFile;

void setup() {
  // put your setup code here, to run once:
  Serial.begin(9600);
  SD.begin(4);
  dataFile = SD.open("data.txt");
  while (dataFile.available()) {
    Serial.write(dataFile.read());
    }
  dataFile.close();
}

void loop() {
  // put your main code here, to run repeatedly:

}
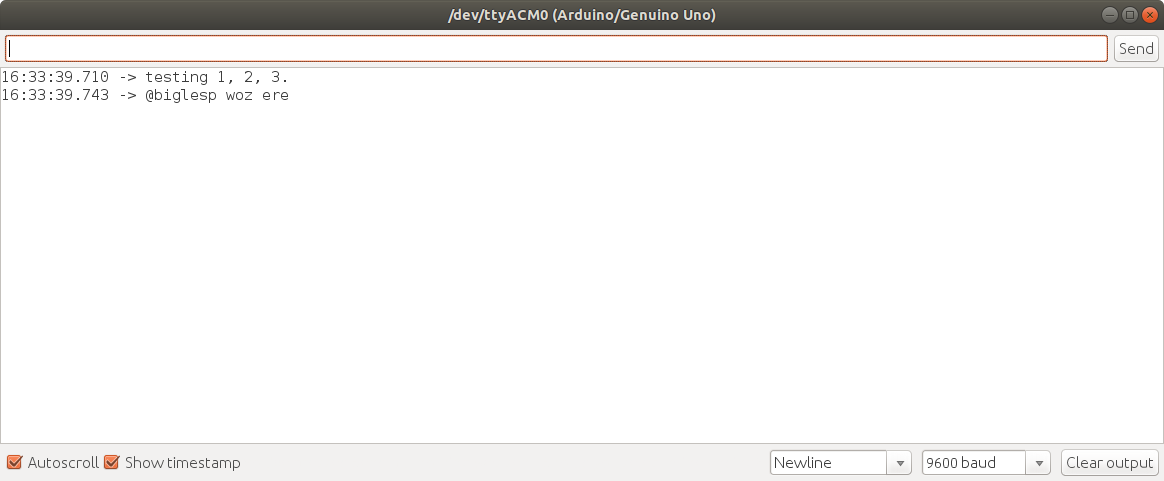
Save the code to your computer and then upload the code to your Arduino. Open the Serial Monitor (Tools >> Serial Monitor) and you will see the text from data.txt printed in the console.
so there we go!
We now know the basics of reading and writing data using micro/SD cards. This knowledge can be used to read / save data in a project. For example we could store sensor data to SD card for later investigation. A cheap Arduino board in the field, running from battery, gathering data for later analysis.